This article is a guest contribution by Leonard Paul, president of the School of Video Game Audio. He has worked on over twenty AAA and indie games such as ‘Need for Speed: Hot Pursuit 2,’ ‘NHL11,’ ‘Vessel’ and ‘Retro City Rampage’ as a technical sound designer and composer, and he has also composed for documentaries like ‘The Corporation’ and the upcoming ‘Beep: A Documentary History of Game Sound.’ You can visit his School of Video Game Audio website or can follow him at @SchoolGameAudio.
In the previous two installments, we looked at how C++ code works by triggering simple events in FMOD Studio for Mac. In this final installment, we’ll look at how you can add FMOD Studio to a clone of the classic video game ‘Breakout’ using Xcode on OS X. If you’re on Windows and looking for a similar tutorial, feel free to leave a comment and if there is enough interest I’ll add a bonus installment in the future. Also, feel free to download the source code and the FMOD Studio project as well as the completed application, if you just feel like playing around.
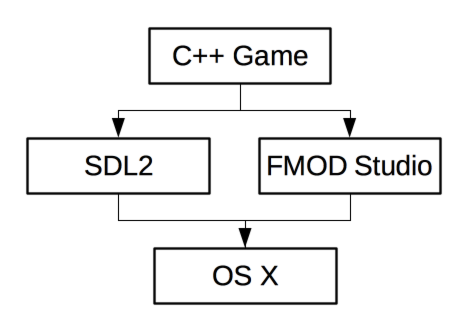
Since we want to work with games, it would be nice to test our coding skills on an actual game instead of use the basic code from the previous parts. Unfortunately, we can’t add our FMOD Studio code to just any game, since they aren’t often open source. Another issue is that games are quite complex, which makes it very difficult to correctly combine all of the elements together without any issues. I’ve opted to utilize SDL2 (Simple DirectMedia Layer 2), a free open source engine, which has been used on commercial titles including Team Fortress 2, Left for Dead 2 and DOTA 2. One advantage is that it allows us to run the code relatively unchanged on Windows, Mac OS X, Linux, iOS and Android, which are all supported by FMOD Studio as well. If you use the SDL2 audio system instead of FMOD Studio, then you can also compile to JavaScript using Emscripten and run on nearly any system with JavaScript support.
The drawback of using “building blocks” such as SDL2, Xcode, FMOD Studio, and even OS X is that they all need to line up to work well together, which makes our project fairly fragile. Issues arise when one element updates and causes the entire code to not work, much like the issues that would arise if you “upgraded” an old motorcycle with parts from a newer model without checking to see if they’re compatible. Maintaining these elements for a functional game is difficult, but hopefully this tutorial will last a while before it needs to be repaired and maintained as these programs change over time.

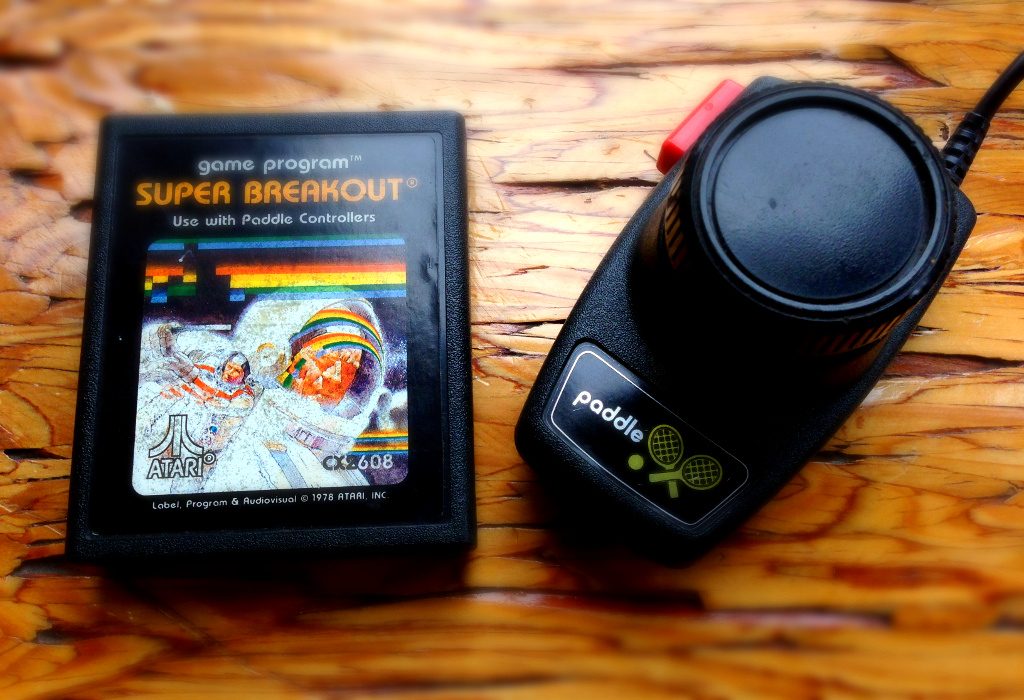
The game we’ll focus on is an open-source project from Rembound.com based on the classic arcade hit ‘Breakout’. The site goes into a lot of detail on how the game code works, but we’ll just concentrate on how to get the project started with some basic sounds and music using FMOD Studio. I’ll give an overview of how to make the project from scratch, but if you’re not interested in details about SDL2 and FMOD Studio integration you can just skip ahead.
1) Xcode Application
First, let’s create an Xcode application. Xcode has a template for these under File→New→Project under OS X→Application→Cocoa Application. You can call it whatever you’d like using the default settings, such as “Breakout-SoVGA”. Place the project in the same folder as our previous projects, under ~/FMOD Studio, so it is at the same level.
2) FMOD Studio
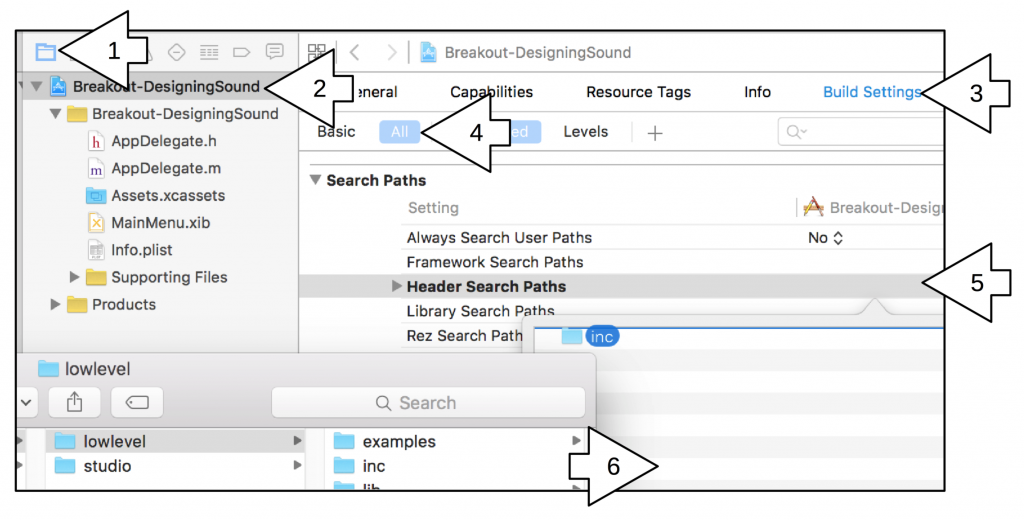
The first thing we’ll do with our empty project is make sure the code can see the header files that define what the FMOD Studio library can do. To add the fmod.h and fmodstudio.h header search paths, go to Project (the blue folder icon)>Build Settings>Header Search Paths (All) and double-click the Header Search Paths entry to create a popup window. Drag and drop ~/FMODStudio/FMOD Programmers API/api/ from the Finder, as well as ~/FMOD Studio/FMOD Programmers API/api/studio/inc to include the ‘studio’ header files.
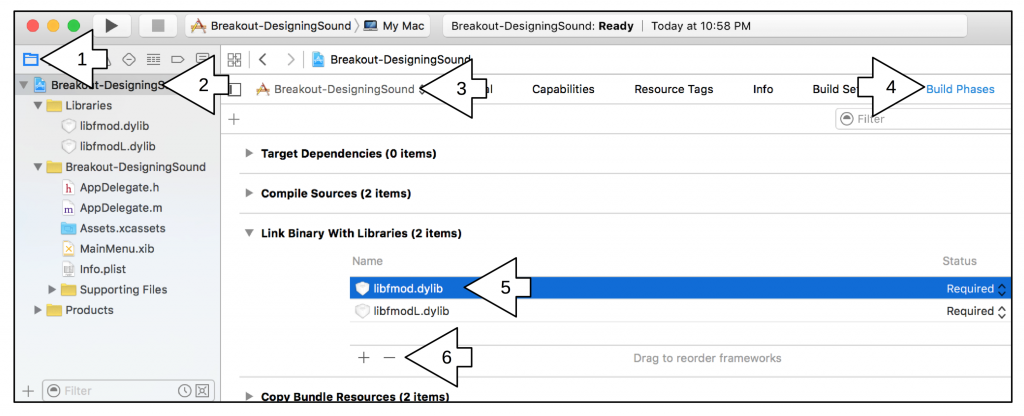
Now we’ll add the FMOD Studio libraries that allow FMOD Studio to do its magic. Right-click the project to create a New Group called “Libraries” and add all four libfmod.dylib, libfmodL.dylib, libfmodstudio.dylib and libfmodstudioL.dylib files from the ~/FMODStudio/FMOD Programmers API/api/lowlevel/lib and ~/FMODStudio/FMOD Programmers API/api/studio/lib folders. Since we want the libraries to be loaded when the application starts instead of being compiled into the code, remove the .dylib libraries from “Link Binaries with Libraries” under Project>Build Phases for your target (it will show an application icon).
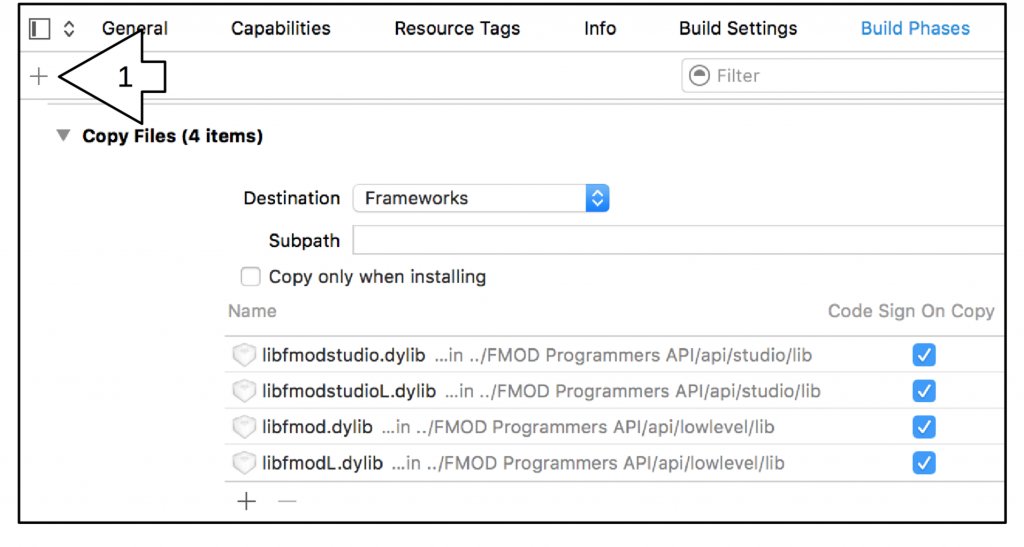
We need to tell the code where the libraries can be loaded from, so in Project>Build Phases use the “+” in the top left to create “New Copy Files Phase” and add all four .dylib files, then set the Destination drop-down menu to “Frameworks”. This adds the libraries to the application bundle.
 We must also allow Xcode to tell the game where to find the FMOD Studio engine code. To add to the Project linker (which will also be added to Target), go to Project>Build Settings (All)>Linking>Other Linker Flags and double-click the Debug entry. This will create a popup where you can drag and drop the low-level debug file at FMOD Programmers API/api/lowlevel/lib/libfmodL.dylib and the FMOD Studio library at FMOD Programmers API/api/studio/lib/libfmodstudioL.dylib. In the Release category, double-click the entry for a popup and drag and drop the library files at FMOD Programmers API/api/studio/lib/libfmodstudio.dylib and FMOD Programmers API/api/lowlevel/lib/libfmod.dylib. This, of course, will allow the libraries to be used for the release version.
SDL2
The advantage of using SDL2 is that it is cross-platform, robust, open-source and free to use on commercial projects. The reason we’ll be using FMOD Studio instead of the audio functionality in SDL2 is that it is much more powerful than the SDL2 audio library. Using SDL2 with FMOD Studio together allows us the flexibility to port our code to different platforms relatively easily and take advantage of the generous free licensing FMOD Studio allows for smaller game studios. To download the SDL2 framework development library files, visit their website: https://www.libsdl.org/download-2.0.php. Since we’re also working with images, we’ll need the image library, too: https://www.libsdl.org/projects/SDL_image/. Drag and drop the SDL2 framework files from their .dmg files into ~/Library/Frameworks. To add them to the project, link them using Project (Target)>Build Phases>Link Binary with Libraries and select both files from the ~/Library/Frameworks folder.
C++ Game Code
Download the modified game code files from the school and add the .cpp and .h files as well as the ‘Media’ and ‘fmod’ folder to the main project folder, overwriting the existing main.m file. We’ll need to tell the compiler to compile main.m as a C++ file, so open the file in the editor and assign it as a “C++ Source” on the right panel under “Identity and Type”.
Add all the new .cpp and .h files (Ball.cpp, Ball.h, Board.cpp, Board.h, Entity.cpp, Entity.h, Game.cpp, Game.h, main.h, Paddle.cpp and Paddle.h) to the project in Xcode by dragging and dropping them onto the Project name. They should automatically be labelled for compilation in “Compile Sources” under Build Phases.
Now add the ‘Media’ folder to the Project, which will automatically be added to Project (Target)>Build Phases>Copy Bundle Resources. We’ll also need to add the CoreFoundation.framework, so click on Project (Target)>Build Phases>Link Binary With Libraries, select the “+”, and add it from the default list. Hopefully there aren’t any issues that need to be addressed, so we can just run our code!
Complete Breakout Project
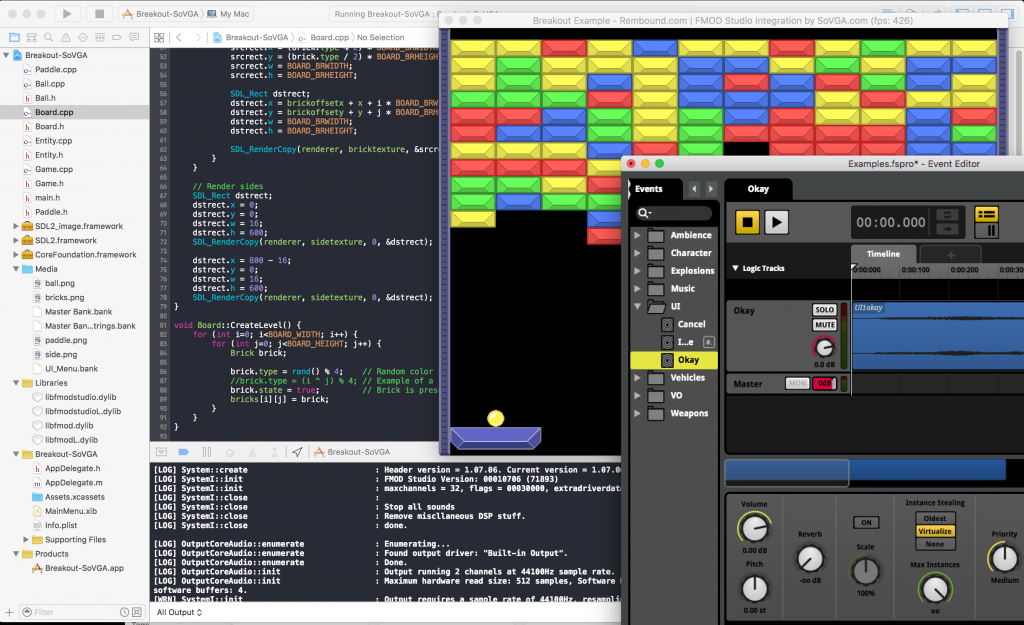
So if you weren’t interested in making your own project, you can download the final app from the school as well. When you run the code you’ll see the project come to life, and we can connect to it the same way we did in the last installment, allowing us to see how the events are triggered while the game is running. However, if you want access to the FMOD Studio project, you’ll still need to download the source files mentioned above. The FMOD project can be found in the ‘fmod’ folder where it is named “Breakout-SoVGA.fspro”.
Upon looking at the code in Game.cpp, you will see a lot of similarities to the code from the previous articles. The setup and shutdown code is basically the same. I’ve added a new function called Game::PlayOneShotSound, and as you can see, it triggers and runs the clean up process just like the cookie metaphor from Part 2! If you search for this function you’ll see all the places I’ve added one-shot sounds to react to the game. If you want to add your own sounds, you’ll need to add new events in the FMOD Studio project, build the bank, add the code to play the event, and recompile. This is definitely starting to feel like game audio programming territory!
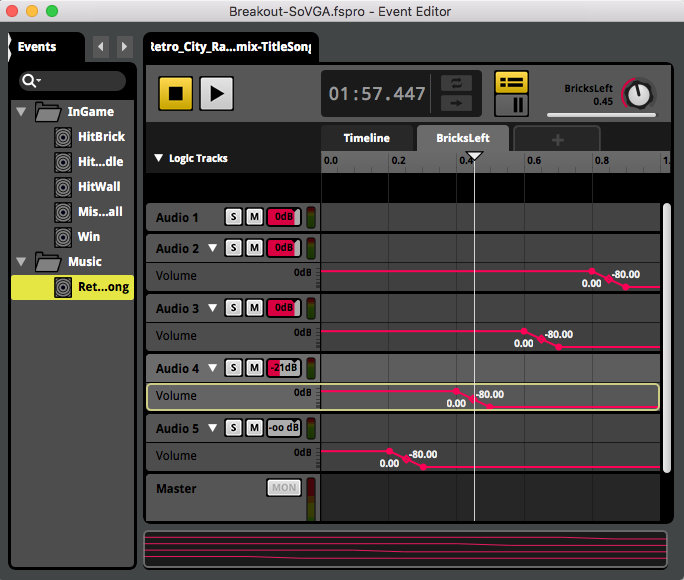
In the FMOD Studio project, I’ve added an event for adaptive music that adds musical layers as we eliminate bricks. The track is the title song from the Retro City Rampage Soundtrack album, so the full mix will be revealed when nearly all the bricks are gone. This was done by creating a ‘BricksLeft’ parameter for the ‘Retro_City_Rampage(…)’ event in FMOD. Then we set the ‘BricksLeft’ parameter to the musicBricksLeftParameter in our code, which allows it to change with the Game::GetBrickCount() function.
We divide the number of current bricks (brickcount) by the amount of possible bricks from the board size (BOARD_WIDTH*BOARD_HEIGHT) to give us a fractional number between 0 and 1. Usually it’s a good idea to normalize your values so you’re not dealing with various ranges from different parameters, as it can easily get confusing. The music also ducks within the ‘BricksLeft’ FMOD parameter to make the sound effects clearer by pushing the background music out of the way when a musical stinger plays.
There are all sorts of different implementation techniques you can try with the existing code – making stingers play in time with the music when bricks are eliminated or playing a musical transition segment when you miss a ball. I’ve only scratched the surface, and with the new code, there are limitless possibilities. You could add your own custom graphics by changing the .png files, update the sounds and music, pan the sounds as we move left and right, or even add score and lives counters to make things more interesting. If you want to share your modded game with your friends, all you need to do is copy the .app file and send it to them, as long as they have a Mac. Integrating FMOD Studio with a game using SDL2 on Windows is a similar process. If there are a good number of comments, I’ll do my best to attempt another article in upcoming months.
Having Fun Swimming in Code!
I hope you’ve had fun with this brief introduction to programming FMOD Studio in C++ with Xcode. There are many fun new possibilities available with just a small amount of code knowledge. I’m considering adding mini-courses to the School of Video Game Audio to include basic game audio coding similar to this three part series. If you’re interested in hearing more, just send me an email using our webpage at http://School.VideoGameAudio.com or on Twitter at @SchoolGameAudio.
If you have any questions, it’d be great to hear from you! -Leonard


![int Game::GetBrickCount() { int brickcount = 0; for (int i=0; i<BOARD_WIDTH; i++) { for (int j=0; j<BOARD_HEIGHT; j++) { Brick brick = board->bricks[i][j]; if (brick.state) { brickcount++; } } } // SoVGA - Update the parameter of bricks left only when we need to if (brickcount != oldBrickCount) { musicBricksLeftParameter->setValue((float)brickcount/(BOARD_WIDTH*BOARD_HEIGHT)); oldBrickCount = brickcount; } return brickcount; }](https://designingsound.org/wp-content/uploads/2016/03/Screen-Shot-2016-03-11-at-9.03.39-AM.png)
It’s so amazing that you guys make time to write stuff like this for people who want to learn more about the craft. Missed part 1 and 2 so better start there. :) Thank you!
Thank you!
This is what i looking for