This article is a guest contribution by Leonard Paul, president of the School of Video Game Audio. He has worked on over twenty AAA and indie games such as ‘Need for Speed: Hot Pursuit 2,’ ‘NHL11,’ ‘Vessel’ and ‘Retro City Rampage’ as a technical sound designer and composer, and he has also composed for documentaries like ‘The Corporation’ and the upcoming ‘Beep: A Documentary History of Game Sound.’ You can visit his School of Video Game Audio website or can follow him at @SchoolGameAudio.
In this second part of our three-part series “Diving Into Code” with game audio, we’ll go through the details of the code itself, as well as see how the code works in the Xcode debugger. This tutorial uses the project and C++ files from Part 1 of this series, so if you are just now joining us, please see that article first.
Experiment with Effects
Before we look at how the code works, let’s have a bit of fun by adding a delay DSP effect to our sound. The FMOD Studio Tool allows game audio artists the ability to implement common audio behaviours and change the way the SFX, music and dialogue play in a game without having to change the code at all. However, we need to create a bank and replace the existing bank referenced by the code.
First, let’s open the FMOD Studio project:
/Applications/FMOD Studio/examples/Examples.fspro
I won’t go into much detail about the FMOD Studio Tool, since there is plenty of great information available online and in the manual.
To add an effect to the “UI/Okay” event, make sure the Events tab is selected, then open the “UI” folder and select the “Okay” event. Click on the “Okay” timeline track (not just the UI1okay blue trigger region) to put a yellow highlight around the entire track, including the track name and blue trigger region.

Select the “Okay” tab in the dock at the bottom right next to the “Events Macro” tab to see the fader widget on the bottom left. Click the “+” to the right of the fader to Add Effect→FMOD Delay with default parameters. Now when you play the event, you should hear an echoing delay effect. Save the project so you don’t lose your work.
Let’s build the bank so that it includes our new delay effect by selecting File→Build…. However, if you try to run our Xcode project (from Part 1) to hear the changes, they won’t appear since we need to first manually copy the bank files to the project. To copy the files, find the FMOD project at:
/Applications/FMOD Studio/examples/Build/Desktop
and while holding the option key, overwrite the Xcode project files at:
~/FMOD Studio/FMOD Programmers API/api/studio/examples/media
Now when you run the example code (the simple_event.xcodeproj in the “xcode32” folder), you should hear the delay effect! The great thing is we didn’t even need to change any code.
Make Our Own Event
In part 1, we learned how to change the code in Xcode. Adding our own new code isn’t that different. First, let’s make a new FMOD event. All we do is drag-and-drop a high quality (44.1 kHz/16-bit or better) uncompressed .wav or .aif file below the “UI/Cancel” event and FMOD Studio will make a new event with the same name as the sample. Double-click the event and name it “MySound”. Since FMOD won’t add it to the UI bank by default, we need to right-click the event and Assign To Bank→UI_Menu. We’ll also need to build the bank and copy it to the correct folder as we did above, so the code can access it.
By default, Xcode doesn’t show the line numbers. This can be changed in Xcode→Preferences(⌘,)→Text Editing→Editing→Line Numbers. It’s also fun to modify the theme’s colours to something you like by going to Xcode→Preferences(⌘,)→Fonts & Colors. For the rest of this article, I’ve used the “Dusk” theme, as I prefer to work on a darker background when possible.
To trigger the sound, we just need to add some code. Insert the code below at line 54 just above the “do” loop:
// Get the “MySound” event link and store it in &mySoundDescription
FMOD::Studio::EventDescription* mySoundDescription = NULL;
ERRCHECK( system->getEvent(“event:/UI/MySound”, &mySoundDescription) );
This will make a description for our new sound and allow us to trigger our new custom sound. We can think of this as a cookie cutter that will help us create instances of actual cookies. We also need to add code to trigger it, so insert the following lines at line 77 underneath the code for our button “1” condition code:
// Check if button 2 was pressed
if (Common_BtnPress(BTN_ACTION2))
{
// Create an instance for triggering the Cancel event
FMOD::Studio::EventInstance* eventInstance = NULL;
ERRCHECK( mySoundDescription->createInstance(&eventInstance) );
// Start playing the MySound event from the instance
ERRCHECK( eventInstance->start() );
// Release will clean up the instance when it completes
ERRCHECK( eventInstance->release() );
}
This is basically the same as the button “1” code with a few small changes so it’ll play our MySound event. If you’re having any issues, you can compare it with the new modified code: http://School.VideoGameAudio.com/simple_event-mySound.cpp.
If you run the program you’ll notice it will trigger your sound when you click the “2” button even though it doesn’t give you any instructions on how to do it. As an easy bonus, see if you can add a line to tell the user to press the “2” button to play your sound. If you get an error “FMOD error 74” then you need to make sure that you’ve replaced the Xcode project banks with the updated FMOD Studio banks.
You’re now a real game audio programmer, since you’ve added an event to the code that wasn’t there before. Pretty cool!
Understanding the Simple_event.cpp Code
So far we haven’t looked at the code in depth since we just wanted to get things up and running. Let’s do that now.
If you click on your modified simple_event.cpp in Xcode’s left panel (simple_event→Sources folder→simple_event.cpp), you’ll see the code inside of the .cpp file. I’ve added a few additional comments after the double slashes “//” to help explain things. Hopefully you’ve modified your Xcode settings so you can see the line numbers on the left of the code. Depending on what you’ve changed in the program, the lines may be slightly different, but they should be fairly similar.
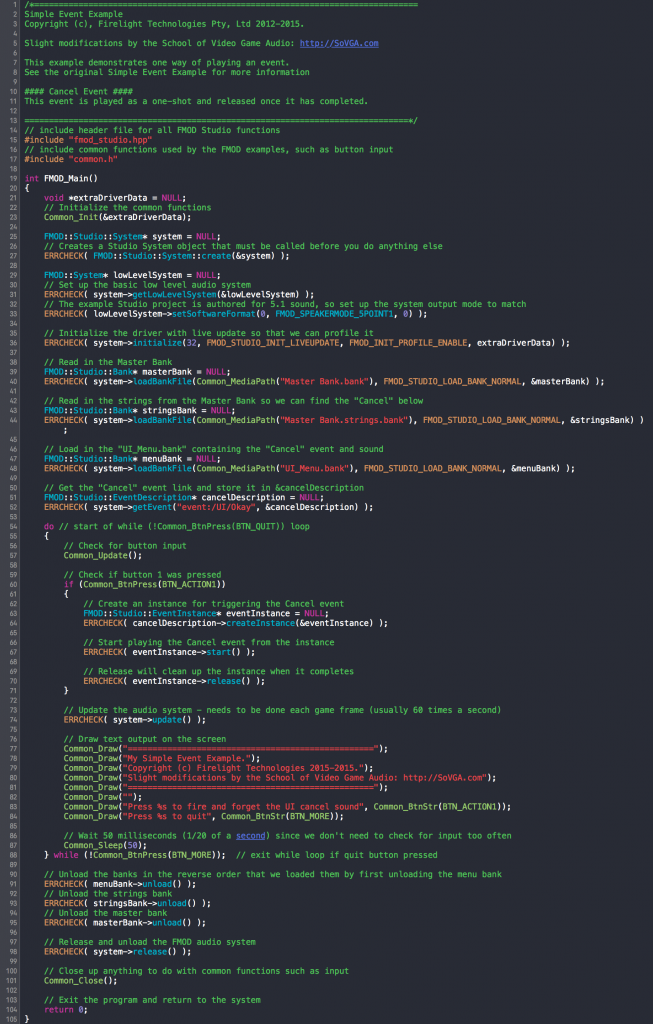
- Lines 1-14 are comments which are usually green, depending on the colour theme of your editor. Comments are important since they not only explain the code to others but also to yourself.
- Line 15 includes the API of FMOD Studio which defines how our code will talk to the FMOD engine code.
- Line 17 refers to a header file so we can borrow code used in other FMOD examples. This way we’re not constantly making copies of reused code, similar to:
It’s easy to spot a future programmer pic.twitter.com/dM22yBKwgI
— Bertrand Fan (@bertrandom) January 15, 2016
- Line 19 starts our main function, and its bracket in line 20 is paired with the one at the end on line 105. It’s important to make sure to balance your braces. Xcode helps you with this by highlighting the matching brace when you enter them and displaying warnings if your brackets aren’t balanced.
- Line 36 is good to note, as we’ve used the define directive FMOD_STUDIO_INIT_LIVEUPDATE so we can attach the FMOD Studio profiler in real-time to the code while it is running. We’ll play around with this later.
- Lines 38-44 load in the Main bank file as well as the strings that define the event names such as “event:/UI/Okay”.
- Line 48 loads the UI_Menu.bank file into memory which contains our UI sounds.
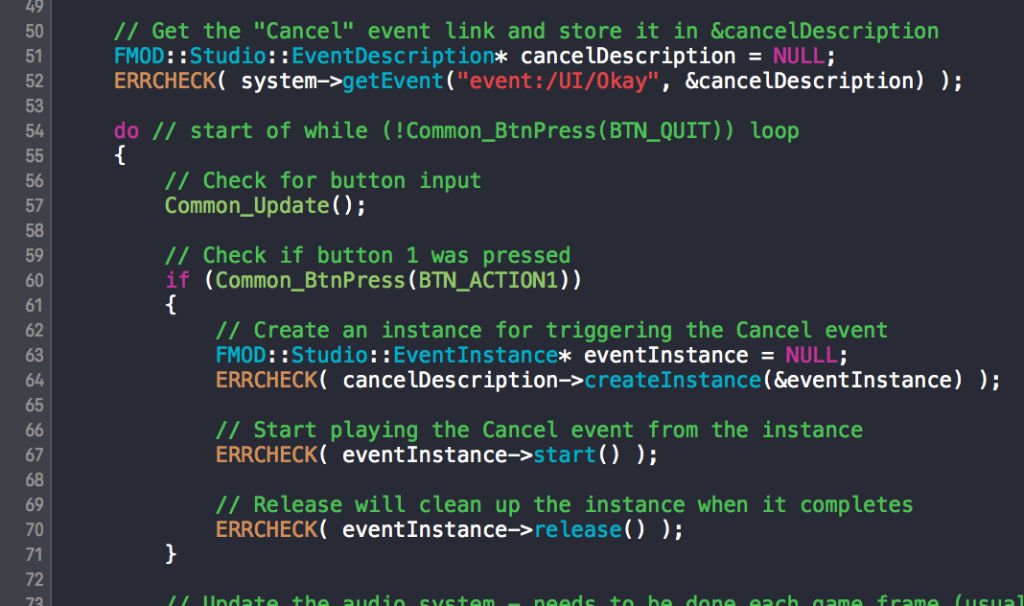
- Line 52 sets up a description for an instance of our UI sound. This is like making a cookie cutter; each time we make a “sound cookie,” the description is used to cut the code into the right shape.
- Line 54 starts the main loop of the program which just repeats until we exit the program. We check for input on line 57 and see if the input is something we recognize. If we find the “1” button was pushed, then we create an instance on line 64 from our “cookie cutter” description.
- No sense leaving our sound cookie laying around; we’re finally ready to play the sound! At line 67 we start biting into and playing the sound.
- Mmm… sound cookie. On line 70, we tell the system to clean up after our instance has played to make sure we’re not leaving any crumbs behind. This cleanup is important as the digital crumbs can accumulate in memory and cause memory issues after a while.
- Since we have an FMOD system update in each loop, line 74 allows it to do all of its “magic” of playing sounds, updating their locations, rendering effects, etc. Our sound won’t play without this update, and it isn’t usually an issue if we call it too often. However, if we don’t call it frequently enough, it can “starve” for data. When playing a sound instance, it takes a while to chew the current bite in the sound buffer, and this update makes sure the program is ready to process the next buffer of data. Without it, we’d be stuck with the information we currently have which can sometimes cause the “stuck buzzing sound” you may have heard when a game crashes.
- Lines 77-84 output words onto the screen.
- In line 87 we tell the system it’s okay to do other things and to not waste our time waiting.
- On line 88 we check if the “more” button has been pressed to see if we should exit the loop, otherwise we’ll loop back up to line 55 to start things all over again.
- From line 90 onward, we tidy up by removing the banks from the memory and cleaning up the FMOD sound system.
I hope this gives you a good idea of what is happening since there is a lot of cool stuff going on there. The more you work with code, the more comfortable you’ll be with understanding how things might work just by looking at them. However, even when you’re good at coding, things can still get pretty complicated, which brings us to our next section about debugging and profiling.
What’s Going On? Debugging and Profiling
Sooner or later, you’ll add something to the code that doesn’t work. Although you can trace through smaller programs by hand, you can also use the power of the computer to help you out. So far we’ve used Xcode as a code editor and a compiler, but it really excels as a debugger. You’ve likely already heard of debugging; it just means we’re tracking down and fixing errors in the code. If we think of the code as a car engine, the Xcode’s debugger allows us to take off the hood and freeze the engine at any instance in time so we can really see what’s going on.
A fun and easy way to check out the debugger is by setting breakpoints. If you click on a line number then you’ll add a breakpoint, which is like a stop sign telling the computer to pause the program. Let’s add a breakpoint in the code we added at line 81. Now when we run the code and click on the “2” to play our sound, the debugger will pause the code and show us what the code is doing. There are various options in the Debug menu that allow us to move slowly through the code in steps, or we can just continue as well. If you use F6 repeatedly to “step over” the code, then you can get a good idea of how the loop works. To remove the breakpoint, right-click and select “Delete Breakpoint” which will allow the code to run uninterrupted.
If we look at the items on the left in the Debug Navigator (⌘6), we can examine a list that consists of the CPU, Memory, Energy Impact, Disk and Network. It’s fun to see how the CPU graph increases when we quickly click our sound and tapers off as the sounds complete.
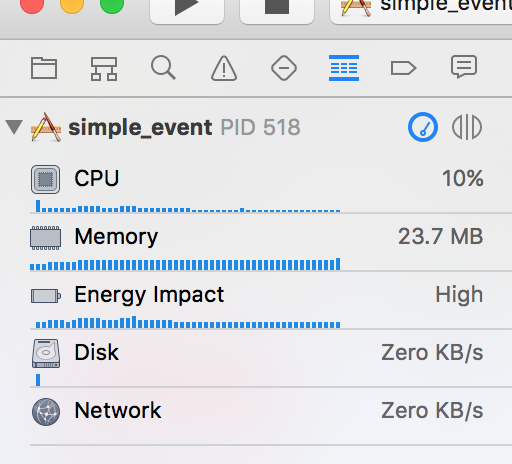
To check out the disk profiling in action, we can change our sound in FMOD Studio to stream from the disk. Usually this is used for longer audio such as music so we don’t have to load all the audio into the memory. First, select the Banks tab (instead of the Events tab). When we select our sound, we see there’s a “Stream” button on the track under the track name. Select this button. After we rebuild the banks, copy them over the Xcode project media banks, and run the code, our sound should play from the disk. To see that this is happening, we select the “Disk Report” in the Debug Navigator while the code is running and click to play our sound. There should now be a new entry in the “Open Files” list as the sound plays, which will disappear once the sound has completed. Depending on the file and your machine, you might also see the Disk use output change as your machine will do its best to optimize where the sound is actually played from.
Game Connect
The last thing we’ll look at is how to connect to the code from FMOD Studio while it is running. This is a pretty fun feature. Run the code, and then in FMOD Studio select File→Connect to Game…. When we do this we’ll see the network traffic increase. If we start a profiler session in FMOD Studio (by switching to Window→Profiler, ⌘6) and hit record, we’ll see the network traffic increase as data is continuously sent back and forth between the program and FMOD Studio. When recording in FMOD Studio, the profiling data will change as we see the response in the number of instances, meters and other data. Not only can we play the recorded data but we can also change our implementation, replay the profiler recording and hear the changes without the game. There’s a great video describing all the details here: https://www.youtube.com/watch?v=4G0IHefO4v8. We can also change parameters such as the pitch range in FMOD Studio while our program is running by locating “UI/MySound” and right-clicking the volume dial on the track to select Add Modulation→Random.
Summary
We’ve learned a lot in this installment! We’ve looked at how the entire C++ example code works and how to use Xcode’s debugger and profiler. We also got a taste of adding our own game audio hooks into the code to trigger our events. Hopefully by playing around with the debugger you have a better idea of how the code “flows”…
And don’t forget to check out Part 3! In our final instalment, we’ll dive into the fun details of working with game audio code on an actual game!

