Guest Contribution by Alex May
If you were born in the 70’s or 80’s and played video games, you’ll no doubt have fond memories of the early days of game audio when consoles were incapable of playing back more than basic pulse waves or noise. All sounds had to be forged from these primitives, and game SFX were rarely even slightly reminiscent of anything actually real. Now, however, realistic sound is only as far away as your portable recorder or favourite sound library. Realism in sound has become accessible to the point of it being often considered a given; a basic assumption of the art.
Enter the idea of “100% synthesized SFX”. This is a self-imposed workflow limitation that declares that all sounds for a project will be synthesized, and not recorded. Foley, vehicles, weapons, combat, ambience, UI, and in certain cases even voices; all produced with synthesizers.
Wait, all synthesized? What could we possibly gain from doing things in such an inefficient and impractical manner? Surely it makes better sense to use tools and methods that are appropriate for the results we’re after, right?
Well, yes, that is true. However, being that ultimately we’re aiming to produce sound that complements the visual style of the game, it may not always be the case that recorded real-world sources are the best fit. If the visual style has a strong character about it, then so should the sound. One method for achieving this character is to place limitations on the production process, and that is what this article discusses: limiting sound production to synthesis. By doing this we can achieve an overarching “stylized realism” that, when paired with equally stylized visuals, can contribute to a sense of immersion in the game world.
Let’s now take a look at some work practices for a 100% Synthesis approach.
Preparing Your Tools
Regardless of which synth you choose or DAW you prefer, you should consider familiarity with both to be of greatest importance. Knowing both inside out will help you get the most out of the relationship between them, and allow you to compensate for any shortcomings that either might have. It also enables you to move through the work faster with less head-scratching and fiddling, which is a key concern if you have a large quantity of sounds to synthesize.
Below are some synthesizer features that I have found to be invaluable with SFX synthesis:
1: Routing Flexibility
Many of the more feature-rich software synthesizers on the market have a “Routing Matrix” or an equivalent system which allows you to pipe any control signal value into any synthesis parameter you wish. For example, a typical synth will allow simple routing like LFO to oscillator pitch, but a routing matrix will allow you to do creative things like route Key Follow to LFO rate, or an ADSR envelope to a filter frequency, and so on. This degree of flexibility becomes invaluable when you start using (or abusing) the synth’s deeper functionality.
2: Multi-Stage Envelope Generators (MSEGs)
The terminology differs for these, but essentially it means envelopes of greater complexity than standard ADSR shapes. These are extremely useful for creating complex sonic motion. When combined with a routing matrix as described above, it enables you to create custom envelopes for filters, oscillators, waveforms and more. If your favourite synth lacks these, a DAW’s automation curves tied to synth parameters can be used instead. This will yield the same results, but will take a little longer to set up and will not facilitate experimentation as effectively.
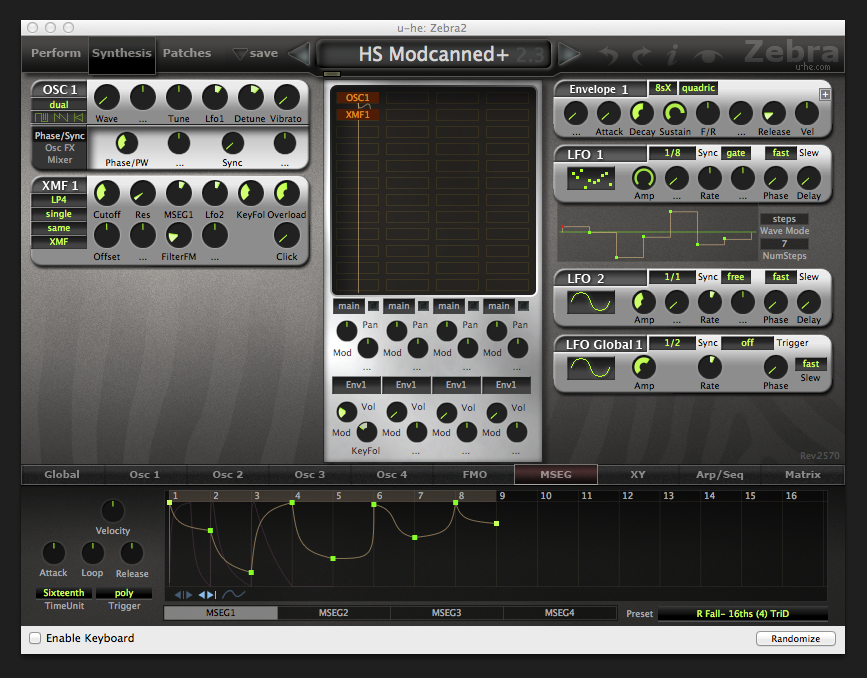
3: A Range of Synthesis Models
Synthesizers that are capable of multiple models of synthesis (subtractive, FM/PM, granular, wavetable, modal etc.) will obviously be able to produce a wider range of sounds, which will aid greatly with efficiency. There is nothing wrong with using different synths for different synthesis models of course, but having all this accessible in the one interface will help with efficiency and experimentation. If you are limited to only one synthesis model, then DSP effects can be used instead to expand the range of sounds possible.
4: Internal Effects
The quality of your synth’s built-in effects may not be on par with that of dedicated plugins, but again this is an issue of efficiency. With all the effects controls in a single synth interface, you can experiment more easily and arrive at the tone you’re after faster. If you have an extensive collection of plugins that you would rather use, then it may be necessary to use multiple instances of the synth so that you can apply effects independently to each individual component of the sound.
5: A Range of Noise Manipulation Algorithms
Noise is an essential element when producing sound effects, so it’s helpful if the synth is capable of a few different noise models (white, pink, digital, ring modulation noise, FM noise etc.) As above, if your synth lacks these, then splitting noise components into different tracks and using DSP effects will allow for better flexibility and variety.
6: An Arpeggiator
Whilst not essential if you are using your DAW to trigger the synth for output sampling, a built-in arpeggiator aids greatly with experimentation when you’re searching for the best way to synthesize a sound. Often mechanical sounds consist of small sound grains triggered in rapid succession, and having an arpeggiator at hand will allow you to quickly try this out.
7: An LFO with Sample & Glide or Sample & Hold Random Waveforms
These are generated waveforms that consist of randomized values. They are extremely useful in sound effect generation as they can provide an organic unpredictability to the sound. Also they make the process of generating variations of your samples very simple, because you can set up your synth patches to be slightly different each time they are played. The process then of creating 10 different variations of the same sound becomes trivial; it’s simply a matter of triggering the patch 10 times in the DAW, and sampling each instance separately – much like traditional “round-robin” recording.
I’m personally a shameless fanboy of the German plugin maker u-he, and mostly use Zebra, ACE and Bazille. All three of these synths have a large range of modulation potential, and above all have intuitive interfaces that invite experimentation. Other synths that excel at SFX synthesis include Native Instruments Massive, Absynth, FM8 and Reaktor, Madrona Labs Aalto, Dmitry Sches Diversion, Linplug Spectral, Tone2 Electra2 and Gladiator2, Steinberg Halion 5, Image Line Harmor and Sytrus, KV331 Synthmaster, Rob Papen Blue 2, Synapse Audio Dune 2, Vember Audio Surge, and many many more.
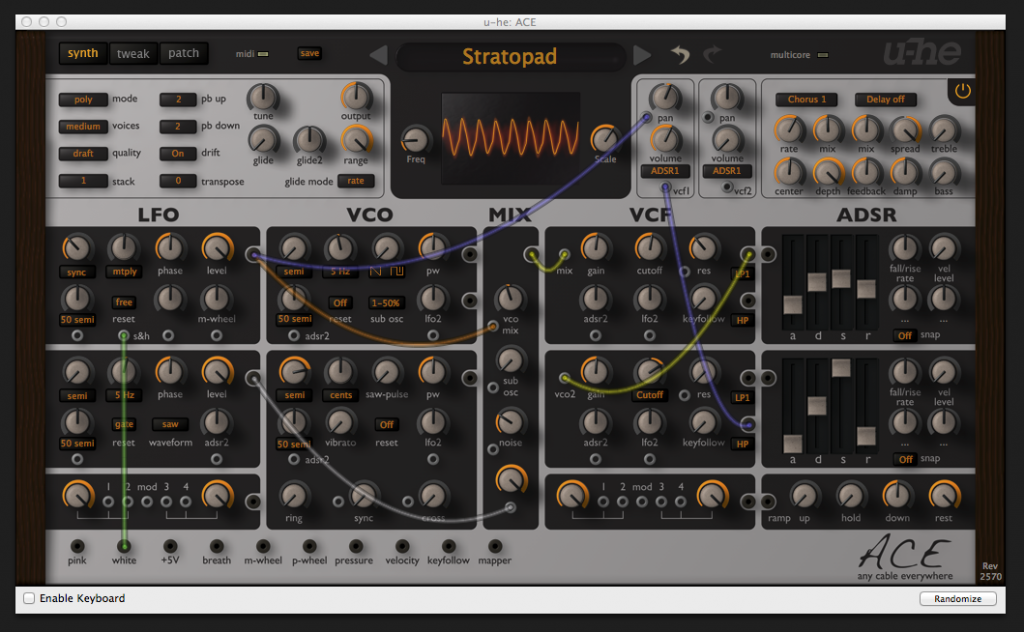
As for a DAW, I use Renoise. I come from a tracker background so the interface and workflow are very intuitive to me, but beyond that Renoise is highly capable as a synthesis tool in itself. It has its own library of useful “meta” modulation plugins, such as LFOs, signal followers (gates which trigger control values based on audio input), key and velocity trackers, and routing plugins that are capable of powerful data interchange all within itself. All these features aid greatly in the efficient creation of sound effect variety.

Ultimately though, it all comes back to familiarity. Use what you know, and find ways to compensate for what your favourite tools can’t do.
Referencing From The Real World
The first step in SFX synthesis is to source reference material. Some reminiscence to real-world sound is often necessary to keep our sounds easily interpretable, so modelling off of a real-world reference is a good starting point.
There are plenty of excellent resources available online, such as freesound.org and others. This can also be a good opportunity to get outside and hunt down some references yourself. Give that portable recorder a bit of love so it doesn’t feel totally dejected by your bizarre production experiment!
Sound quality is of some concern when sourcing or recording reference material, because ultimately we will be looking to emulate the reference sample just as it is heard. A poor sounding reference sample is not likely to result in a great sounding synthesis patch!
As an example, let’s try to synthesize a car skid sound similar to this reference sample on freesound.org, recorded by user “audible-edge”.
http://freesound.org/people/audible-edge/sounds/76804/
[soundcloud url=”https://api.soundcloud.com/tracks/170169203″ params=”color=ff5500&auto_play=false&hide_related=false&show_comments=true&show_user=true&show_reposts=false” width=”100%” height=”166″ iframe=”true” /]
This is a great recording of a Volvo performing a hand-brake turn. Let’s attempt to synthesize the core skid sound, which we can then manipulate in our middleware.
Listening In Terms of Synthesis Process
OK, so now we need to analyze our reference sample and break it down into components that we can fit into the workflow of a synthesizer. This involves listening in terms of synthesis process, and envisaging how each part of the sound will be synthesized.
First we’ll isolate one section of the sound to focus on. We can then loop it to better hear what is going on.
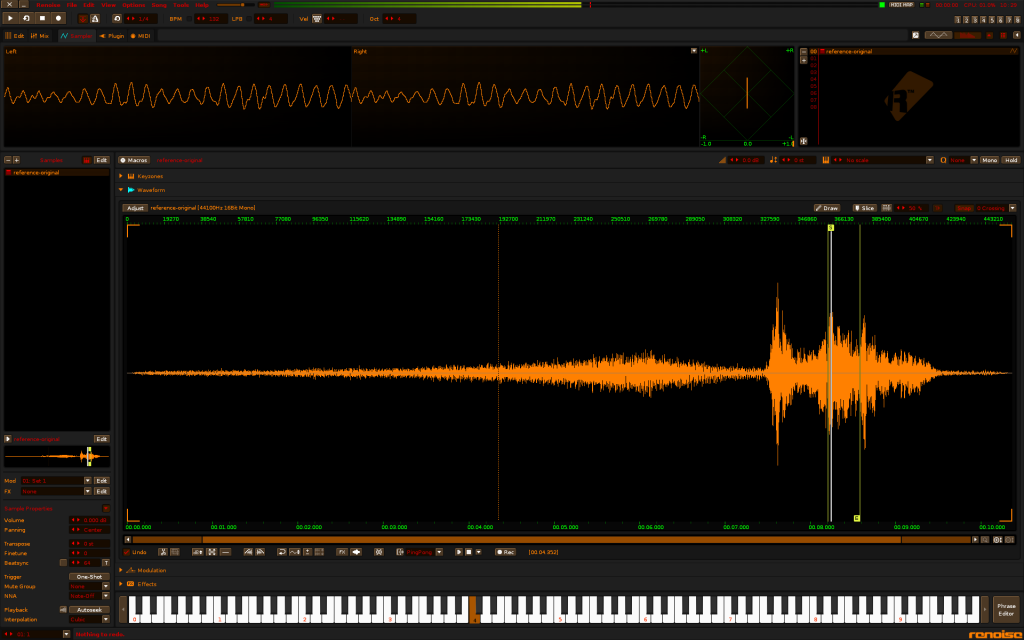
[soundcloud url=”https://api.soundcloud.com/tracks/170169265″ params=”color=ff5500&auto_play=false&hide_related=false&show_comments=true&show_user=true&show_reposts=false” width=”100%” height=”166″ iframe=”true” /]
In this sound, we have a pitched tone that sounds somewhat like a breathy flute, and a foundation of white noise underneath it. These two elements seem to be combined together and distorted. Outside of the reference loop we can hear randomized pitch and volume fluctuations, so our focus should be creating this core loop and then using our middleware to provide the fluctuations in synchronization with the game physics.
Synthesis Begins
For this example I have chosen u-he’s ACE modular subtractive synthesizer (pictured above). It has ring and cross modulation capabilities that may be useful in producing the breathy flute tone, and it also has some neat analogue emulation features that may help in bringing the two elements of this sound together more cohesively.
To emulate the first breathy flute tone, I arrived at the following settings.
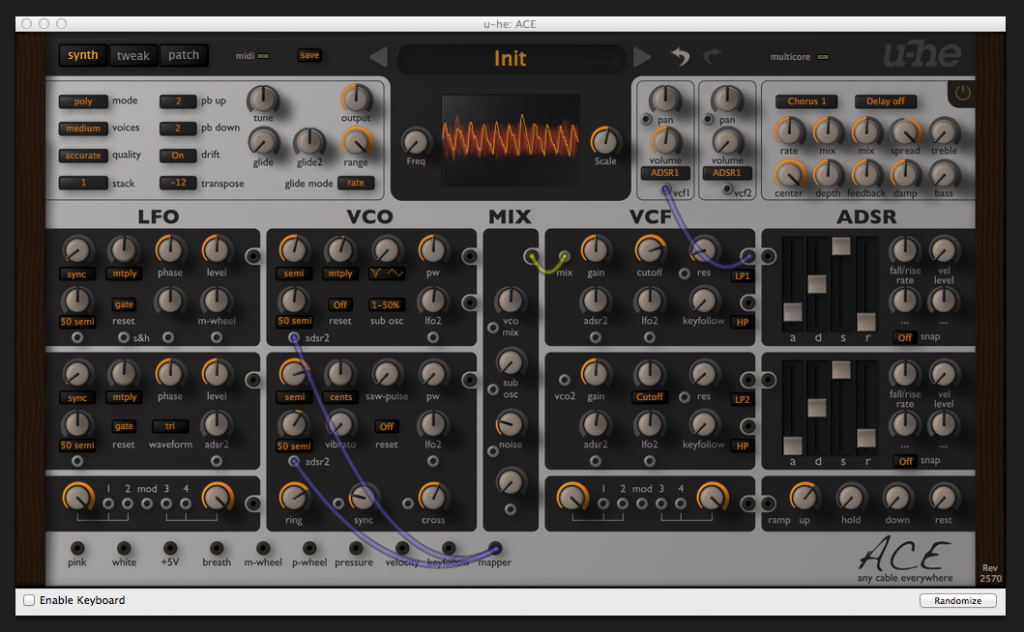
A sound clip is following, but first let me explain what is going on.
ACE’s two oscillators are active here, with one set to an asymmetric sine and the other a saw wave, and these are being ring and cross modulated. This creates a harsh noisy tone, on to which we have added some white noise. The result is pushed through a gentle single-pole low pass filter. This removes the harsh edge off the tone, and gives a softer flute like sound.
If pink or white noise come across as being too static and primitive for your uses, you can always count on ring or FM modulation to provide you with a varied palette of rich and highly controllable noise models. As both of these entail the cross modulation of oscillators, you will typically have access to modulation parameters for how the oscillators are combined. This can give you excellent control over how the noise develops over time.
Just on its own the sound we have now is overly artificial, so to give it some movement we’re going to set up a random waveform modulation. ACE has a dedicated generator for this which outputs a random signal, but it’s a little too quantized for my liking; this means that you can hear the waveform stepping through each of the random values with a transition that is not adequately smooth enough. To get around this, we’ll make use of ACE’s map generator, which can be accessed via the “Tweak” tab.

Most u-he synths have map generators, and they are useful for a multitude of purposes. They can be used to create simple arpeggiator patterns, basic hand-drawn waveforms for wavetable synthesis, additional multi-segment envelopes and more. Here though, we will use the “randomize” feature to create a random series of values in the map, and then change the mode to “Map Smooth”, which will cause any movement in the map to glide between values smoothly. To enable movement we’ll set the Ramp generator (a kind of very simple oscillator for creating repetitive movement) as a source. This will cause the map to continuously loop through the values, stepping through each node smoothly for as long as a note is triggered. In effect, a smooth sample & glide waveform.
Back on the main page, we can now connect the output of the map to the pitches of the two main oscillators, and this gives us a continuously variable tone. The result is this:
[soundcloud url=”https://api.soundcloud.com/tracks/170169263″ params=”color=ff5500&auto_play=false&hide_related=false&show_comments=true&show_user=true&show_reposts=false” width=”100%” height=”166″ iframe=”true” /]
Next, the noise component of the sound. This is much easier now that we have the map set up.

Here, we simply pipe ACE’s white noise generator through one of the filters set to a smooth 2-pole low-pass. To give some variation to the tone, we’ll connect the map output to both the filter gain and cutoff frequency, but only allow it to modulate these very subtly. The result is this:
[soundcloud url=”https://api.soundcloud.com/tracks/170169272″ params=”color=ff5500&auto_play=false&hide_related=false&show_comments=true&show_user=true&show_reposts=false” width=”100%” height=”166″ iframe=”true” /]
Finally, we combine the two components.

As an additional step, on the Tweak page we’re going to make use of ACE’s analogue emulation features, and crank up the “Crosstalk” and “Osc Cap Failure” knobs. These are unique to ACE – Crosstalk simulates leakage of tone between the different components of the synth, so a slight amount of our oscillator tone will be “leaked” into the white noise generator, and vice versa. This creates an effect of gluing the two sounds together, giving a more coherent and seamless mix. If your synth lacks features like ACE’s “Crosstalk”, heavy handed compression can be another way to mash together different parts of the synth’s output to form a more sonically coherent whole. As for “Osc Cap Failure”, this emulates the tone and unreliability of old failing capacitors in the oscillators, and adds further randomization and unpredictability to the tone.
OK, so this is what we have so far:
[soundcloud url=”https://api.soundcloud.com/tracks/170169275″ params=”color=ff5500&auto_play=false&hide_related=false&show_comments=true&show_user=true&show_reposts=false” width=”100%” height=”166″ iframe=”true” /]
The key points here have been the usefulness of ring or FM modulation for controlled and varied noise, randomization in any way that the synth can do it, and some kind of mechanism for blending different sonic components together cohesively.
Refining with EQ and Filters
A useful trick at this stage is to view the reference sample in a spectrum analyzer, and try to identify an approximate equalization trend in the sound. Setting the analyzer’s smoothing function helps here to isolate a rough picture of the spectral character. This can then be used to apply a very basic EQ curve to your synthesized sound to give it a little more resemblance to the original. All this is highly unscientific and often only helps a little; however, sometimes it can be just the tiny bit of extra push the sound needs to bring it closer to the reference sample.
Here is how the looped portion of our reference sample looks in Voxengo’s famous free analyzer Span:
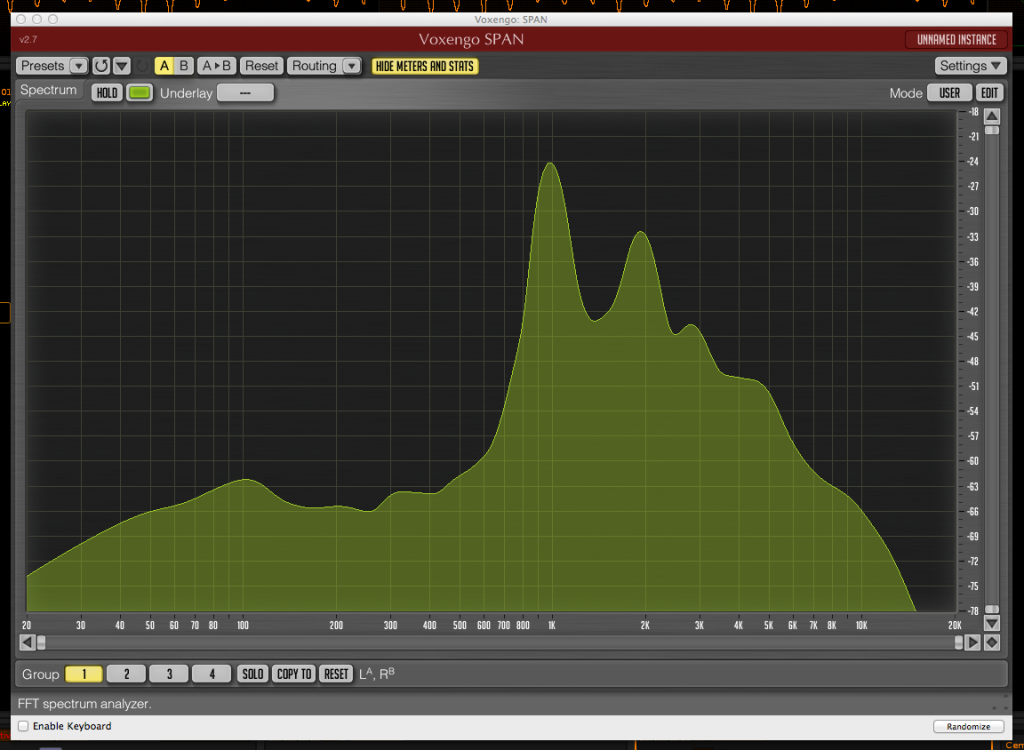
As you can see, the most dominant features here are a strong peak between 900Hz and 1kHz, a second peak just below 2kHz, a distinct dip around 250Hz and a small bump at 100Hz.
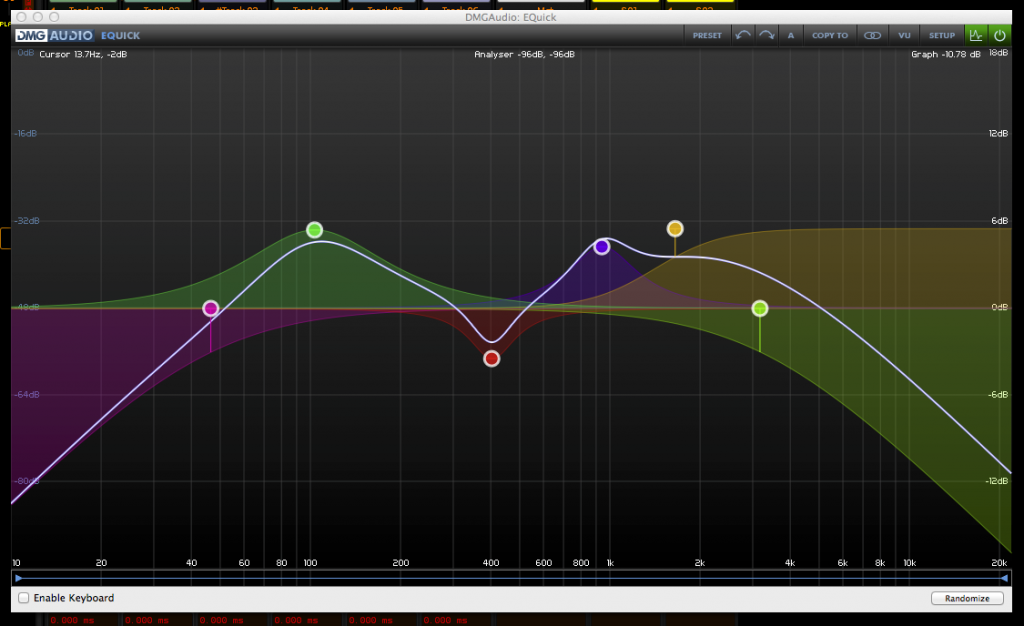
So starting with these basic guidelines, we can formulate a spectral profile that matches. Copying the spectral curve exactly rarely works well and of course a lot of adjustment is necessary.
After some massaging, here is the result we arrive at. EQ is provided by DMG Audio’s efficient EQuick plugin:
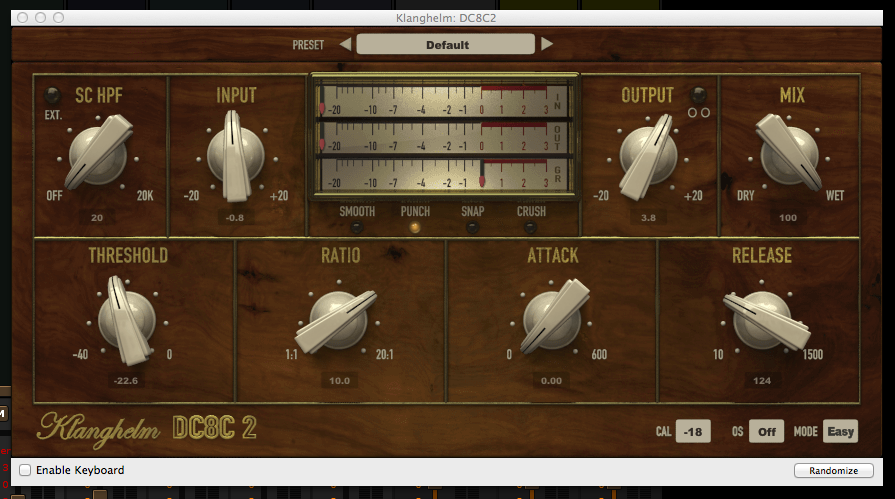
Before finalizing, we’ll also pass our sound through a compressor to keep any stray peaks or random transients under control. This is often necessary when using synths such as ACE, which are designed to emulate old unreliable analogue gear. Compression is provided here by Klanghelm’s DC8C2, as it has some of the fastest attack envelopes in the business.
Here is our final sound:
[soundcloud url=”https://api.soundcloud.com/tracks/170169284″ params=”color=ff5500&auto_play=false&hide_related=false&show_comments=true&show_user=true&show_reposts=false” width=”100%” height=”166″ iframe=”true” /]
And that’s it! We’re now ready to implement this sound into our middleware to create the overall volume and pitch fluctuations.
Concerning EQ plugins, I would recommend using both curve based EQs and also knob-based parametric EQs. Curves are excellent for mirroring spectral character as demonstrated above, but they do not excel at facilitating experimentation. Often, I have found parametric EQs more useful for loose knob-spinning and searching for sweet-spots to bring the sound on, especially when using high-Q cuts as simple band-reject (or “band-stop”) filters. In addition, most parametric EQs tend to be emulations of vintage hardware units, and when overdriven will impart overtones and harmonic distortion that sometimes helps with avoiding an artificial tone. (Although admittedly the difference here is often negligible – let’s call it a placebo effect :)
Putting it All Together
From start to finish, the above example took me about 90 minutes to complete. I would class it as being of a medium difficulty level, and a fair amount of experimentation was necessary. The more practiced you become at SFX synthesis the less time it takes, but regardless, efficiency and experimentation are two core principles that are vital to this style of SFX production. Familiarity with your tools helps greatly, as does a healthy dose of reckless knob-tweaking and trial-and-error.
To recap on the most important point here: why even bother?
The whole point of enforcing odd production policies such as this is to try and forcefully impart some kind of common connection between the assets we’re creating for a single project. With all the freedom we have today in sound design, it’s useful to be able to narrow down our focus and work towards making something which is consistent and complementary to the overall project aesthetic. If the visual artists in the team are intentionally limiting themselves to working in two dimensions, working with pixelated graphics or with low-poly models, or pursuing any other visually stylized representation of the game-world’s reality, then arguably as sound designers we should attempt to follow suit with sound effects that are equally stylized, and intentionally limited. There are of course many ways to achieve this that don’t involve synthesis, but none of them make you feel like a mad scientist the way this does. Give it a try.
Alex May has been involved with music production and synthesis for over 2 decades, and currently works as creative director for the independent game studio Winning Blimp, and audio director for Japan based studio Vitei. He is also a regular on the Game Audio Hour video podcast, and would love to hear from you on Twitter at @atype808
Thanks for posting, very interesting!