Guest Contribution by Graham Gatheral
Let’s be honest: code can be daunting. All those words and numbers and operators and punctuation errors… For a start, there’s no GUI. How are you supposed to make anything without a GUI?!
Well, as we’ll see later we can make a GUI-based synth in SuperCollider with just a few dozen lines of code! But let’s put GUIs to one side for now, because SuperCollider’s real power is in its ability to produce flexible and complex dynamic systems directly from code, and without too much trepidation… My aim here is to introduce an audio synthesis programming language to an audience that is, for the most part, more comfortable working with a GUI. So I’ll start off with some simple code examples and then move onto how SuperCollider can use game-code parametric data to drive synthesis ‘patches’ in real-time.
If you don’t have SuperCollider already, download an installer here:
http://supercollider.sourceforge.net/downloads/
Regarding platforms, I’m on Windows 7 but the code will certainly run fine on a Mac.
Warning: The code examples below were written for demonstration purposes and have not been fully tested. Please be careful not to expose your ears to loud sounds (particularly when using the metal impacts tuner) as stable behaviour cannot be guaranteed. This is especially critical if using headphones!
A Quick Introduction
SuperCollider consists of three components:
- an object oriented programming language
- a language interpreter
- a real-time sound synthesis server
When code is executed, it is interpreted and sent to the server, whereupon the sound is generated.
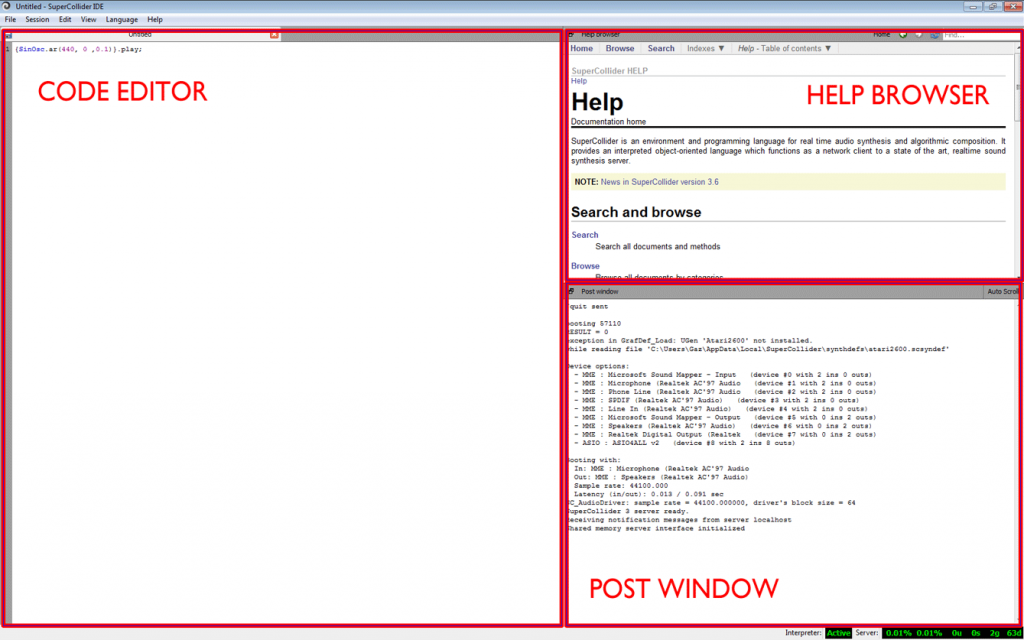
SuperCollider has had an Integrated Development Environment (IDE) since version 3.6, which is great because now you have everything you need in one place:
- Code editor (where you write your code!)
- Help browser
- Post window (shows the outcome of your code, including any errors)
- Document browser [not shown below]
Let’s get started!
Loading the IDE (scide.exe in your install directory) will automatically run the language interpreter, so we just need to press CTRL+B to boot the server and we’re ready to go. Copy and paste the following example into the Code editor. To execute the line of code, place the cursor on the line and press CTRL+Enter.
{SinOsc.ar(440, 0 , 0.1)}.play;
The play message is a quick way to evaluate some code – in the example above, we’re wrapping a 440hz Sine wave oscillator function in a SynthDef (synthesis definition), and then creating and starting a new instance of it.
To stop SuperCollider at any time use CTRL+. (ctrl + period)
Okay so there’s nothing exciting about that sine wave … but stay with me! Let’s create a cascade of 16 sine waves, each with a random pitch between A220 and A880…
{16.do({{SinOsc.ar(Rand(220,880), 0 ,0.05)}.play; 0.1.wait;})}.fork;
Often the best way to learn is to dive in and edit some parameters – try the following:
- change the number preceding .do to change the number of sine waves
- change the two numbers after Rand to define the upper and lower pitch values
- change the number before .wait to change the interval between each new sine wave
- change the oscillator: replace SinOsc with LFTri or LFSaw, for example
Here’s a couple more code examples (from the Help browser)
{ SinOsc.ar(SinOsc.ar(XLine.kr(1, 1000, 9), 0, 200, 800), 0, 0.25) }.play;{ SinOsc.ar(800, SinOsc.ar(XLine.kr(1, 1000, 9), 0, 2pi), 0.25) }.play;
To begin integrating SuperCollider into a game engine, we need to be able to change synth parameters in real-time. To do this we can write a SynthDef, declare some arguments (later we’ll be passing numerical data via arguments to parameters in the SynthDef) and send it to the server, ready for use.
The example below will create a new SynthDef which I’m naming ‘sinewave’. I’ve created an argument, given it the name ‘freq’ and assigned it a default value of 440. I’ve also created a variable called ‘output’ and assigned our sine wave oscillator as its value. Finally, the Out UGen (more on these later) is writing the output to the left and right channels of our audio hardware. (search the help browser if you want more info on what’s happening here!)
(
SynthDef(\sinewave,{|freq = 440|
var output = SinOsc.ar(freq, 0 ,0.1);
Out.ar([0,1], output);
}).send;
)
Execute this block of code by placing the cursor anywhere between the outermost parentheses and press CTRL+Enter.
Now, to create a Synth using this SynthDef, we write the following code (x is just a global variable we can use without first needing to define):
x = Synth(\sinewave);
… and we hear our trusty sine wave. Now we can change the frequency of the sine wave by executing this code to set the value of the freq argument to 220:
x.set(\freq, 220);
So we can use SynthDefs (synthesis definitions) to create and run Synths, and then pass in arguments to change their parameters (known as Class Methods) in real-time. We can do more than pass in arguments from within SuperCollider though: we can take numerical data from other systems and send it to SuperCollider as bundled OSC messages – and this is how we can hook SuperCollider up to a game engine.
I’ve put up some tutorials on how to link UDK to SuperCollider:
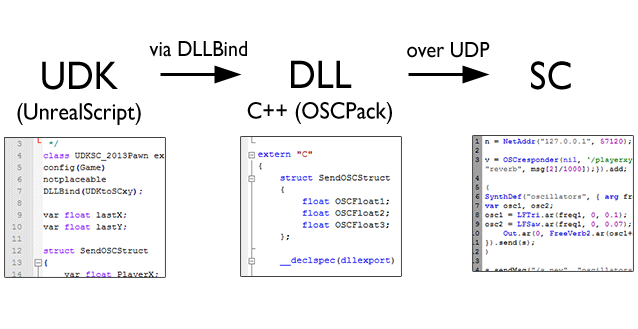
It’s a bit too much to delve into here, but to summarise: on the UDK side we write some code in UnrealScript that accesses an OSC message send function stored in a custom DLL. The OSC send function (see Ross Bencina’s OSCPack) sends the message over UDP (a network protocol) to an IP address and port defined in the DLL (in this case 127.0.0.0 since I have everything running on the same machine). Then you tell SuperCollider to listen out for the incoming OSC message and give it some instructions on what to do with the data when it arrives.
This is derived from Rob Hamilton’s excellent UDKOSC project.
(DLLBind is a feature in UnrealScript and it’s required here because the OSC send functions are written in C++. If you’re working with a licenced version of Unreal you could maybe just integrate the OSC classes into the source code and open up a direct link between Unreal and SuperCollider).
Now you have a system that can take almost any game code variable (floats, integers, strings etc) at run time and use it to change SuperCollider synth parameters in real-time. Here are a few examples of what you could use it for:
- Generating one hit sfx for weapon fire, footsteps, metal impacts
- Varying the intensity of wind, running water, ambient drones
- Changing the dynamics of a generative music piece
The building blocks of SuperCollider are called UGens (Unit Generators). To put it simply, UGens take inputs and use them to produce sound. As previously seen, a sine wavetable oscillator UGen (SinOsc) can be given inputs for frequency, phase offset, output multiplier and add value to output.
{SinOsc.ar(440, 0 , 0.1, 0)}.play;
The DynKlank UGen is a bank of frequency resonators that we can use to approach physical modelling. Using DynKlank with an exciter UGen such as Impulse can achieve some pretty good metal impact sounds. Here’s a quick example which triggers a SynthDef made up of two DynKlank UGens and some filter UGens. (You can view a variation of this code in the Metal Impacts tuner below)
I set up some Kismet that would send a message to SuperCollider every time the sword came into contact with the metal pipe. Hitting different parts of the pipe will result in different impact sounds: hitting the top, shorter part produces a less resonant sound for example. So the OSC message contains parametric data to change values of the SynthDef that control the ring times.
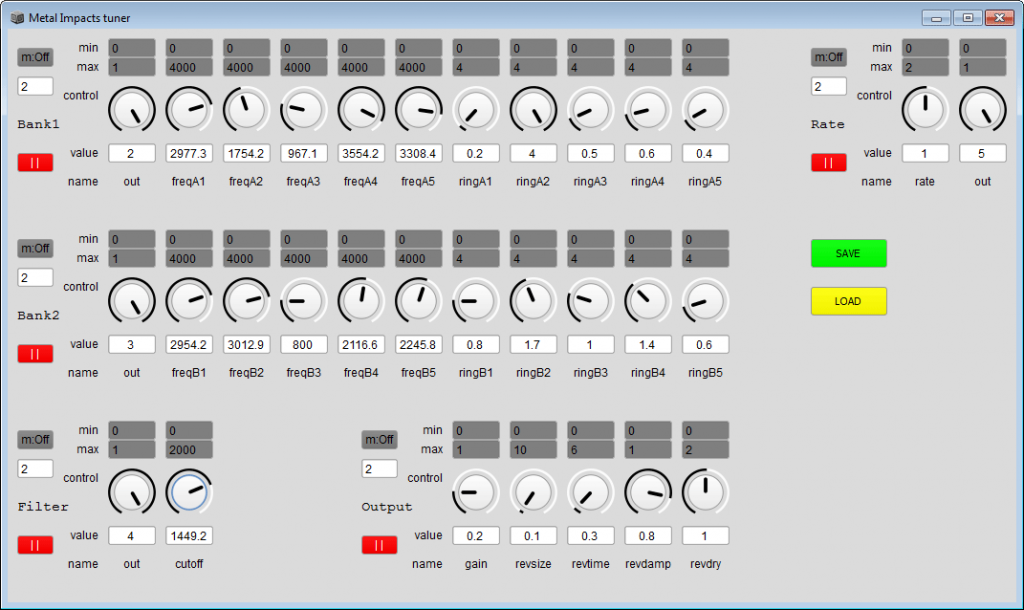
One of the most appealing aspects of using SuperCollider is that you can achieve a lot with very little code. Here’s a GUI interface for a metal impact tuner that could be used to gather the parameters required on the UDK side for generating a range of metal impact sounds in SuperCollider. For example, an audio designer could open the GUI, tweak the frequency, ring time, filtering and reverb settings until he/she has the required sound, then make a note of the parameters and feed them into UDK to control a dedicated metal impacts synth in SuperCollider.
And here’s a video of the GUI in use:
You can see how easy it is to make a GUI and control a wide range of metal impact sounds from the same 40 lines of code:
(
w = Window.new("Metal Impact Tuner", Rect(200, Window.screenBounds.height-700,1055,600)).front ;

SynthDef(\Rate, {|rate=1, out=5|
	~playrate = Impulse.ar(rate, 0, 0.3);
	Out.ar(out, ~playrate)
}).send(s);

SynthDef(\Bank1, {|out=2, freqA1=2000, freqA2=2000, freqA3=2000, freqA4=2000, freqA5=2000, ringA1=2,
        ringA2=2, ringA3=2, ringA4=2, ringA5=2| ~signal1 = DynKlank.ar(`[[Lag.kr(freqA1+40,1),
        Lag.kr(freqA2+40,1), Lag.kr(freqA3+40,1), Lag.kr(freqA4+40,1), Lag.kr(freqA5+40,1)], nil,
        [ringA1, ringA2, ringA3, ringA4, ringA5]], In.ar(5), 0.2, 0, 1).dup*0.4;
	Out.ar(out, ~signal1)
}).send(s);

SynthDef(\Bank2, {|out=3, freqB1=2000, freqB2=2000, freqB3=2000, freqB4=2000, freqB5=2000, ringB1=2,
        ringB2=2, ringB3=2, ringB4=2, ringB5=2| ~signal2 = DynKlank.ar(`[[Lag.kr(freqB1+40,0.3),
        Lag.kr(freqB2+40,0.3), Lag.kr(freqB3+40,0.3), Lag.kr(freqB4+40,0.3), Lag.kr(freqB5+40,0.3)],
        nil, [ringB1, ringB2, ringB3, ringB4, ringB5]], In.ar(5), 0.2, 0, 1).dup*0.4;
	Out.ar(out, ~signal2)
}).send(s);

SynthDef(\Filter, {|out=4, cutoff=1000|
	var output;
	~filtered = HPF.ar(SinOsc.ar(Rand(324,352)) * In.ar(2), Lag.kr(cutoff+20,1), 0.8) +
	HPF.ar(SinOsc.ar(Rand(466,546)) * In.ar(3), Lag.kr(cutoff+20,1), 1);
	~output = Mix.ar(CombL.ar(~filtered, Rand(0.3, 1.8), Array.fill(10,{(0.005).(0.01).rand2 + 0.07}) * 0.06, 0.08));
	Out.ar(out, ~output)
}).send(s);

SynthDef(\Output, {|gain=0.2, revsize=5, revtime=3, revdamp=0.5, revdry=1|
	var output;
	output = Mix.ar(CombL.ar(In.ar(4), Rand(0.3, 1.8), Array.fill(1, 0.07) * 0.06, 0.08));
	2.do({output = AllpassN.ar(output, 0.020, [0.020.rand,0.020.rand], 1, mul:0.9) });
	~reverb = GVerb.ar(In.ar(4), Lag.kr(revsize,0.3), Lag.kr(revtime,0.7), revdamp, 0.5, 15, revdry);

	output = ~reverb.dup*(gain/5);
	output = output.clip2(0.75);
	output = Limiter.ar(output, 0.9, 0.01);
	Out.ar([0,1], output*0.5);

}).send(s);

Synth(\Bank1).autogui(window:w, step:50, vOff: 0, hOff:0, scopeOn:true) ;
Synth(\Rate, addAction:\addToHead).autogui(window:w, step:50, vOff: 0, hOff:830, scopeOn:false) ;
Synth(\Bank2, addAction:\addToTail).autogui(window:w, step:50, vOff: 200, hOff:0, scopeOn:false) ;
Synth(\Filter, addAction:\addToTail).autogui(window:w, step:50, vOff: 400, hOff:0, scopeOn:false) ;
Synth(\Output, addAction:\addToTail).autogui(window:w, step:50, vOff: 400, hOff:360, scopeOn:false) ;
)
The Metal Impact Tuner is a work in progress, if you run the code be aware that the ‘Out’ values need to be as they are and changing them will break it. Also, the ‘revtime’ control is a little unpredictable … Apart from that, have fun with it! To run the code you’ll need to install the ‘autogui’ Quark (Quarks are like plugins for SuperCollider). It’s fairly straightforward in MacOS, just execute the following code:
Quarks.install("autogui")
It’s more complicated on Windows, but you can find instructions here.
Thanks for reading, please post in the comments if you spot an inaccuracy or something doesn’t work! If you want to find out more, there’s a vibrant community of SuperCollider users on the sc-users mailing list – and many excellent resources online, a few of which are below.
- SuperCollider home – http://supercollider.sourceforge.net/
- Browse code snippets and submit your own – http://sccode.org/
- SuperCollider wiki – http://supercollider.sourceforge.net/wiki
- Design sound effects – Designing Sound in SuperCollider
Special thanks to Graham Gatheral for sharing his expertise through this guest contribution. Guest contributions are always welcome and are encouraged here on Designing Sound. If you have something you’d like to share with the community, contact shaun [at] designingsound [dot] org.


Great article ! i’ve always wanted to try this but never managed to get past downloading, having no knowledge of code
this article would help a lot i am sure
Great article Graham. I’ve been researching procedural audio for a few years now, and it never ceases to amaze me. Abstracting the data interface to OSC is a brilliant idea, the possibilities are endless! I’m an Audio Programmer/Sound Designer at Magenta Software and I would love to implement this with our game engine.
Where do all the procedural audio heads hang out? Is there a mailing list or forum you could recommend?