
Hey, cool. We’re making music! But it’s not really interactive yet. In this lesson, we’ll hook up the music system to parameters in the game. We’ll also make editing our step sequencer a little easier with some Unity editor scripting.
Game Parameters
A “game parameter” can really be any quantifiable value in the game, such as the player character’s speed, the camera’s position in the level, a non-player character’s attributes, or the player’s score. We can also combine these to derive parameters that are relevant to the music. If you’re familiar with implementing interactive sound, these parameters are synonymous with RTPCs, States, and Switches in Wwise or Parameters in FMOD.
Similarly, we have a lot of things we can change about the behavior of the music. We can turn on and off parts just like we could when using a collection of audio files. But since this is a note sequencer, we can do a few more things, such as change the tempo (without a change in pitch or articulation), shift the key, change the attack and release of the samplers, and transform the sequences in many ways. Let’s look at a couple simple examples.
Changing Tempo
Because this music system is based on triggering notes on instruments, we can freely change the tempo without any change in the sound of the notes themselves, just like using virtual instruments in a DAW. In this example, we create a script that takes a UI slider value in the range of 0.0-1.0 and scales it to a tempo range, like so:
public void OnSliderUpdate(float sliderValue)
{
  float tempo = _tempoMin + ((_tempoMax - _tempoMin) * sliderValue);
  _metronome.SetTempo(tempo);
}
All that’s left to do here is to create a UI slider and tell its update event to call this function. For the sake of brevity, we won’t go over how to set up UI controls in Unity, but here is a great primer if you’d like to learn more about that.
When you play the demo scene, you should hear the tempo changing with the value of the slider in the game window.
Muting Sequences
Another common technique is to map the arrangement of the music to the intensity of the action in the game. That intensity value could be one value or a combination of many values from the gameplay systems. Using audio files, this would involve fading in or out. But since we’re using sequencers, we can simply stop or start playing notes in that sequence, preserving the tails of notes that were already playing. In the StepSequencer code, we check whether the sequence is currently suspended, and if so, we don’t report notes that would play.
public void HandleTicked(double tickTime)
{
  int numSteps = _steps.Count;

  if (numSteps == 0)
  {
    return;
  }

  Step step = _steps[_currentTick];

  if (step.Active)
  {
    if (!Suspend && Ticked != null)
    {
      Ticked(tickTime, step.MidiNoteNumber, step.Duration);
    }
  }

  _currentTick = (_currentTick + 1) % numSteps;
}
Doing it this way means we keep the sequences in phase when one or more sequences is suspended.
To tie suspending sequences to our “intensity” parameter, we’ll create a way to map StepSequencer instances to a threshold. And then when our intensity parameter gets updated, we’ll check those mappings to determine which sequences should be suspended.
[Serializable]
public class SequencerIntensityPair
{
  public StepSequencer Sequencer;
  public float Intensity;
}

[SerializeField] private SequencerIntensityPair[] _sequencerIntensityPairs;

public void OnSliderUpdate(float sliderValue)
{
  foreach (var sequencerIntensityPair in _sequencerIntensityPairs)
  {
    sequencerIntensityPair.Sequencer.Suspend = (sliderValue < sequencerIntensityPair.Intensity);
  }
}
And as before, we can hook this up to a slider in the UI. In the demo scene, you should hear parts turn on and off as you move the intensity slider around.
Step Sequencer Editor
Because we want to move a little faster when making our sequences, let’s take a look at some editor scripting and make the inspector a little prettier.
Custom Inspectors
Unity is an extremely flexible game engine and tool set, and at the heart of that flexibility is a modifiable editor. When you select a GameObject in the scene or project hierarchy, the inspector pane shows that object’s attached MonoBehavior scripts and their properties. If the default inspector layout isn’t suitable for your purposes, you can make your own using the Editor class and the CustomEditor attribute. For further reading, Unity has some great tutorials on editor scripting here.
Pretty Sequence Steps
By default, editing steps in our StepSequencer is a little clunky.
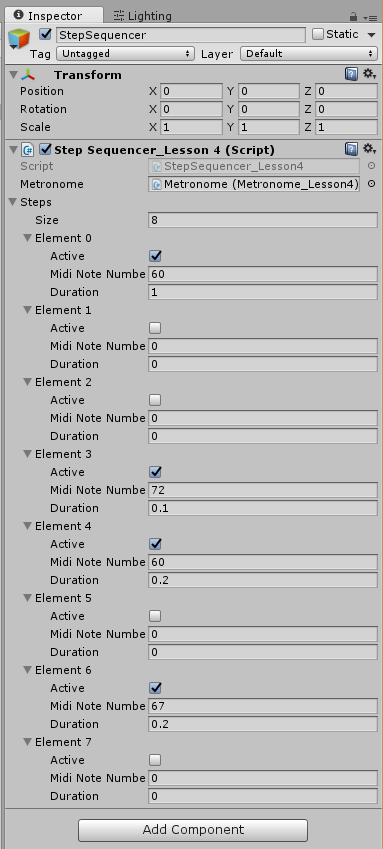
A nice improvement would be to have all the controls for the steps up front, instead of buried in a tree editor.

To do that, first we need to hide the default editor for the steps in the StepSequencer.
// hide this field in the inspector. We'll be making a custom inspector for these
[SerializeField, HideInInspector] private List<Step> _steps;
Then we can make our own editor for steps by overriding OnInspectorGUI.
List<StepSequencer.Step> steps = sequencer.GetSteps();

// Set the number of steps in the sequence
int numSteps = EditorGUILayout.IntSlider("# steps", steps.Count, 1, 32);

// Add or remove steps based on the above slider's value
while (numSteps > steps.Count)
{
  steps.Add(new StepSequencer.Step());
}
while (numSteps < steps.Count)
{
  steps.RemoveAt(steps.Count - 1);
}

// Draw the steps
for (int i = 0; i < steps.Count; ++i)
{
  StepSequencer.Step step = steps[i];

  // Draw all the step fields on one line
  EditorGUILayout.BeginHorizontal();
  EditorGUIUtility.labelWidth = 60;
  EditorGUILayout.LabelField("Step " + (i + 1), GUILayout.Width(60));
  step.Active = EditorGUILayout.Toggle("Active", step.Active, GUILayout.Width(80));
  step.MidiNoteNumber = EditorGUILayout.IntField("Note", step.MidiNoteNumber);
  step.Duration = EditorGUILayout.FloatField("Duration", (float)step.Duration);
  EditorGUIUtility.labelWidth = 0;
  EditorGUILayout.EndHorizontal();
}
And there we have it. A much easier-to-edit sequencer.
Thanks for following along! We hope this series has been helpful. If you have any questions or comments, please post them below.
Thanks for the detailed post
Awesome work, really easy to follow as Samantha says, really appreciate it!
EPIC tutorial series! – immensely grateful for the detailed walk-through / insights (espesh’ the “look-ahead” audio sync!) *humble bows*