 Despite all of this, I’m still relatively new at Pure Data and the Max language. To those who chime in with corrections or clarifications in the comments, you are most appreciated! If you’re new to PD, make sure you check the comments section for clarifying info provided by generous souls.
We’re picking up steam here. The synthesizer is essentially done. What we’re doing in the last two projects is adding features to make it a little more fun. Today, we’ll be adding in a 3 stage filter section. We’re going to route our synthesizer output through a hi-pass filter, then a band-pass filter, and finally a low-pass filter. It will pass through each of them in series, but we’ll be able to turn the filters on and off. Just to make things a little extra interesting, we’ll incorporate an LFO into each filter to sweep the center frequency (which we’ll also be able to turn on and off). You’ve completed the previous seven tutorials…right? ;)
The awesome part of what we’re doing today is that the code for each filter section is nearly identical. The only filter we’ll have to make any significant changes to is the band-pass filter, and even those will be relatively minor. Let’s get started…but don’t forget to configure you MIDI controller before opening your patch.
Create a [toggle] and then use a “comment” to label it “High Pass”. We’re going to use this toggle to turn our filter on and off. Open it’s properties window and set the “send-symbol” to $0-filter1″. We’ll use that variable much later. Next, create a horizontal slider, and label it “Center Frequency”. Set its output range in “properties” to 0 to 2000, and assign “$0-filter1Freq” to it’s “send-symbol”. Create a number atom that you can put next to the slider, and set its “receive symbol” to the same variable (you may want to change the “size” too). This way we’ll know exactly where we’ve set our center frequency.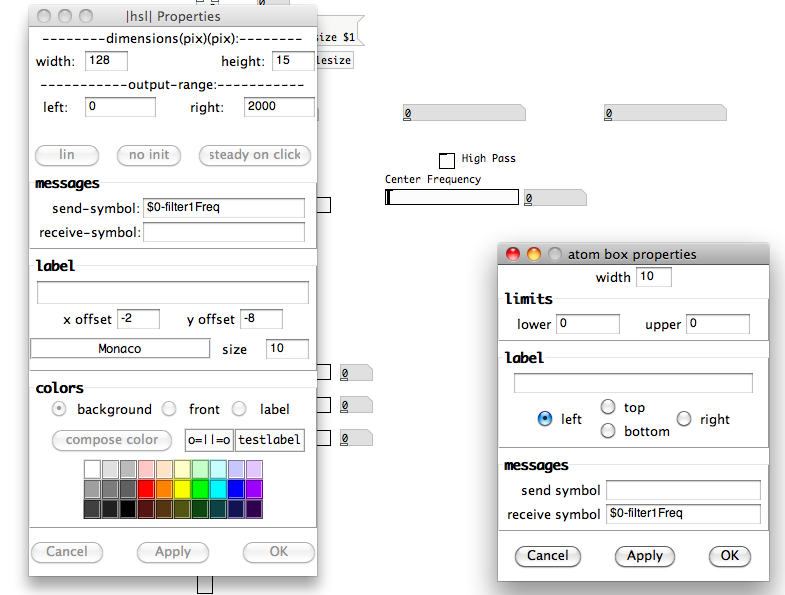 Before we apply this frequency to a high pass filter, let’s build our LFO generator. Thankfully, we can just reuse our “oscGenerator” abstraction patch. Create [oscGenerator] and place it in you patch a little ways below the horizontal slider you just created. Now create a vertical radio atom and change its “number” to “6”. While you’re in there, set the atom’s “receive-symbol” to “lfoInit”…we’ll come back to that as we finish up this stage of the filter section. Label the first five boxes (top to bottom) in the same order that you labeled the “Modulation Shape” selector we created for frequency and amplitude modulation. Label the final box, on the bottom, “LFO Off” and connect the vertical radio atom to the cold inlet of [oscGenerator]. Create a vertical slider and connect it to the hot inlet. Open the slider’s properties window and set the “bottom” and “top” values of “output-range” to “1” and “20” respectively. Label it “LFO Rate”.
Next, we need to think about the range of frequencies over which our LFO will be able to sweep the high-pass filter. I like the idea of being able to sweep over the entire range to which we’ve already assigned our filter with the horizontal slider (0 to 2000). Why don’t we drop a vertical slider with the “bottom” and “top” of the “output-range” set to that as well? Then connect it to the hot inlet of a new [*~] atom. I’m going to pause here, because there’s a potential problem with simply connecting [pd lfoGenerator1] to the cold inlet of [*~]. Our LFO is going to swing between -1 and 1. What happens if our range slider is outputting 1500…meaning that we’re multiplying by 1500? Well that means our output will swing between -1500 and +1500. If our center frequency is set anywhere below 1500, then we’re dropping below 0 Hz. We need to restrict the {range*LFO} value to remain positive. We’ll use the same math process that we did for the amplitude modulation…{(LFO output+1)*0.5}.
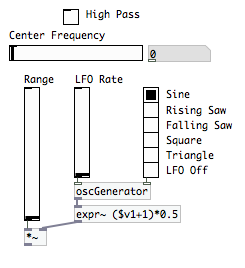 Rather than use two atoms, one for “+ 1” and one for “* 0.5”, like we did last time, we’re going to use an atom that allows us to represent that process as an equation…[expr]. [expr] is another one of those atoms that can be used on data streams or signals. Since the output of [oscGenerator] is an audio signal, we’re going to use [expr~]. For the equation, we’re going to use the one I ended the last paragraph with…only substituting “LFO output” with the local variable “$v1” (the standard “$1” won’t work here, we need that extra little “v” in this application). PD follows standard mathematical orders of operation…everything in parentheses first, followed by multiplication or division, followed by addition or subtraction. Connect the output of [oscGenerator] to [expr~ ($v1+1)*0.5], and connect that [expr~] atom to the cold inlet of [*~].
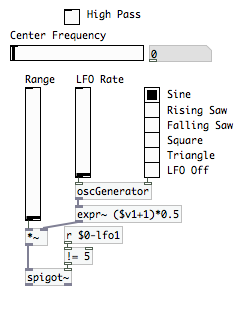 Now we’re going to want a way to stop this modulating signal if it the vertical radio selector is set to “LFO Off.” Let’s use [spigot~] again. Create that atom and place it below [*~], but don’t connect it yet. We need a way to send it a “0” value. We can rig this up with a [send] / [receive] pair and a Boolean atom. Open the properties of your vertical radio wave shape selector, and set its “send-symbol” to “$0-lfo1”. Now it not only passes the value to [oscGenerator], but also through that nice little variable. Remember that computers count from 0 up. On this selector, the value for “Sine” is “0”, and the value for “LFO Off” is “5”. We want our [spigot~] atom to let the audio flow whenever the value DOES NOT equal “5”. Create the atom [r $0-lfo1] then connect it to another new object atom, [!= 5]. [!=] is the opposite Boolean process of [==]. [!=] means “does not equal”, and will output a “1” whenever the incoming value does not match the argument. Connect the [!= 5] to the cold inlet of [spigot~], and connect the output of [*~] to the hot inlet.
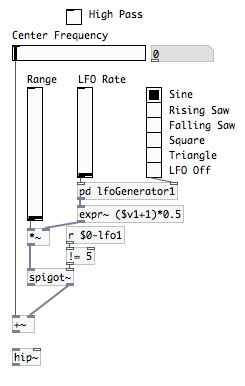 We’re still using tildes, because we’re still working math on an audio signal generated out of [oscGenerator]. Create the math atom [+~]. Connect the right outlet of [spigot~] to the cold inlet, and connect the “Center Frequency” slider we created (back at the beginning of this post) to the hot inlet. Remember, we can add numbers and signals. It simply means that the sum that is output will be a signal as well. At this point, we have our center frequency, and a LFO sweep to modulate that frequency. Now we need to actually produce our filter. PD has an atom for that…[hip~]! Its cold inlet receives the center frequency where it should begin the low cut, and it’s hot inlet receives a signal. However, we’ve got a small problem to deal with. Create [hip~] and drop it in your patch, but don’t make any connections yet. Examine the atom, and see if you can figure out what, exactly, the issue is.
Did you notice that the cold inlet is white? That means it needs the cut-off frequency in data form. We currently have it in signal, and need a way to convert it. Worry not, we have [snapshot~]! [snapshot~] takes a signal and converts it into a number whenever it receives a “bang”. What’s that you say? “Our signal is constantly changing because of the LFO”…? Correct, we need to be continuously outputting bangs to [snapshot~]. Do you remember the [metro] atom?
Here’s how we fix our issue. Create [snapshot~] and connect it to the outlet of [+~] and the cold inlet of [hip~]. Now, create [metro 1] (outputs a bang every millisecond, thanks to the argument “1”) and connect that to the inlet of [snapshot~] as well. Create a [loadbang] atom and connect it to the inlet of [metro 1], because we want [snapshot~] to always be working. It’s not a bad idea to have a manual [bang] as well, so create one of those and connect it to the inlet of [metro 1] as well. You can use either a button [bang] or a message atom [bang] here. I chose a message atom.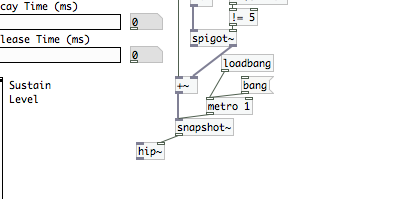 The only thing we’re missing now is our actual signal from the synthesizer. Look under [pd polytouchSynth], where you probably have a [dac~] at the moment. Click on the [dac~] atom…in “edit mode”, of course…and change it to [throw~ filter1]. Create its partner [catch~ filter1] and connect it to the hot inlet of [hip~].
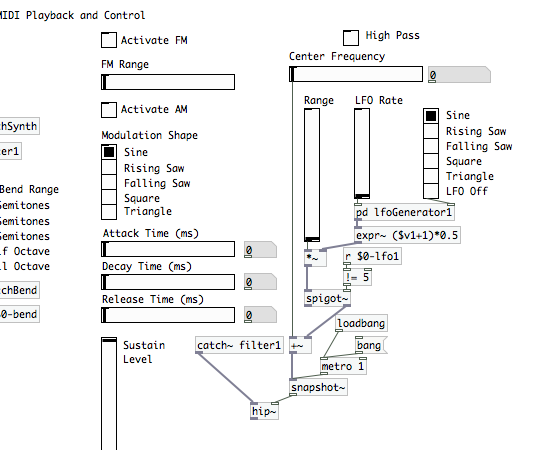 The only thing we need to finish off this first filter stage is a way to “bypass” the actual filter. Let’s turn to our dual [spigot~] solution once more. Create 2 of them; connecting one to the outlet of [catch~ filter] and the other to the outlet of [hip~]. Waaaay back in the beginning of this article, we created a [toggle] that’s passing its output over the variable “$0-filter1” (it was the very first thing we did). Create the atom [r $0-filter1] and connect it to the cold inlet on both [spigot~] atoms. Finally, create a new atom, [throw~ filter2], and connect the [spigot~] outlets to it (left outlet for the one directly connected to [catch~ filter~], and right outlet for the atom connected to [hip~]). We’ve got one last little thing to do in this filter stage. We set up the wave shape vertical radio selector to receive the symbol “lofInit”. We need to configure that to set the LFO off on opening the patch. Last time, we created the pair of atoms [loadbang] -> [; sustainInit 1]. Let’s edit that message atom. Add a “;” immediately after the 1, press enter/return, and then type lfoInit 5. Now it PD will set the LFO “off” whenever it loads this patch. [You can see my example of this edited atom under the “Load File” section.]
 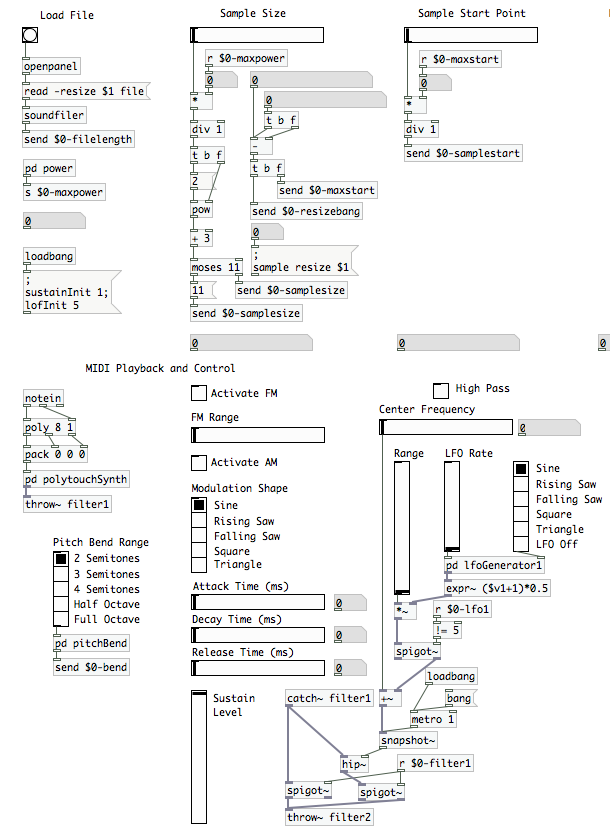 Hooray! We’ve finished the hi-pass filter. The rest of this is very much like cruising downhill! Copy everything we’ve done so far today (your entire hi-pass filter section, [toggle] to [throw~ filter2]) and paste it into your patch twice. Now we just need to do some minor updates. Relabel the middle stage [toggle] “Band Pass” and the third stage [toggle] “Low Pass”. We’re doing this now so that its easier to keep track of where we are, because we’re actually going to move to the “High Pass” stage first.
All we have to do here is a lot of renaming.
- Open the [toggle]’s properties and change “$0-filter1” to “$0-filter3”
- Open the horizontal slider’s properties and change “$0-filter1Freq” to “$0-filter3Freq”
- Change the slider’s “left” and right “values” to “20000” and “5000” respectively
- Open the number atom’s properties and change “$0-filter1Freq” to “$0-filter3Freq”
- Change the equation in [expr~ ($v1+1)*0.5] to “($v1-1)*0.5″…on this one, we want it to only subtract.
- Change [r $0-lfo1] to [r $0-lfo3]
- Change [hip~] to [lop~]
- Change [catch~ filter1] to [catch~ filter3]
- Change [r $0-filter1] to [r $0-filter3]
- Change [throw~ filter2] to [throw~ output]
Your hi-pass filter is done! Let’s turn back to the band-pass filter now. We’re going to start out with many of the same changes, but we don’t actually need to make all of them:
- Open the [toggle]’s properties and change “$0-filter1” to “$0-filter2”
- Open the horizontal slider’s properties and change “$0-filter1Freq” to “$0-filter2Freq”
- Change the slider’s “left” and “right values to “1000” and “10000” respectively
- Open the number atom’s properties and change “$0-filter1Freq” to “$0-filter2Freq”
- Delete the [expr~ ($v1+1)*0.5] atom…we don’t need it here
- Change [r $0-lfo1] to [r $0-lfo2]
- Delete the [loadbang], [bang], [metro 1], and [snapshot~]…we won’t need these either
- Change [catch~ filter1] to [catch~ filter2]
- Change [r $0-filter1] to [r $0-filter2]
- Change [throw~ filter2] to [throw~ filter3]
Your “Band Pass” section should now look like this.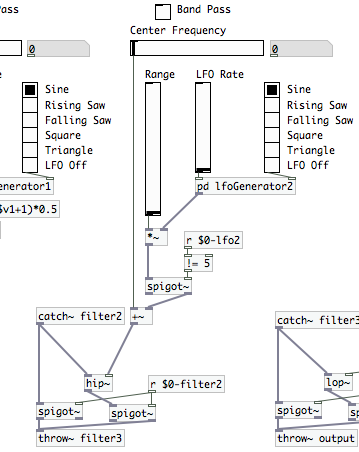 PD actually has a band-pass function that accepts a variable signal built right into it…[vcf~] (“voltage controlled filter”). We’re going to use that here instead of the basic [bp~] (band-pass) filter atom. Were we to use [bp~], we’d have to stick with the previously used [metro 1] -> [snapshot~] method. Click on [hip~] and change it to [vcf~]. [catch~ filter2] should maintain its connection at the hot inlet. The middle inlet, which is also a signal inlet, can take our center frequency signal. Connect the outlet of [+~] directly to this inlet. [hip~] and [lop~] are fixed Q filters; [vcf~] is not. The other cold inlet…the white, data, inlet…accepts a value for Q. We’ll place a new horizontal slider in the patch, and label it “Filter Q”. Open the slider’s properties window. Set its range from 0 to 5 (or set the “right” value differently if you like…it’s up to you), and set the “send-symbol” to $0-bpQ”. Create [r $0-bpQ] and connect it to the right most inlet of [vcf~]. Now our band-pass filter is done as well!
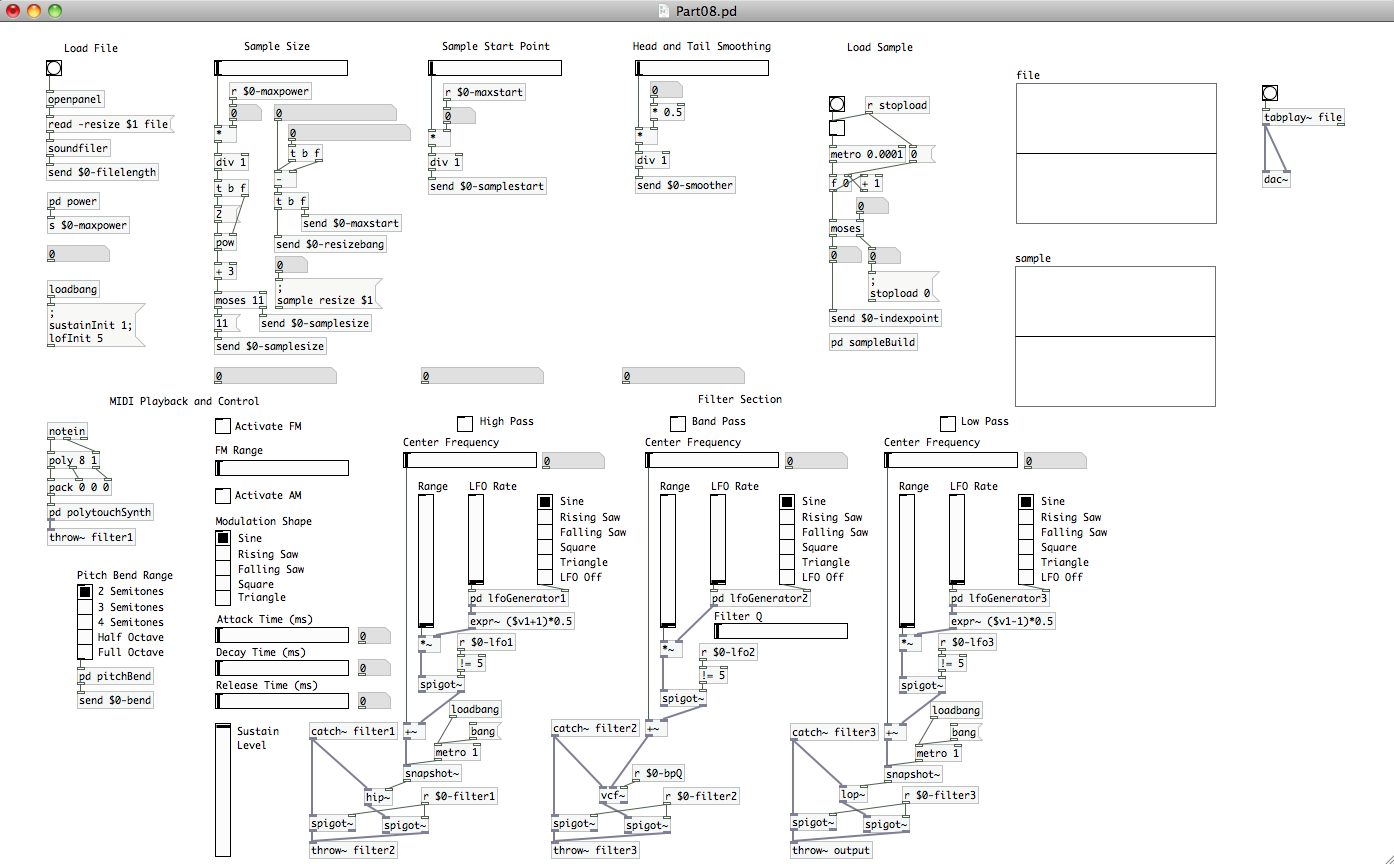 The only thing we have left to do is get the audio back out of the computer again. At the bottom of the “Low Pass” stage, we changed the [throw~] argument to “output”. We’re setting ourselves up for the next, and final article, with that. For now, create [catch~ output], and connect a new [dac~] atom to it. If you want a final comparison reference, use the image at the head of this article.
Stick a fork in it…we’re done for the day! When we finish up the project for good next time, we’ll be adding an anti-aliasing filter and the ability to record sounds directly to the hard drive from this patch. In the meantime, play around and have some fun with your fully functional synth patch!
You don’t look so new to the language…. nice to see PD articles here.
I’m a fast learner. ;) It helps that this isn’t the first “programming language” that I’ve worked in. There are definitely places for improvement/increased efficiency within the code of these tutorials though. Some of those points are intentional…as it allowed me to introduce more methods and atoms…but there are just as many that are due to my “upper-level-novice” experience. Glad you’re enjoying them.
Hi, again your tutorials are relly awesome, thanks a lot !!
I would like to ask, if you can also serve the patches for each tut. I know the idea is to go through all the tutorials and fix errors yourself, but last time I got stucked and instead of 2 hours debugging, I would have liked to use a working patch and continue with the next tutorial …
Cheers,
Oliver
I plan to put up the finished patches only, Oliver. There will be a download link in the last article. You can at least use that to compare against your patches if you’re having issues.
Hi there, just trying to follow this but where it says
“Open the
[+ Toggle Item]
‘s properties and change “$0-filter1″ to “$0-filter2″”
it doesn’t actually open anything up. Turned my adblocker off and nothing came of it. Anything you can think of?
oops, I’m being really thick, ignore that lol