Guest Contribution from Steven Smith
Introduction
In some ways it seems quite strange to find myself authoring a post on synthesis that has as its main topic: “Not everyone needs to be a synthesist”. But from another angle of practicality, it makes a great deal of sense. Many of us already have found ourselves naturally diving into certain areas of synthesis from within the field and somewhat skating around others. So… If you are not a synthesis geek, this article is for you.
‘Why would it be helpful to explore this area?’ you may be wondering. Even though today’s virtual instruments commonly ship with hundreds or even thousands of presets, many users will still find themselves passing over sounds that are not quite right. Yet with some fundamental knowledge and strategies I feel most non-synthesist could quickly address some of these sound’s shortcomings and reshape them close enough to quickly put them in service.
This is precisely my goal. I hope to address some fundamental strategies and principles relating to synthesis and synthesizers in order to facilitate what I like to think of as quick fixes. Even though these strategies will not work 100% of the time, you should find them coming to the rescue quite often.
From the onset it will be my intention to populate this article with images from multiple synths. This is a small attempt to expose you to as many different views as possible. Given that each synth designer has its own GUI strategies (in addition to its own sound design strategies), I hope this will further help the usefulness of the material presented.
There is also a body of knowledge that we must have to enable us to find sounds, change them, and then Save these changes. Let’s jump in…
To Manual or Not To Manual
This isn’t even really the proper question. The better question commonly is: “When should I use the Manual…” I know many of us resist opening a manual at all costs (even if it is virtual). But there are times when it really is the best place for some answers you will need. Additionally, with pdf manuals the ability to search for terms is a real asset that can often reap quick results.
Here is a quick list of items you should consider as proper motivation to cross that barrier:
-
Learning about the synth’s Browser
-
Quick Start manuals
-
Library specific documentation
-
Learning how to bypass built in effects
-
Learning how to disable an Arpeggiator
-
Learning how to access the different views
To be able to access some of the controls we will need to tweak, in some synthesizers you will need to navigate through various views or panels. Often this can be quite straightforward and only require a minimum of exploration on your own. Unfortunately you may encounter a few that will require you to pull out the manual and search for specific terms (some of which will be included below).
The Browser
Almost all virtual instruments today have built in patch browsers. This is one feature you should spend the time to learn. There are several tasks related to the Browser. Let discuss three main tasks.
1. Finding The Sound
Browsers continue to evolve more and more as our computer OS’s browsers evolve. Here are some key features to look for in a synth’s Browser:
-
Does it have a search field?
-
Does it use category based filter buttons?
-
Can you search by sound type: ‘piano’, ‘guitar’, ‘mallet’, …
-
Can you search by descriptive terms: ’sweep’, ‘rise’, ‘warm’, ‘edgy’, …
-
Can you mark favorites or rate sounds?
-
Can you add your own tags?
-
Can you assign colors?
As I suggested earlier… This is the one place you really should pull out the synth’s manual. Time spent here is usually well invested. One example is Native Instrument’s sampler, Kontakt. Its ‘Quick Load’ system can improve workflow dramatically and once configured it will continue to serve without any further time investments. I strongly recommend learning at least the fundamentals of the Browser’s functionality.
2. Decoding Preset Names
Naming synth sounds is a continuing challenge that prompts sound designers to both reach for as many conventions as possible and be inventive and creative in new ways. For a newbie this can be challenging. Many of the naming conventions have roots in Pop Music’s keyboards of the past (as far back as the early 1980’s) and their naming conventions.
Unfortunately, if I were to try to cover this topic here, we would exceed a reasonable length very quickly. I will simply offer you this tip: Run an internet search for: “synth sound naming conventions”. This should get you up to a basic speed in this area.
3. Saving Modified Sounds
Soon we will be into the body of this article and look at sound troubleshooting and modification techniques. However, if you can’t save these modified sounds, this knowledge will often lose its ability to really help more than hinder.
~~ Before altering sounds, you must learn how to save a modified sound. ~~
Fortunately there is good news here! It has been my experience that about 95% of the time you can discover this technique on your own by exploring the synth’s interface in the top header section.
If not, again, this is one of those situations where you will have to resort to reading the manual.
Exploring The Sounds
Don’t be too quick to judge when checking out sounds. You need to set up some patterns of exploration. The key term here is having a pattern. If you develop your own repeatable procedure to cover the following strategies, you will soon find you are moving very quickly through this process and obtaining more valid results.
-
Play across the range of pitches (low notes, middle notes, and high notes)
-
Play with different strengths / velocities (hit the key softly, medium, strong)
-
Move the Modulation Wheel while holding down a key
-
Play short notes and then long notes (some sounds are deliberately designed to evolve slowly)
-
Play more than one note at a time (monophonic / polyphonic)
-
Play legato phrases (where notes connect with one another) and then staccato (where notes are shorter with spaces between each other)
Quick Modifications
Finally we have reached the heart of the matter. Let’s look at several fundamentals that can be very helpful when a sound is close but there is just this one thing that prevents it from being usable in a specific context.
1. Too Slow -or- Too Fast
One of the most common edits I need to make to a sound involves how it evolves over time. Does its sound begin too slowly (or too quickly) and/or… Does its sound end too slowly (or too quickly). This is controlled by a component known as the Envelope Generator (commonly abbreviated E.G. or Env Gen). The details of how the Envelope Generator work can get quite sticky but the controls you want to grab are usually straight forward.
Envelope Generator:
Most EG’s have at least four controls labelled: A, D, S, and R and they adjust the following parameters respectively: Attack, Decay, Sustain, and Release.
The Attack control is essentially an adjustment for the amount of time it takes for a sound to begin.
The sound will begin as soon as a ‘Turn this note on” message is received.
-
Reducing this means the start time will be quicker.
-
Increasing this means the start time will be slower.
The Release control is essentially an adjustment for the amount of time it takes for a sound to fade away.
The sound will start this part of the process as soon as a ‘Turn this note off” message is received.
-
Reducing this means the fade time will be quicker.
-
Increasing this means the fade time will be slower.
As you move forward with this technique, it is very important to keep in mind what triggers the Attack and what triggers the Release components of the sound shaping function of an Envelope Generator!
(Note On / Note Off)
Additionally, in Quick Mod #3, we will discuss the impact of Effects on a sound which often will create another issue with sounds lingering on too long after the trigger ended.
Now let’s take a look at some examples where we change the Attack time. I’ll start with Native Instruments’ Absynth:
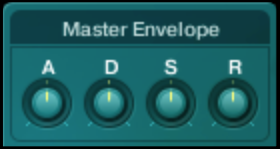
Absynth:
This is a great first example. This E.G. only has the four primary controls presented as virtual knobs. We can usually solve most time related problems by adjusting the A (Attack) and/or R (Release) controls. Here is a recording of a sound in its original form and then three other variations with a screen shot beside them to show how the Attack control was set for each:
ABSYNTH #1a: Here is the sound in its original form (before the Attack setting was altered):
Focus in on the amount of time it takes for this original to begin.
ABSYNTH #1b: Here is the sound with its Attack setting significantly decreased:
Notice it takes this version a bit less time to begin.
ABSYNTH #1c: Here is the sound with its Attack setting dramatically decreased:
This one begins very rapidly.
ABSYNTH #1d: Here is the sound with its Attack setting significantly increased:
Now that we have increased the Attack time, it takes longer to begin.
ABSYNTH #2a: Here is the sound in its original form (before the Release setting was altered):
 Focus in on the amount of time it takes for this original to fade out.
ABSYNTH #2b: Here is the sound with its Release setting significantly decreased:
 Notice it takes this version a good bit less time to fade out.
ABSYNTH #2c: Here is the sound with its Release setting dramatically decreased:
Notice how this sound fades out almost immediately now!
ABSYNTH #2d: Here is the sound with its Release setting dramatically increased:
So now we have an initial understanding of how the Attack and Release times work, let’s add in one more important detail. Most synthesizer have at least two Envelope Generators. Commonly (but not always), one of these is preassigned to control the output of the amplifier (and thus shape the overall volume). Often the second E.G. is preassigned to control the Cutoff Frequency of the filter. The one you will want to target is the one assigned to the Amplifier. Let’s look at a few more images to see examples of this.
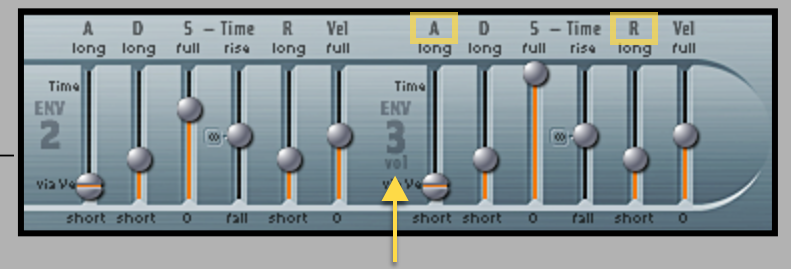
In this example we see the two main E.G.’s from Logic Pro’s ES2 synthesizer. ‘Env 2’ is essentially freely assignable to control whatever we may choose. However, if you look closely at ‘Env 3’, just below its name we see ‘vol’ (for volume). This indicates that this E.G. is permanently linked to the synth’s amplifier section and again, it is the one we would want to adjust to control the shape of the sound’s overall volume contour.
Also notice that we see these two E.G.’s have some extra controls. Almost all the time you can ignore these and still focus on just the Attack and Release controls.
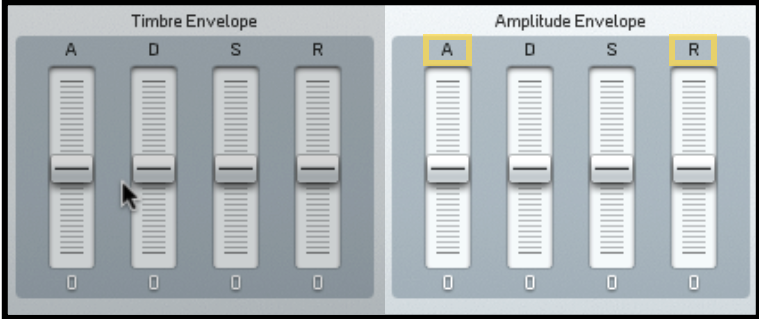
In this third example we see the two main E.G.’s from Native Instrument’s FM8 synthesizer. The first E.G. (on the left) is labelled ‘Timbre”. This indicates that this E.G. is permanently linked to the synth’s tonal section.
The second E.G. (on the right) is labelled ‘Amplitude’ – and again, the one to adjust.
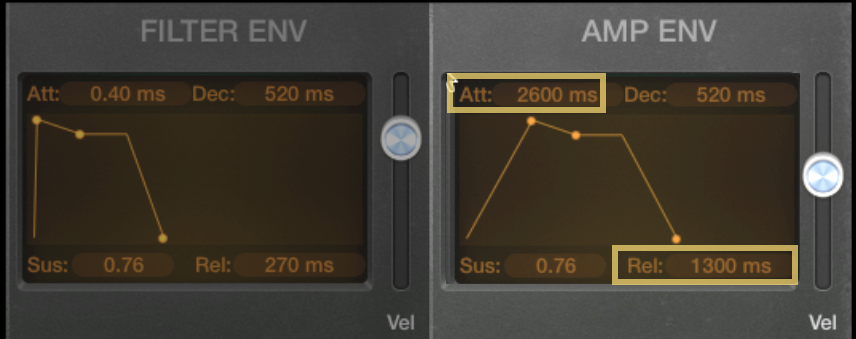
In this fourth example we see the two main E.G.’s from Logic Pro’s ‘Retro Synth’ synthesizer. The first E.G. (on the left) is labelled ‘Filter (tonal section). The second E.G. (on the right) is labelled ‘Amp’ (volume).
This example is good in two ways:
- The values here are primarily changed numerically. We see the four values placed around the display section that contains an embedded image that reflects the current values visually. The first line on the left of each E.G.’s shape represents its Attack time. The last line on the right of each E.G.’s shape represents its Release time. Compare the shape of the two Attack segments… Notice that the Filter’s is almost a straight upward line (representing a fast beginning) while the Amp’s has much more of a slope (representing a slower beginning).
- As is common with many E.G.’s that have a graphical display area, this is interactive so that you can actually adjust the values by dragging points and/or lines around.
Notice the Attack, Decay, Sustain, and Release values located around the E. G.’s display area.
One final point about Envelope Generators. Many of today’s synths offer some advanced and more sophisticated E.G.’s. One great thing that works in your favor is that in recent trends the virtual synth makers are adding what you can thing of as simple or easy layer of controls. Take a look at the image below of one of Absynth’s E.G.’s in a more complex view. This could be quite daunting to many. Yet, if you compare this image to the simplified Master Envelope controls from this very same synth we used as the first example (with only the A, D, S, and R knobs), you will see a great example of this type of ‘additional layer of simplified design’ coming to our aid.

2. One part of the Sound is Off Target
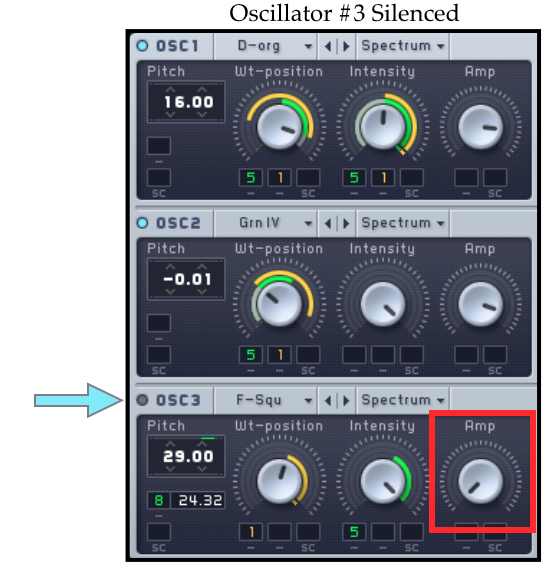
Synth sounds of today are commonly created by layering more than one sound together internally. Often I find a sound that is enticing except for…. something. Many times this ‘something’ can easily be silenced (or reduced in level to better suit the need at hand). The first way to silence it is commonly available in most synths: find its volume control. The second technique is available on many synths (but not as consistently by far): find an On/Off switch. In the following example, Native Instruments’ Massive synth has a traditional 3 Oscillator structure. Each of the three Oscillators contributes to the overall sound. By silencing them one at a time you can isolate which part of the sound each oscillator is contributing. For the examples created below, the offending part of the sound was being generated by Oscillator #3. In the image, the red rectangle outlines the volume control for Oscillator 3. The controls on the left show the amplifier’s volume has been turned all the way down.
Even though this would be enough to silence the sound, this example also illustrates the second technique. The light, blue arrow is pointing at Oscillator #3’s On/Off switch. Clicking on the light, blue circle next to its label [OSC3] toggles this component On/Off independently of the other synth elements.
Massive’s Three Oscillators combine to create more complex sounds
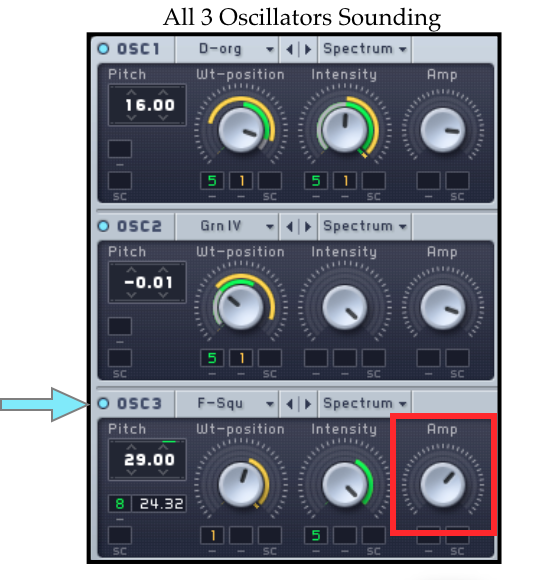 Massive sound with moving element:
Here is an image of Camel Audio’s Alchemy synth. Notice the 4 Oscillator structure used in this configuration. Similar to Massive, each oscillator has its own On/Off switch and independent volume control.
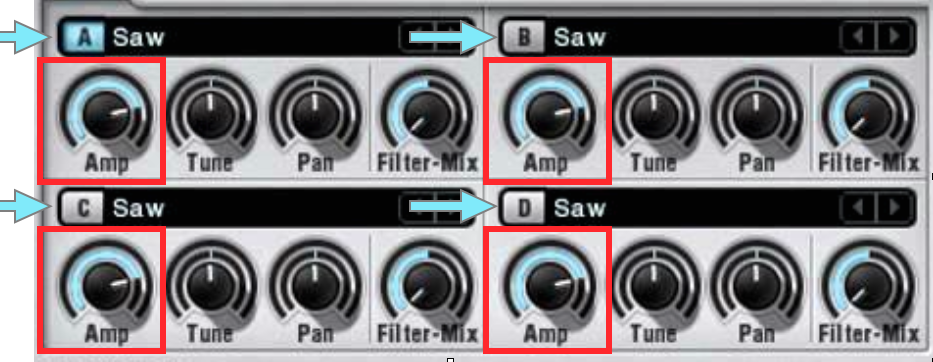
“Alchemy”
— Oscillators —
Some synths have a mixer section that is used to adjust the levels of the Oscillators. In the image below (of Native Instruments’ Monark), there is a mixer section located adjacent to the Oscillator section with independent level controls for each of the three Oscillators.
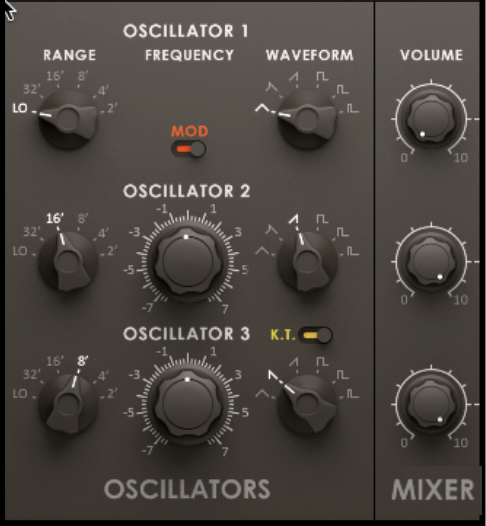
“Monark”
— Osc and Mixer section —
Here are another pair of examples where one component of a sound (from an Absynth patch) was silenced:
Absynth sound with ‘chirp’:
Absynth sound without ‘chirp’:
3. Too Much Effects
Sounds in synths are often designed to impress in stand-alone mode. Unfortunately, this ‘bigness’ can work against us when mixed in with other elements such as dialog and/or multiple instruments. One of the main troublemakers here can be the use of effects, especially Delays and Reverbs.
When troubleshooting this type of problem with Reverbs, we want to look for one of two types of controls:
-
On/Off switches and …
- Wet/Dry Mix controls
When troubleshooting this type of problem with Delays, we will add in a third control:
-
On/Off switches and …
-
Wet/Dry Mix controls
-
Feedback
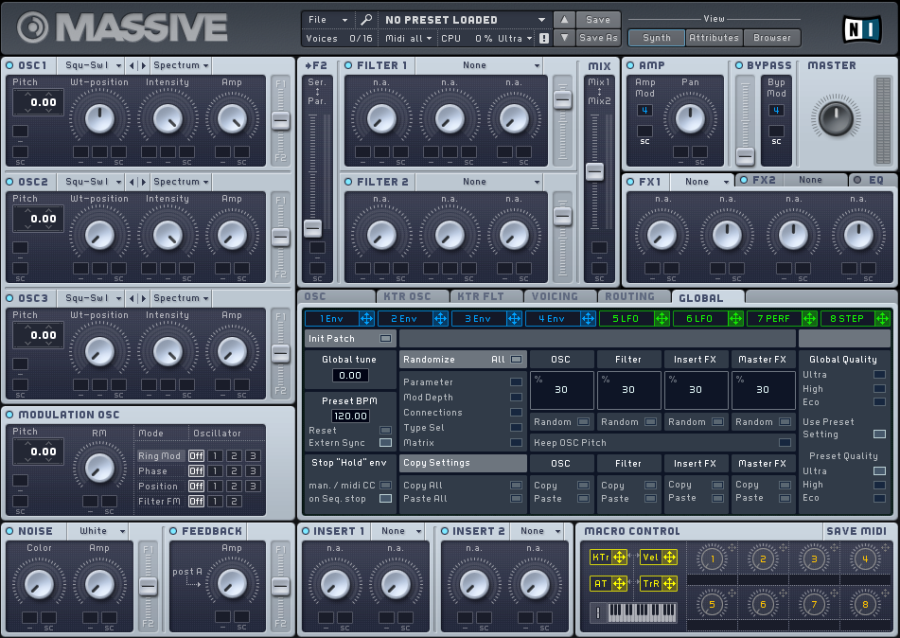
Below, within the image of the Master section of Native Instruments’ Massive, we see two (Master) Effects panels. Each has their own On/Off power switches as we also found on its Oscillators earlier. Notice that with the master Delay effects tab selected, we can easily access and change the Feedback knob to determine the number of times the Delayed sound is repeated and mixed in with the overall output of the synth. Additionally we can also see the Dry/Wet control. Sometimes it can be confusing to know whether to change the Feedback amount, Dry/Wet mix settings, or both. Here is an example:
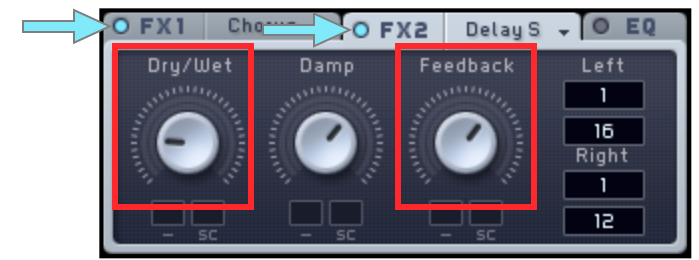
“Massive”
— Master Effects —
Massive 1a: Here is the original sound:
Massive 1b: Here is the sound with only the Dry/Wet mix changed (less Delay mixed in):
Massive 1c: Here is the sound with only the Feedback strength turned down (fewer repeats):
Massive 1d: Here is the sound with both adjusted but neither as drastically:
Out of context it could be hard to decide which of these adjustment would work best but the last variation would commonly be my first guess.
Some synths include an array of effects. This is great because they are often grouped together in an easily accessed section of their own. This image is from Native Instruments’ Kontour synth. Notice it has 5 separate effects devices. Each has their own On/Off switch and Mix control. Very nice!

“Kontour”
— Effects Section —
Listen to these three examples where the Reverb’s Mix control is successively adjusted Dry-er:
Kontour Reverb #1:
Kontour Reverb #2:
Kontour Reverb #3:
In the next image we see Lennar Digital’s Sylenth 1’s Effects page with a list of parameters down the left hand side with independent On/Off switches in the form of checkboxes. Currently the Reverb is being edited and its virtual Wet/Dry control in the lower right.
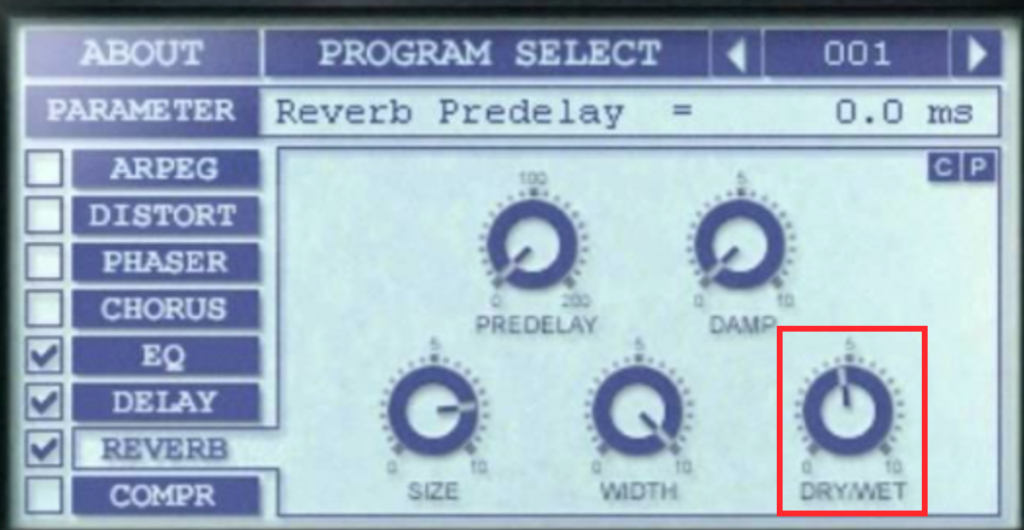
“Sylenth 1”
— Effects —
A little caveat here is to keep and eye out for Insert Effects. These effects are dedicated to processing only a specific part of the signal flow and at times it can be a bit harder to truly discern how they are routed and therefor also how they are altering the sound. Notice they are clearly identified as Insert FX here.
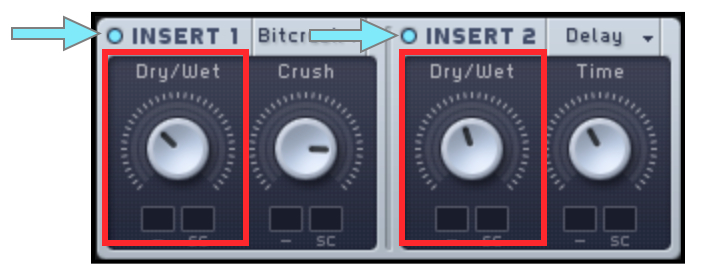
“Massive”
— Insert Effects —
4. Tonal Problems
When it comes to EQ, most of us are familiar with basic EQ use (decrease the lows, boost the mids, etc). This might make it seem as though the best choice would be to use an EQ device we are already familiar with to process the sound after its left the synth’s internal workings and not worry about getting inside the synth to fix this type of problem. In many cases this would be an okay choice. But again, when there is the use of FX, we may need to fix a problem before it hits the synth’s effects devices.
Fortunately, most internal EQ components found within synths are very straight forward. In this next section we’ll simply look at some imagery to get an idea of what to expect.
Here is a simple three band EQ component inside Logic Pro’s Sculpture modeling synthesizer:
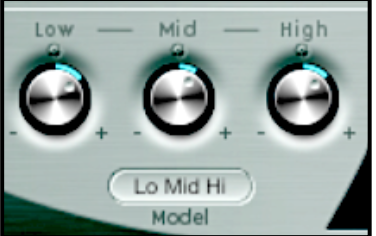
“Sculpture”
— EQ Section —
This contains a basic Gain control for the Lows, Mids, and Highs allowing us to boost or cut the volume of each band independently.
Returning to Massive’s Master Effects section we find a three band EQ:
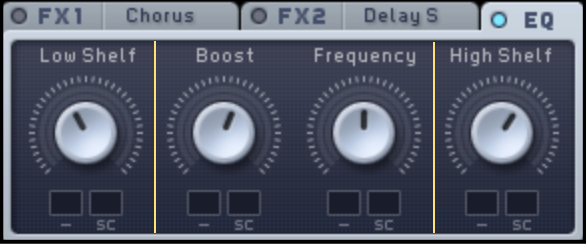
“Massive”
— Master Effects —
In this image I’ve added the two yellow lines to divide the EQ more clearly into its three bands.
The Low Shelf and High Shelf bands are each equipped with a single gain control for boosting or cutting the levels of those bands.
The center band is a sweepable peak/dip style band with a movable center frequency control in addition to its standard gain control.
It is surprising to see that within Logic’s Ultrabeat there is a quite powerful two band EQ section available for each of its 25 drum Voices.
Each band is switchable between shelf and peak modes.
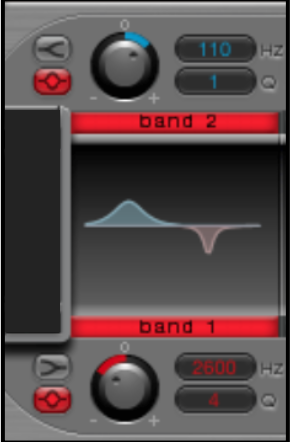
“Ultrabeat”
— EQ Section —
In addition to the standard gain controls, each band also contain separate frequency sweep (Hz) and bandwidth (Q) controls.
The red bars labelled ‘band 1’ and ‘band 2’ are actually bypass switches for each EQ band.
The display is color coded so the bumps have the same coloration as the controls within each band. (red for ‘band 1’ and blue for ‘band 2’)
In Closing…
Well if you’ve made it this far you’ve covered quite a distance. I would be remiss if in this final section there weren’t some word of caution. Some soft synth designs and interface components will be beyond the reach of such an article as this. (I myself am currently in an extended study of a new synth, Rounds from Native Instruments, which is full of learning challenges for any experienced synthesist). At that point you will have to choose a different strategy. Move on (choose another sound), add a different synth to your arsenal, or get a friend/freelance designer to help out.
And yet these tips about the Manual and Browser alone have served me well over the years. In regards to the actual sound shaping tips – Attack and Release, silencing offending elements, taming effects and tonal issues; maybe this little taste of the inner workings of synths will whet your appetite to dig further. But then, maybe not. Either way, thanks for the shared journey here and my best to you as you move forward.
Editor’s note: A special thank you to Steven Smith (performer, educator, synthesist, and more…) for this great write-up. He can be reached through email at: [email protected]


This is excellent for the non-synthesist.
When you got to the EQ, though, I was wondering why you didn’t mention filters. That’s not the most universal thing to teach, I suppose, because filters play less of a role in synths like FM8. The first thing I learned to do with a synth was to find and experiment with the filter. For some synths, like Massive and Monark that you feature, that’s the majority of the sound’s character right there.