Guest Contribution by Rodney Gates
Greetings!
Welcome, and thanks for checking out this (TL;DR) article on the creation of the virtual instrument sample library, GuitarMonics, designed for Native Instruments’ Kontakt software. It was a long road from concept to completion, and I thought it might be a good idea to discuss some of the processes and discoveries I learned along the way for those that may be interested in creating their own sample libraries, for commercial or personal use.
Having been a Sound Designer and Audio Director for video games for over a decade now, and always a huge fan of virtual instruments that load up in the computer and sound stunningly real, I felt the desire to branch out into this field and begin establishing a foothold of my own with my new company, SoundCues.
Working in games is a pretty even blend of creative and technical work. Like any art form, you learn over the years how to create cool new sounds that no one has heard before and master the techniques of integrating those sounds into the game’s soundscape using a wide variety of tools.
Creating a library and integrating it into sample software such as Kontakt has been a similar kind of journey, as I figured it might be.
The Concept
Two things inspired the idea for creating GuitarMonics. One was this Opening Titles piece by composer John Powell for the film, The Italian Job, featuring acoustic guitar harmonics in the lead role, playing the simple melody (towards the end of the preview here).
The other thing was witnessing this elegant harmonics technique from one of my favorite guitar virtuosos, Tommy Emmanuel. The concept of an all-harmonics sample library was very appealing to me.
I imagined what it might sound like on it’s own – those pure, bell-like tones so typically limited on a guitar fretboard – and just knew that it could sound pretty cool being played like a piano.
After taking a look around, I noticed there weren’t a lot of guitar libraries out there that featured harmonics as their primary focus, so I jumped into the planning stage.
Like any new endeavor, it started with a few questions. How should I capture all of the notes I would need for a library that could make guitar harmonics a playable instrument in its own right? Which actual instruments should I include? How was I going to record this? What should I call it?
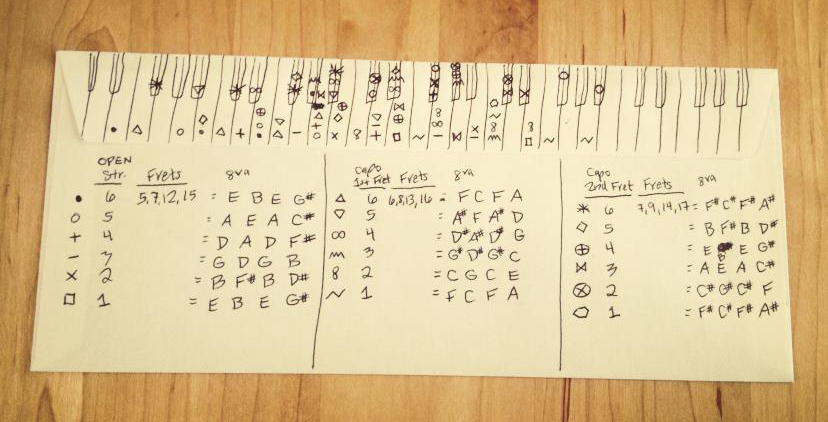
In an attempt to answer the first question, I sketched out a rough map of the fretboard on an envelope one night, using all of the strongest natural harmonics I knew were available on each string (typically frets 5, 7, and 12). Unlike Tommy Emmanuel’s method of playing them virtually anywhere using a two-handed technique, I knew that I wanted these notes to ring from open strings for the longest decay.
Intrigued by my little sample map, I did some test recording with my acoustic guitar and quickly mapped those into Kontakt as a proof of concept to see if this was going to work. Fortunately, despite the quick recording and noisy environment, I heard the potential.
I wanted to make the library as comprehensive as possible, so I decided to include electric, electric bass, and acoustic guitars. This would allow for some nice opportunities for using the virtual instruments individually but also allow the ability to blend them together to create all-new sounds that you couldn’t do live even if you were Tommy Emmanuel.
The bulk of the recording was going to be done at my home studio, through a quality DI (direct input) preamp, so I had total control over time and recording environment starting off without having to watch the clock. The acoustic guitar would need to be recorded in a studio; someplace more controlled than my home.
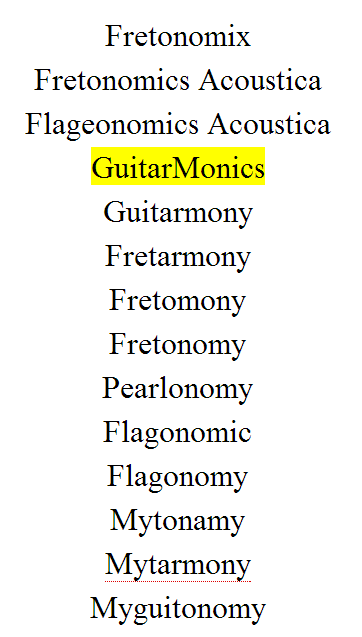
What should the library be called? This was actually a fun little brainstorming project that my wife and I played with one night. Being a huge fan of puns, I had already thought of the name “GuitarMonics,” simply merging“Guitar” and “Harmonics” together, but wanted to see if we could come up with anything else – here’s our list:
Recording
When it came time to start recording, I realized that I could get 80% of the way with 3 separate tuning passes per string, tuning up a half step each time.This was going to be a lot of takes with quite a bit of note overlap. However, being the first time I was ever doing this, it was important that I capture as much material as I could since I didn’t know how the flow of the notes was going to sound from one sample to the next on the keyboard. With the overlap, I knew I had additional note performance options to choose from when the assembly time came.
Nuendo 5.5.6 was my DAW of choice for the project (the current version at the time). I’ve been a Nuendo user since version 4 back in 2007 and absolutely love this platform. I grabbed my Ibanez electric guitar and began recording through a StudioProjects VTB1, a great-sounding mic preamp / DI, at 32-bit / 96kHz, by way of an RME Multiface audio interface (In my opinion, RME makes the best interface hardware out there).
On average, I recorded 10 or 12 takes of each note, letting each one decay naturally (some lasting 20 – 30 seconds), then chose the 5 best “round robin” selections from the group (round robin is just another term for variations). I intentionally changed my right hand’s pick position on the string for each take, slightly altering the timbre each time, for the best variety.
This was repeated for each pickup selection (bridge, neck and dual) as well as for each of the 3 string tunings and 3 dynamic layers. This took quite a while, but since was pretty easy / consistent work, I found myself watching a lot of Pensado’s Place during the DI recording. ;-)
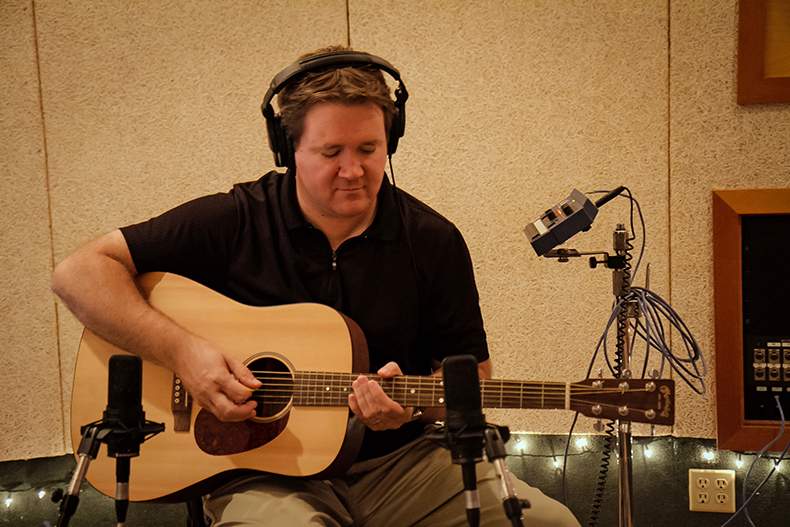
My Martin acoustic guitar was recorded in stereo at StudioWest by Grammy-nominated engineer, Kellogg Boynton IV. The recording chain to Pro Tools HD 10 at 32-bit float / 192kHz consisted of a spaced pair of Audio-Technica AT4050 microphones (cardioid pattern) by way of two 500-series Shadow Hills Mono GAMA preamps (using the Nickel transformer setting). One mic was positioned on the neck around the 12th fret while the other was near the bridge. We tracked each mic to a separate channel, as inevitably there would be slight phase issues as I moved around in the seat, or changed position after a break, etc.
Since I work in Nuendo, we simply named the takes accordingly and exported a slew of large .wav stems, though I kept the session for future access.
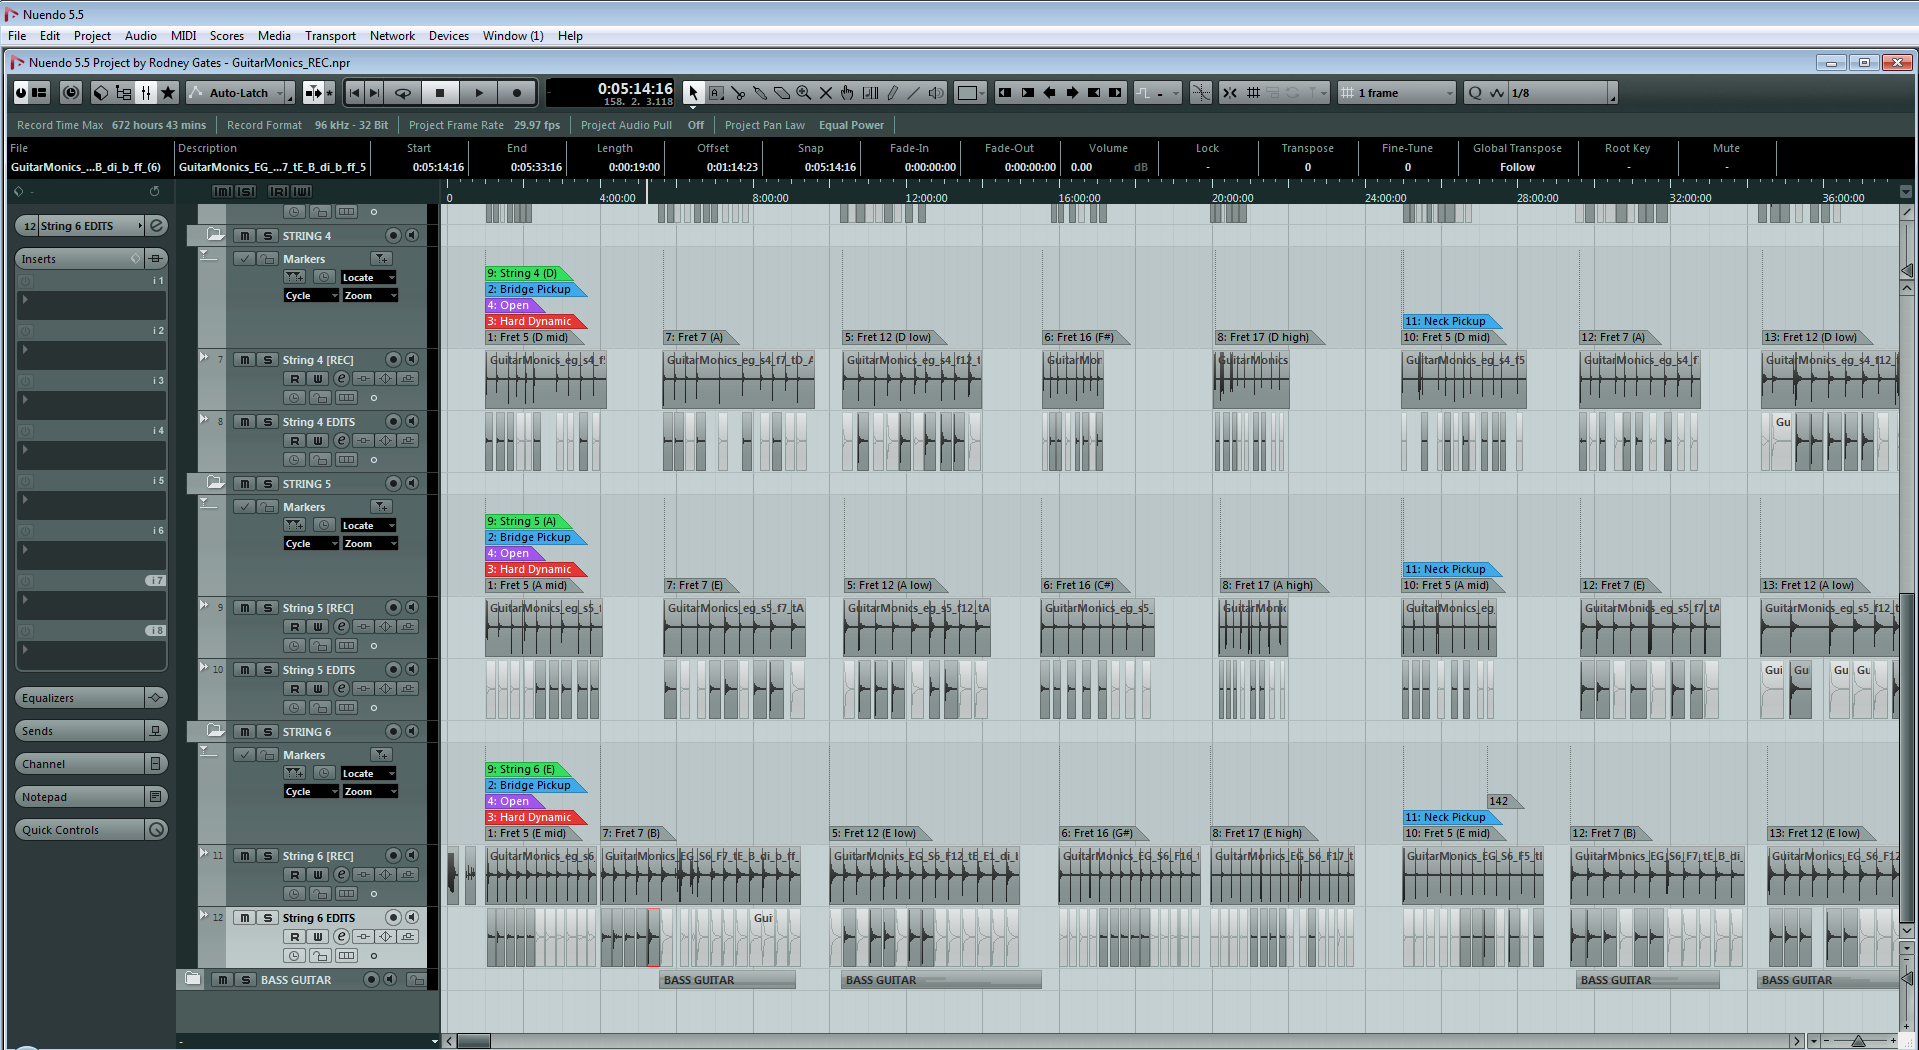
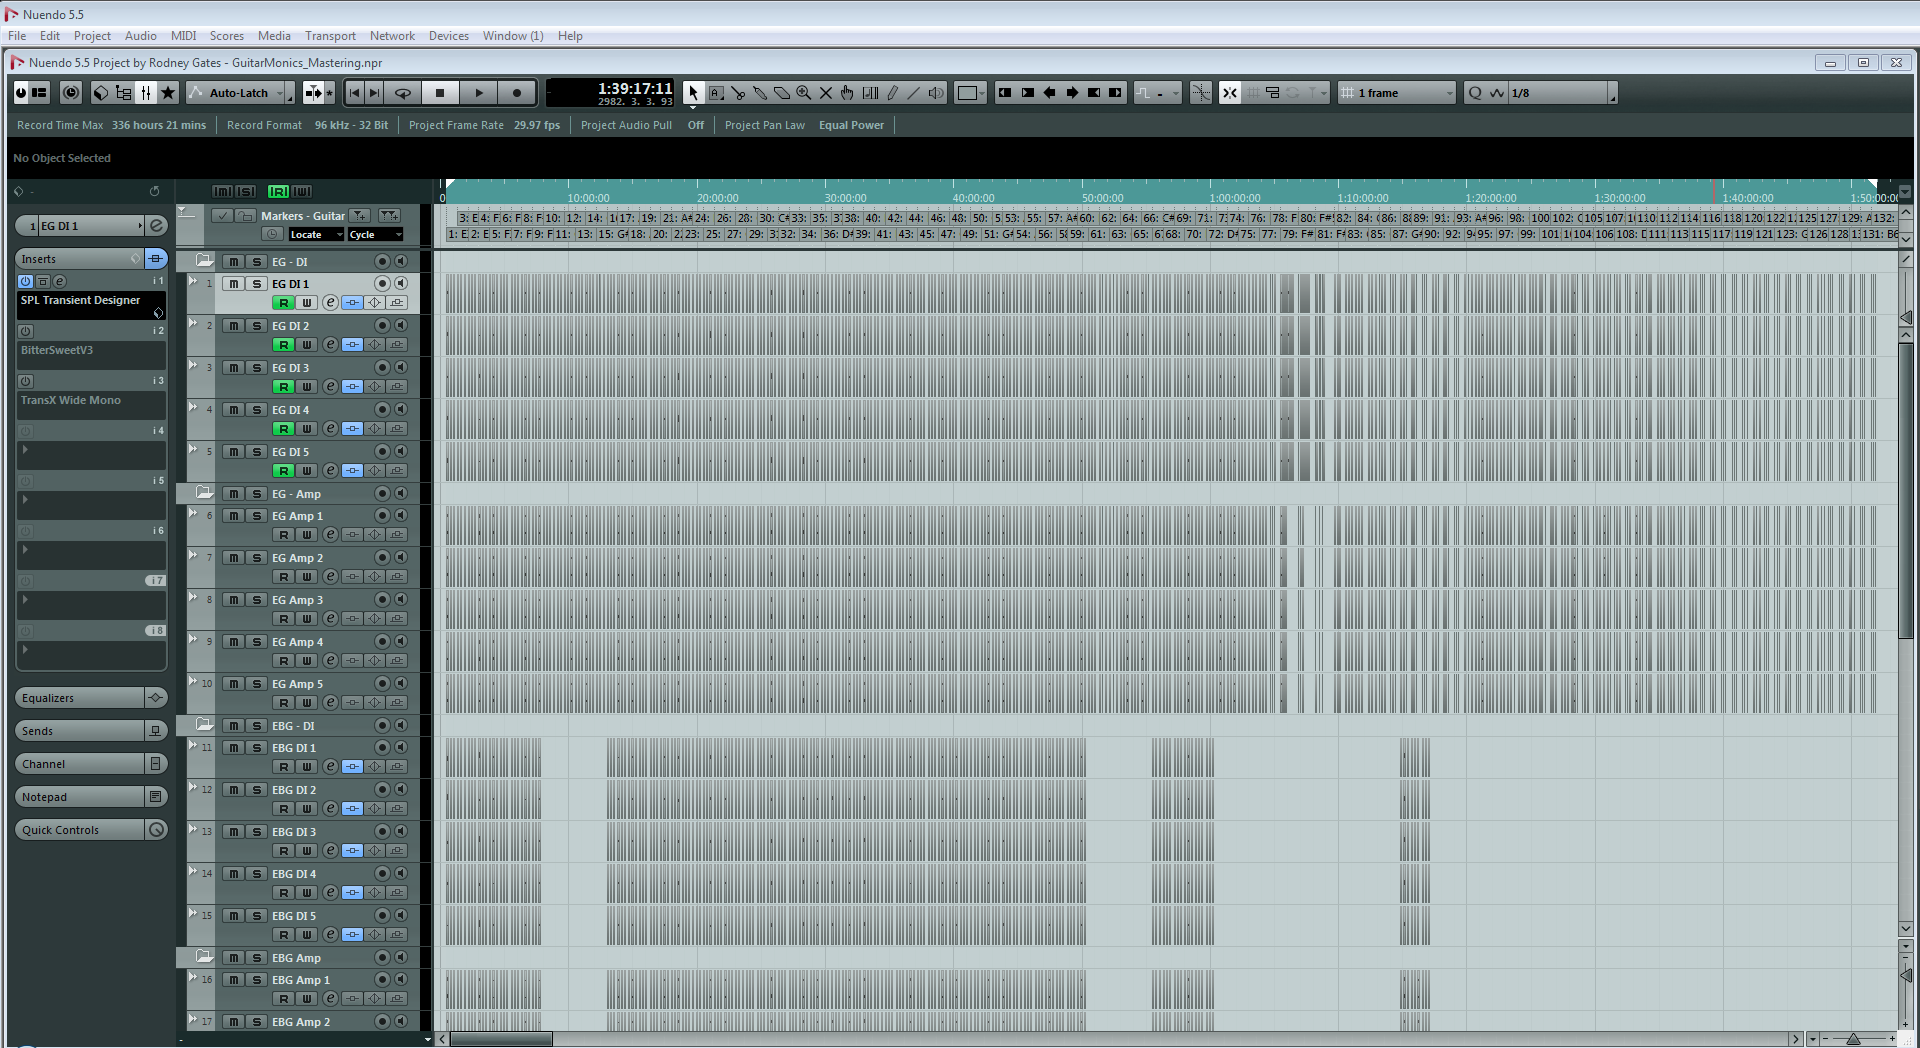
Below is a screenshot of the main recording session’s edit window in Nuendo (for the electric guitar). You can see the multiple markers depicting the strings, dynamic layer, frets and notes, with the favored selections chosen beneath them:
Here is a closeup of a single take and it’s 5 edits:

Here’s a closer look at the 3 string tuning passes – zoomed way out – showing 3 of the 6 strings:
Editing
Similar to organizing game audio assets, I knew I was going to need a robust naming convention for the samples since there were going to be a lot of them, and I would need to be able to identify them at a glance. Here’s what I ended up with:
GuitarMonics_eg_A#3_di_b_ff_02.wav
<library name>_<instrument type>_<note name>_<recording type>_<pickup selection>_<dynamic layer>_<round robin selection>
These are the variables I used across the 3 instruments:
- Instrument Type: eg (electric guitar), ebg (electric bass guitar), and ag (acoustic guitar)
- Recording Type: di (direct input), and amp (amplified)
- Pickup Selection: b (bridge), n (neck), and bn (dual)
- Dynamic Layer: ff (fortissimo), mf (mezzo forte), and pp (pianissimo)
Since it made sense with Kontakt to pool all of the samples of a given pickup selection into a single folder, the dynamic layer designations near the end of the file names helped organize the samples alphabetically from loudest to softest. This made things easier when incrementing to the next sample within the sampler.
Here is an example of one of the folders showing samples alphabetically below – same note, but different dynamic levels and round robin selections:
One thing to note: I kept the original round robin variation numbers as selected within Nuendo in case I ever needed to return to the session to re-select or verify something (which happened on occasion), which is why the numbering isn’t perfectly sequential.
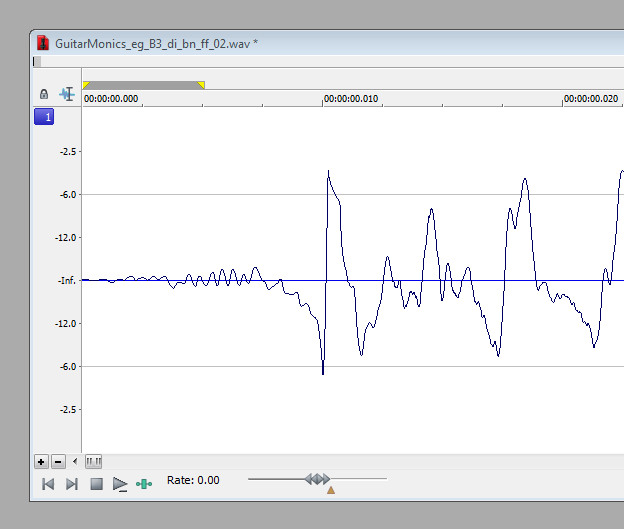
Once basic editing was completed, every sample needed a precise start time for consistent playback. I decided on a 10 millisecond head for each file, back from the initial transient, and fine-edited the samples in Sound Forge Pro 10 to this specification, creating a few custom zoom setting key commands which helped with this.
With Sound Forge’s scripting features, I might have been able to find or write a script to help with this, but to my knowledge, the program doesn’t have a transient detection feature. Another editor, David Cox, helped using Audacity as well (having an editor that can zoom in to the sample level is crucial).
Once fine editing was completed, I created a 5ms fade-in batch job in Sound Forge that I ran all of the samples through, to avoid any sudden waveform start anomalies due to this fine editing, in preparation for mastering:
I should also mention that I used Celemony Melodyne here to determine what octave some of these notes were in, so I knew what to name them and accurately map them to the correct note keys in Kontakt during assembly. If I wasn’t sure whether a particular A# was A#3 or A#4, I would drag the file into Melodyne and it would simply tell me. Pretty cool as it was easy to get a little lost in the thick of it.
Tuning
Tuning passes were made at different stages as the recording went on. It was interesting to see how the guitar strings behaved over the course of a long recording of 10 or 12 takes. Usually the successive notes would fall flat over time as the string settled after being retuned (I wasn’t using the locking nut), but on the higher strings, sometimes they would go sharp, which was unexpected!
At first I tried tuning the samples in Melodyne, but after seeing how that interface was clunky for working with multiple files quickly, I opted for doing it within Nuendo. I tried several tuner plug-ins before settling on Nuendo’s built-in tuner. It was simply the most accurate and consistent. Though it was more difficult to get a good read on the softest dynamic recordings (a problem for any tuner), it worked beautifully overall. Coupled with some custom key commands for pitch adjustment in Nuendo, it went pretty quickly (Nuendo is great in that it has so many great tools in its default installation. I often find that I don’t need to go to third party plug-ins for things like this).
Initially I was tuning the samples in the main recording session, after selecting the round robin takes to use. I quickly discovered that for denoising purposes, this was not the best time to do this, otherwise the individually-tuned notes altered the noise print, making it harder to use a freshly-captured noise print across similar notes within a given take. I learned this when the acoustic guitar files were delivered as long .wav stems, and it made more sense to make a broadband noise reduction pass first, then re-importing them into Nuendo for editing and tuning, which was a huge time saver.
Another tip on tuning, especially for the quieter samples: tuning them after noise reduction improves the tuner’s ability to interpret the notes better. I know that sounds like common sense, but it’s the little details that aren’t as obvious sometimes.
Later on during mastering, I would sometimes perform additional tuning when I would discover that one or more of the 5 edits were slightly sharp or flat from the others. I was able to hear this pretty quickly since I would re-record while monitoring all 5 channels simultaneously, and the offending file(s) stood out like a sore thumb. This offered one more measure of quality control for me, so I could ensure the samples were tuned as close to perfect as I could get them.
Noise Reduction
Remember when Ben Kenobi said there has never been a more wretched hive of scum and villainy than the spaceport in Mos Eisley? There has never been a better piece of software that I have ever worked with than iZotope RX. It is hands-down the best tool for audio repair and noise reduction, by a long shot. This tool is deep, while being pretty intuitive. It’s the kind of tool that rewards you for creatively thinking of ways to fix something; as you get better, it gets better! Here are some examples:
- Accidentally hit the vibrato bar while recording? Not a problem.
- Removing infrasonic air conditioning rumble that kicked on and off somewhere on the roof of the building, transmitting through the structure, the mic stands, and finally to the microphones regardless of using shock mounts in the recording booth? Not a problem.
- Are the 3rd and 6th upper harmonics of a note oscillating a little dissonantly, causing an impure overall tone for the note and could use some surgical repair to reinforce the sound as a whole? Not a problem (!).
I could easily go into an entire article just on this tool alone. I’ll try to keep it to the basics here, but welcome any questions in more detail outside the scope of this article.
Denoising, repairing, and (quite frankly) perfecting audio with RX was by far the lengthiest process in creating this sample library. Each instrument took about a month to complete (give or take a couple of weeks). I was probably way more anal than I needed to be, but I wanted to do it right. As it turns out, this is one of the first things people tell me when they play the library – that it sounds and feels so “pure” to them. :-)
Why is noise reduction so important? Surely recording electric instruments through a DI in a balanced DAW and an acoustic within a professional studio with Class A equipment would require no additional help…right?
Wrong.
Sample libraries are entirely different animals in regards to noise. The noise floor, while very low with today’s modern digital recording, is still there. You won’t hear it at all until it begins to stack up on itself when multiple notes are played, which is a pretty unique problem to sample libraries. Especially issues with the bottom end. Low end whumps and thumps are imperceivable at low levels, but turn things up a bit more for closer inspection and you’ll find little issues like this all across your sample libraries, to varying degrees. A lot of it seems to go unnoticed, probably as the result of editing on systems without a subwoofer or just using headphones, but nothing will eat up your headroom quicker than this. Not to mention the potential for muddying up the mix of your composition (and finding it difficult to determine why and correct it).
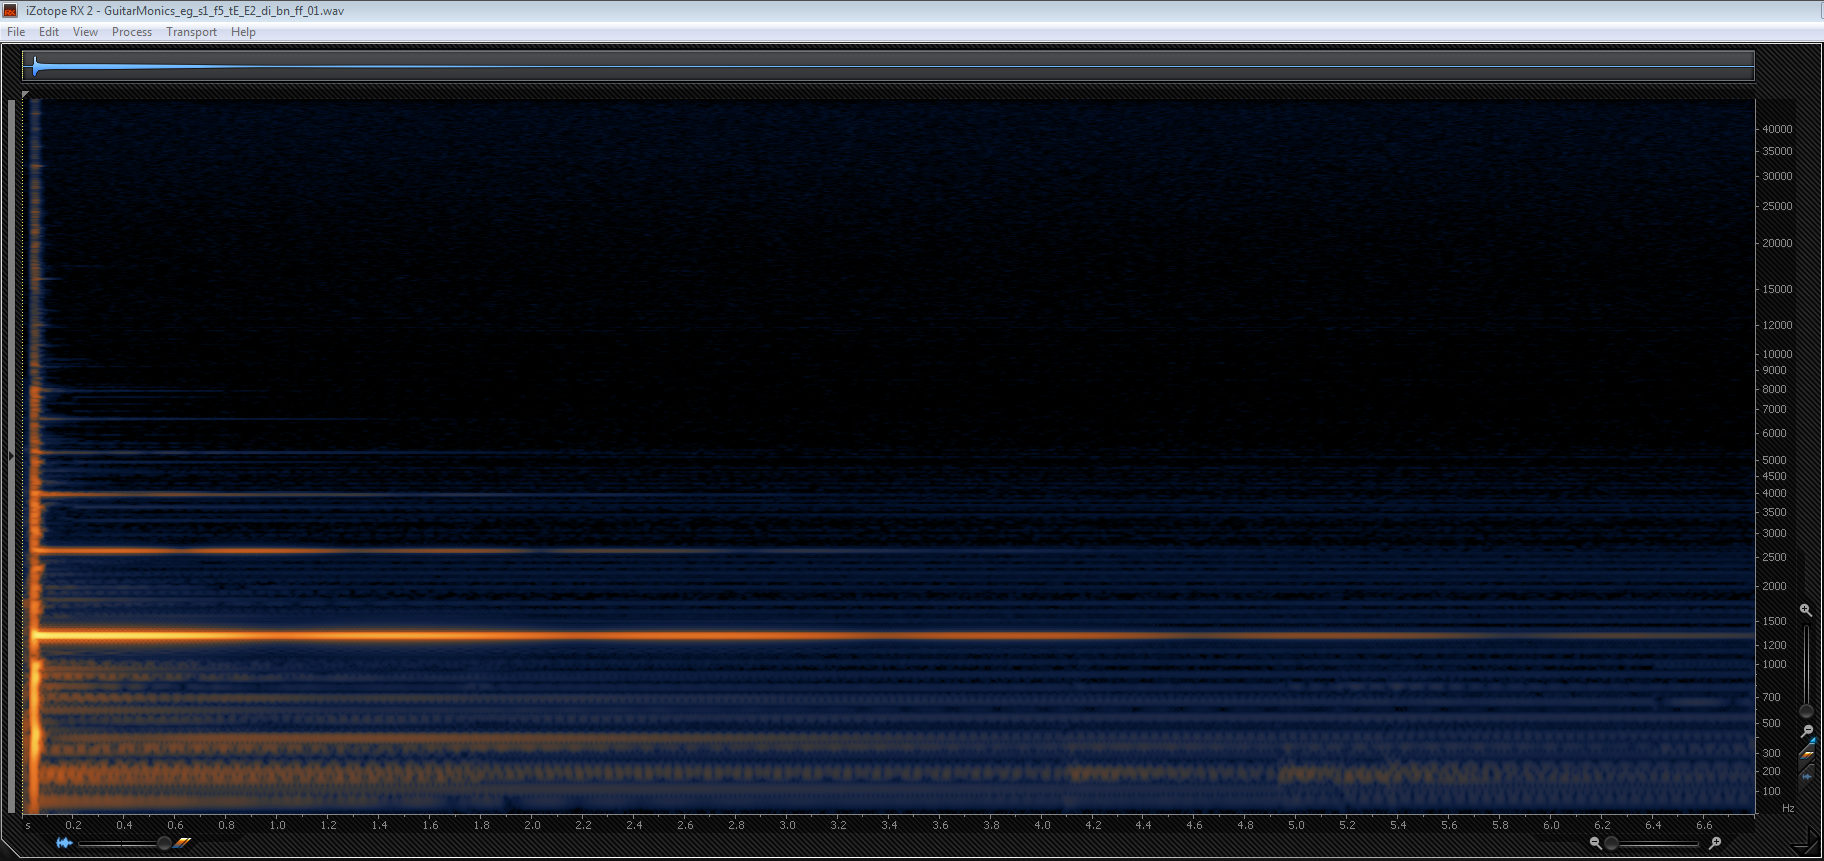
Here is a screenshot of a mono DI-recorded electric guitar sample from GuitarMonics in RX. Note the root pitch (brightest orange line) and it’s harmonics that build the sound upwards in frequency from there. Everything else that’s beneath the root pitch and between the harmonics in hazy blue / lighter orange? It’s all noise, of one kind or another:
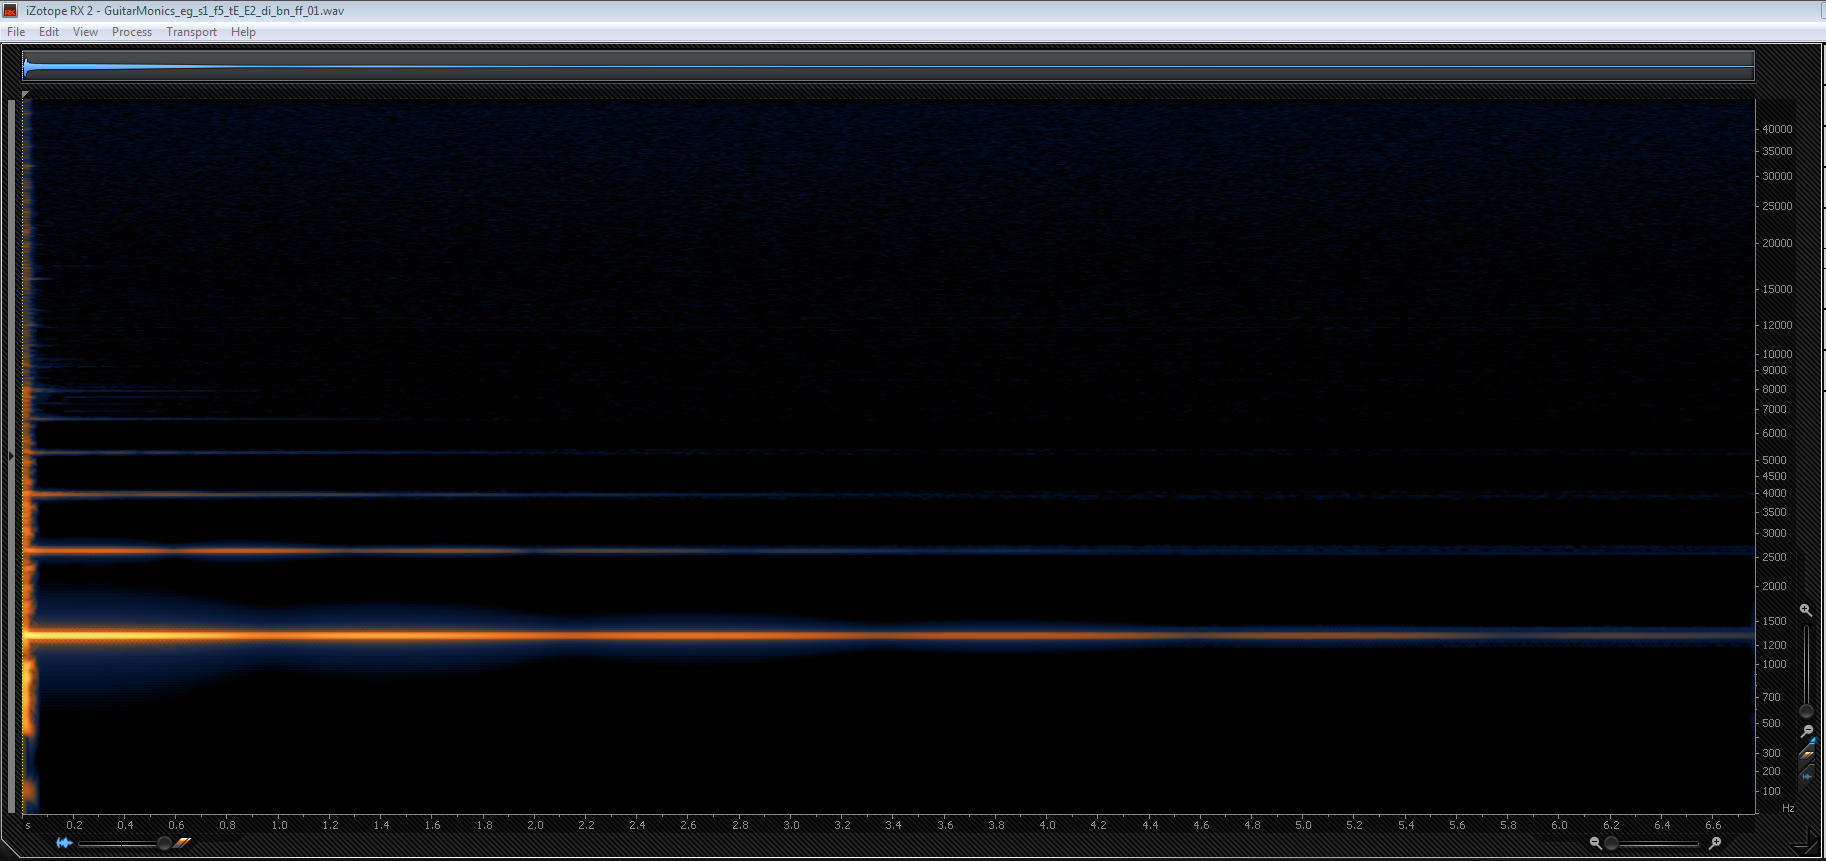
Here is the same sample after noise reduction. Note the preserved pick attack. All of the noise has been removed around and in between the harmonics, with absolutely imperceivable fidelity loss or artifacts:
When working in RX, checking for noise in all of the decay tails, I would often monitor all the way up at (digital) 0dB. On occasion, I would accidentally play the file back from the start, which was *such* a rude awakening. Monitoring this high easily uncovered any problems in the recordings. Things like unexpected room tone changes, ever-so-slight hand movements, accidental sounding of other open strings, mouth and throat tics; even stomach growls.
Many of the corrections I would make were similar and predictable across like notes from a given take, but not quite enough to be able to batch job the finer corrective steps. Every file had to be meticulously denoised and repaired by hand (and ear) in the end, despite a broadband noise reduction pass that I could perform on the entire file. The power of being able to denoise in between the root pitch and its harmonics without touching those parts of the sound was astounding, especially when you could play back just the noise without any of the note material present and then simply remove it for comparison. It was surprising how much noise from the metal elements of the electric guitar’s floating bridge would resonate with every note (and not in a good way).
When it came time to record the bass through the DI, I tried running the RX Denoise “Realtime” plug-in on an insert in Nuendo. Guess what? It magically removed all pickup hum without intruding on the instrument’s sound whatsoever. The Lakland bass I recorded was similar to a Fender Jazz with dual pickups and pots for dialing in the tone (instead of switches), and these pickups were not humbuckers, so certain pot positions that I recorded would introduce hum depending on how they were set. Recording with the Denoise plug-in in the chain added about 150ms of latency, but that latency didn’t matter since the recordings were wild anyway.
Of course, I still made another denoising pass after the recording and editing was finished, though the process went much more quickly than the previous instruments. It was interesting to examine the bass guitar files in RX. The live Denoise plug-in looked like it introduced a thin stream of noise, way up above our hearing range (30 – 40kHz), probably due to some dithering algorithm used under the hood. Even though no one would ever hear this noise, it was amusing to simply remove it from the files anyway. ;-)
Mastering
After all of the editing, noise reduction and tuning was complete, it was time to master the samples. Some developers will keep pretty close tabs on levels during the recording process (as I did) and set their playback volumes on a per-sample basis in Kontakt, but I wanted to get everything mastered to their predefined levels beforehand to make the instrument patch assembly go that much faster.
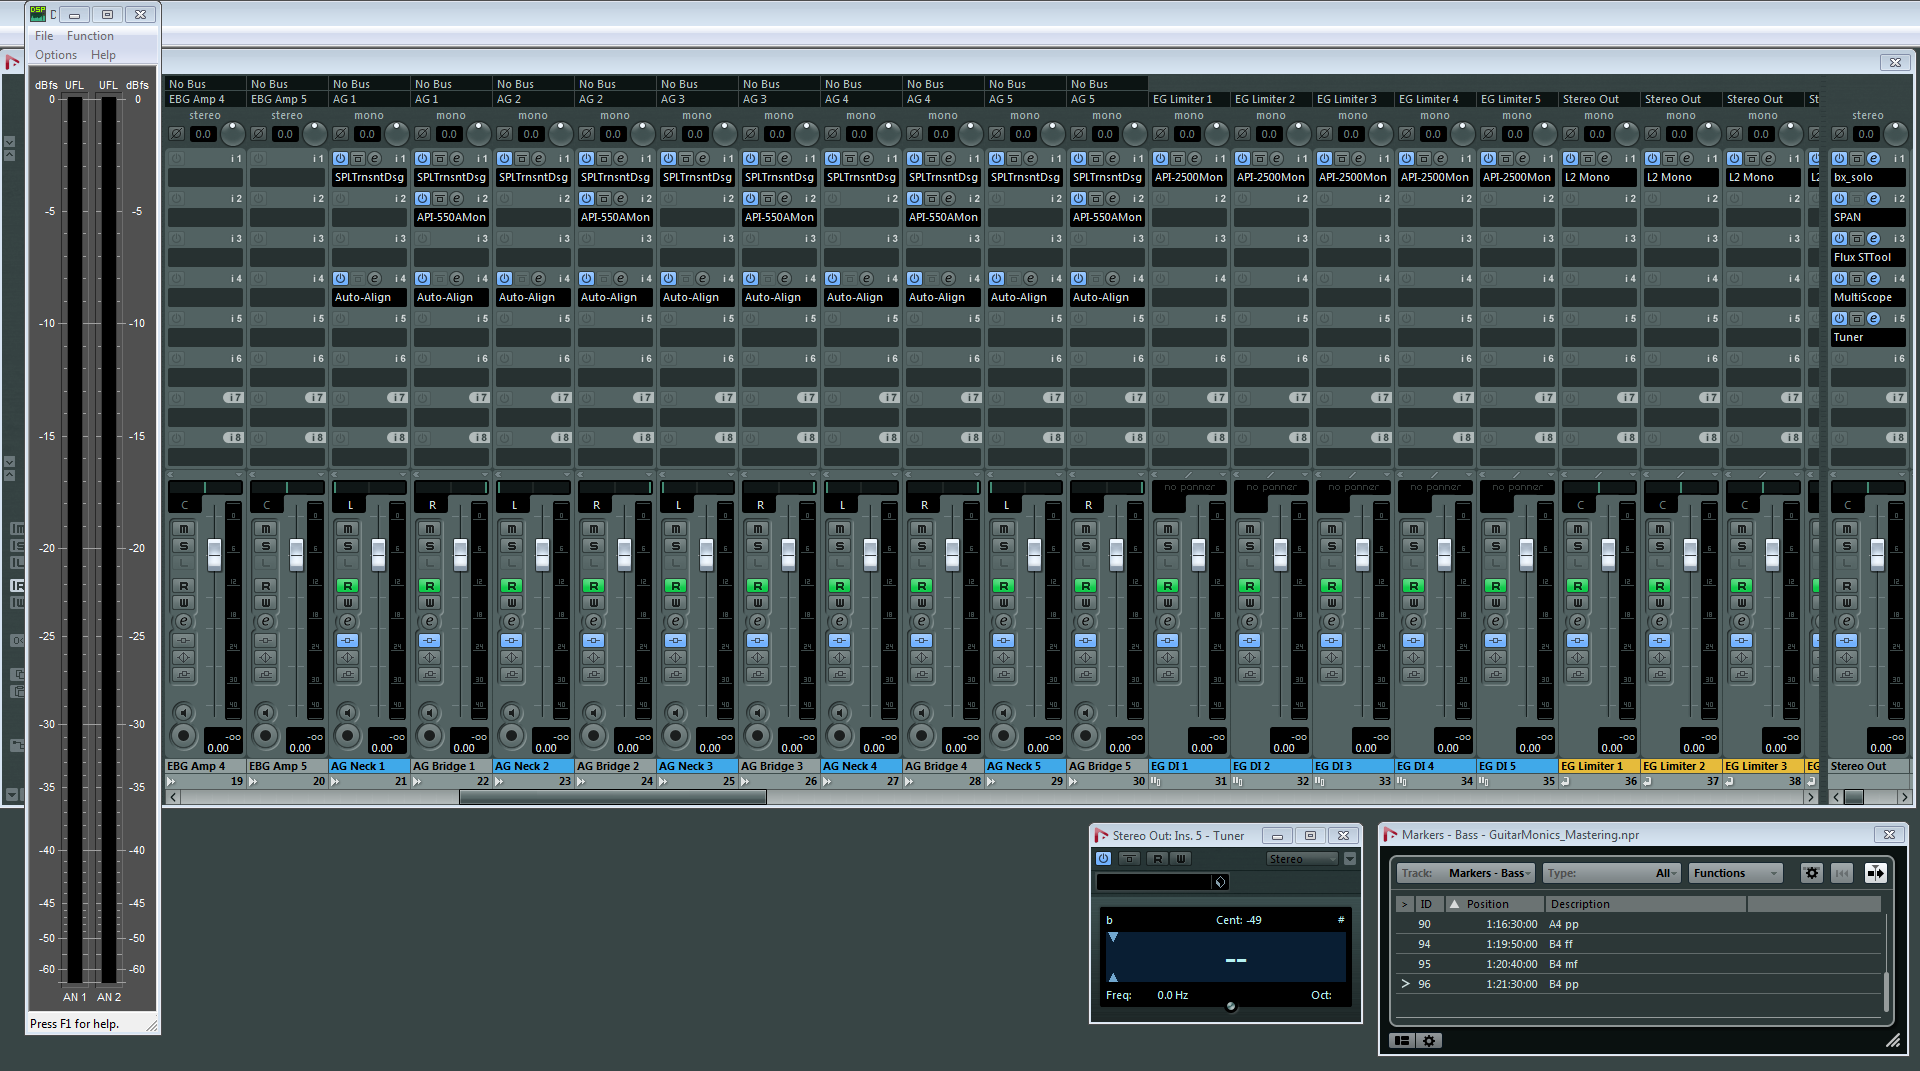
This session was less complex than the recording session, consisting of 5 mono channels of the original unmastered files (10 for stereo acoustic; I worked with the neck and bridge mics independently) routed to their individual auxes, then off to 5 print channels.
As I mentioned earlier, by re-recording to 5 channels simultaneously, I could ensure the tuning across the note selections was exact one last time. I didn’t want to find out in Kontakt that one or two of them were off; better to nail that here. Fortunately, there were only 3 or 4 instances where this happened, and I was able to quickly fix the offending notes.
The single, tall stereo meter you see on the left of the mixer screen below is from a standalone software program designed by RME for all of their audio interfaces called DIGICheck. It operates at the hardware level, and had one unique feature that I loved – RMS “Slow”. This setting calculated a smoother playback response over a longer time period, accurately matching the overall perceived volume that I was hearing, allowing me to get the levels exactly where I wanted them.
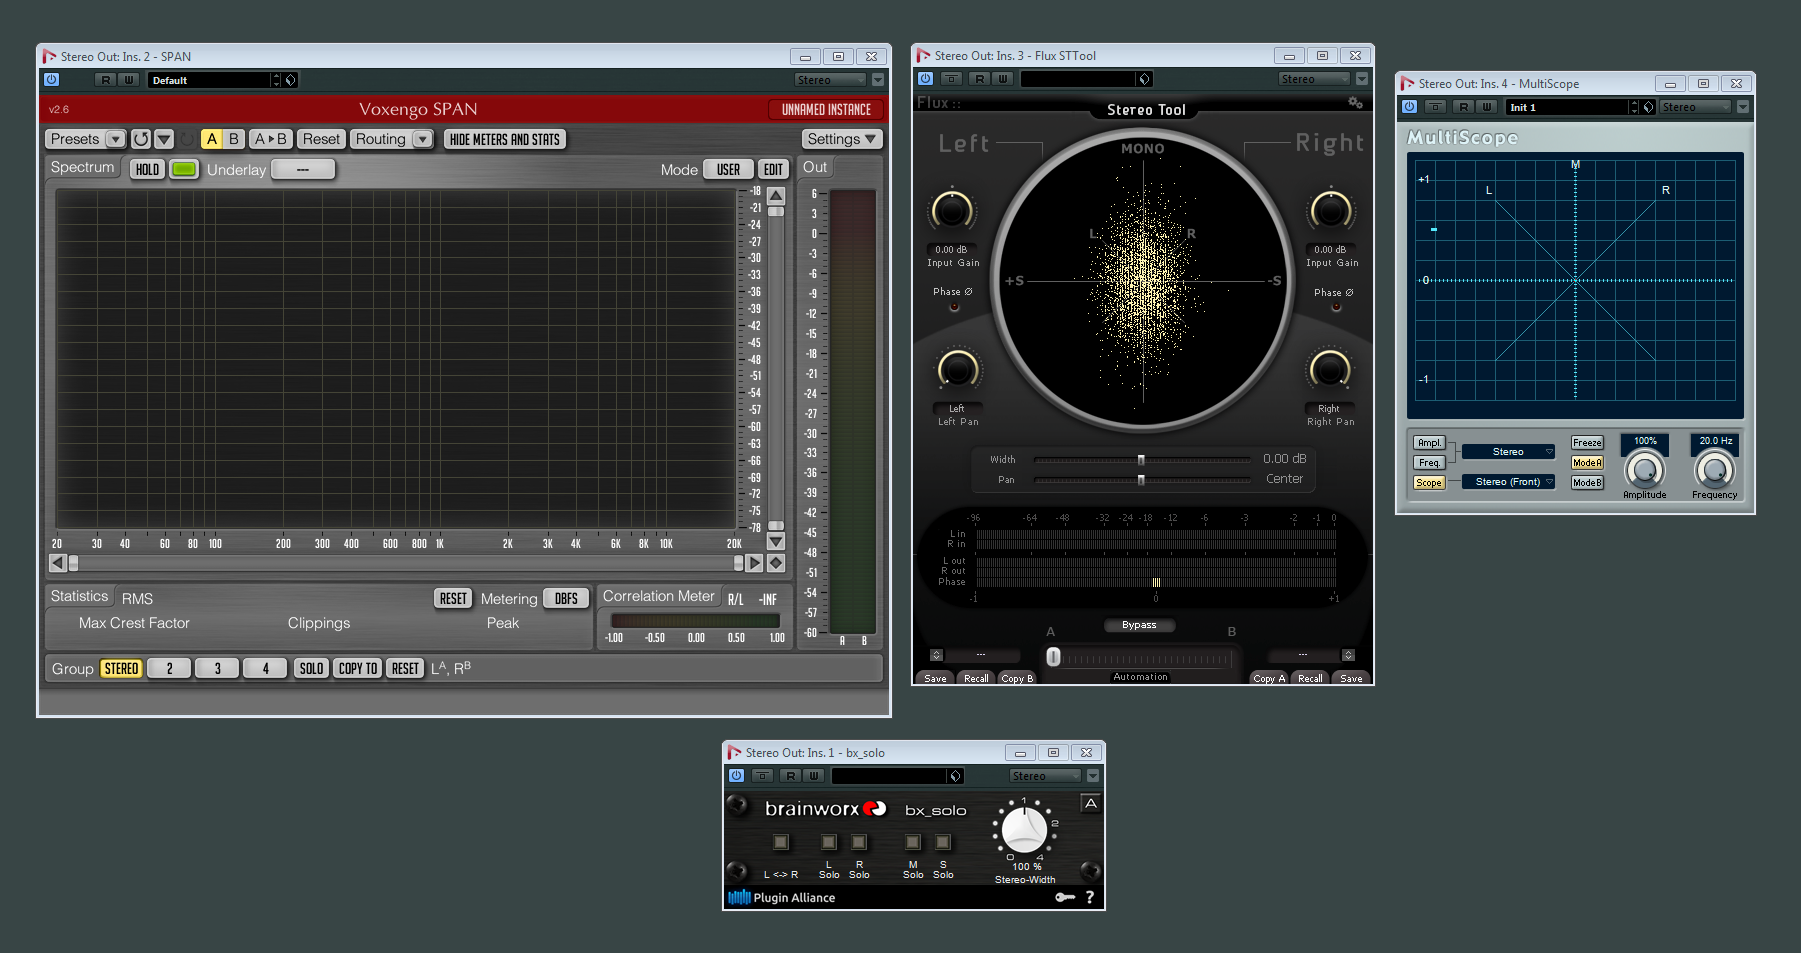
While monitoring, other plug-ins I used were Voxengo SPAN (spectrum analysis, peak / RMS metering, and phase correlation), the Flux Stereo Tool (a fantastic and highly-visible phase scope / correlation meter), and the Nuendo MultiScope (an additional phase tool, but used more as a backup to Flux). Since my surround monitor controller doesn’t have a mono sum button (to be remedied shortly), I used Plugin Alliance’s BX Solo plug-in for this:
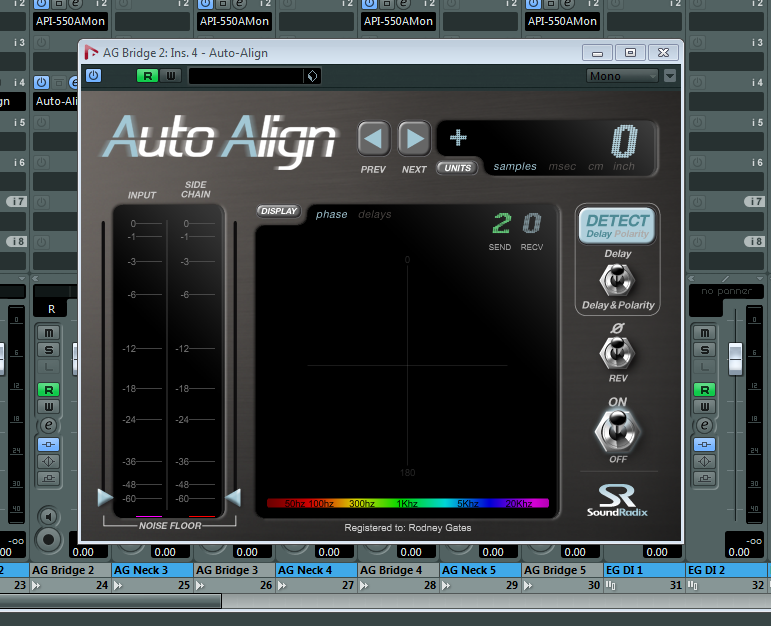
For the stereo samples (acoustic and amped electric / bass guitars), one new plug-in I was turned on to that saved the day was Auto-Align by Sound Radix. This ingenious tool was designed not only for the purpose of detecting phase issues across multiple mics / channels, but also correcting their alignment down to the sample level, using its own sends and returns to achieve this. I cannot wait to use this again on future projects with multiple sets of close, room, and possibly surround mics to align the phase of everything for a correct, full mix playback.
As I mentioned earlier, while recording the acoustic guitar, any slight movement or nuance in positioning during stereo recording resulted in the stereo image being slightly compromised, and Auto-Align was there to catch it all.
On the inserts of every channel, I used the SPL Transient Designer to control the pick attack transients on the recordings. I tried several others (Waves Trans-X and Flux BitterSweet among them), but I really liked how the SPL performed.
When working with the acoustic guitar, I found that not only the levels of the neck and bridge mics were different (expected), but so were the transient pick attacks. The bridge mic was behind my right hand during recording and was much less sensitive on transients than the neck mic. Each channel would sometimes require wildly-different settings on their SPL plug-in instances before hitting the aux channel compressor. It was bizarre hearing the stereo image sound like it started left-heavy but then the right channel would overpower it since that bridge mic was closer to the sound hole, creating this interesting stereo panning effect before being corrected.
Another thing to note here when editing volume is Nuendo’s excellent mouse wheel-driven Event Volume feature. Having the ability to select an Event and use the mouse wheel to increase or decrease the volume in 1dB increments has been awesome for years, and superior (in my opinion) to the more-recently introduced Pro Tools Clip Gain method, allowing me to work very quickly with overall levels.
After auditioning all of the compressors at my disposal, I decided to go with the API 2500 from Waves. This compressor was silky-smooth, very musical, and did a wonderful job at helping out alongside the SPL Transient Designer to control the pick attacks with its rapid attack time and rich sustain. Naturally, I kept the Analog switch in the off position – no need for the occasional “modeled crackling”, thank you very much. ;-)
This screenshot below shows the acoustic guitar – I color-coded the left and right channels to identify them at a glance, along with their mastered, re-recorded stereo files in orange beneath them:
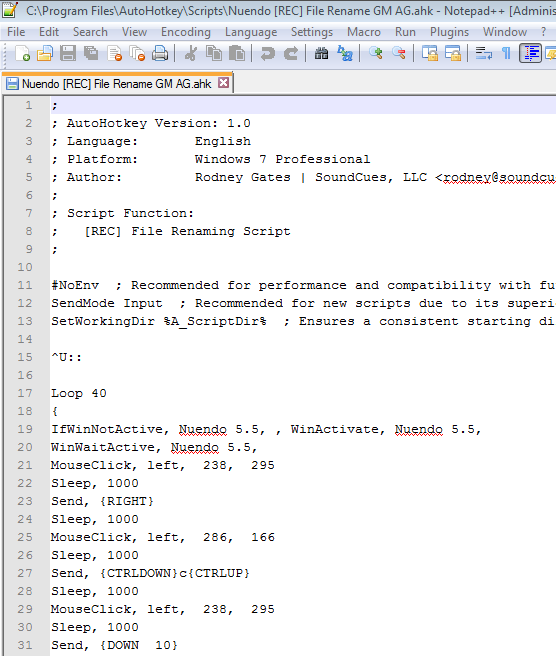
In order to export all of the mastered files out of Nuendo using the same exact naming convention derived from the unmastered originals, I needed to be sure their Description field was set to the same name as the originals. With no easy way that I could find to do this within the DAW with either custom key commands or macros (some users have since mentioned a method with cycle marker renaming / exporting that I haven’t tried yet), I enlisted the help of a free, third-party script program called AutoHotKey (PC-only).
AutoHotKey records all of your keystrokes and mouse click location actions to a script, and though it can be fussy, it became a huge time saver that I could reliably set and leave to do the work. Here is a screenshot of one of the scripts I used:
Export
The very last stage of the mastering process was exporting followed by a final sample rate conversion & bit depth reduction. Up to this point, I had been working at 32-bit / 96kHz for everything (the acoustic guitar recorded at 192kHz was initially down-sampled to 96kHz due to the audio interface I’m using – another issue to be remedied shortly). The library was ultimately going to be 24-bit / 48kHz, so I A/B-ed the results of two programs for this: Voxengo’s high-quality r8brain resampler and Sound Forge Pro 10’s iZotope SRC / Bit Reduction. I ultimately chose the Sound Forge method and simply batched everything post-export
It should be noted that a handful of 24-bit / 96kHz sample libraries are hitting the market now. Kontakt resamples any library you’re using to the sample rate set on your DAW, but 96kHz samples may actually improve the overall fidelity, especially when pitching heavily within the software. This is something to look at going forward, especially since we have the disc space savings with Kontakt’s NCW format.
Version Control
Anyone who works in video games knows what a powerful tool Perforce is. For those that don’t (and I currently don’t know how any sample developers that use it), Perforce is version control software that allows the user to deposit everything into a “depot”, and from there, tracks all of the changes that are made over time. If you need to “roll back” to a previous version of pretty much anything, you can do so in Perforce very easily.
Lately, online storage services like Amazon S3, Dropbox, and others are starting to figure this out and are beginning to offer file versioning as part of their architecture, but I will most likely continue using Perforce due to its familiarity and ease of use. Plus, it’s free for user group sizes under 20!
I recently placed my SoundCues Perforce depot on a 16TB Synology Network Address Server (NAS) using their custom, scalable RAID array for hard drive failure protection, along with using offsite backup to Amazon Glacier. This helps considerably with my peace of mind that, in the case of a hardware failure or a fire, I will be able to recover the work.
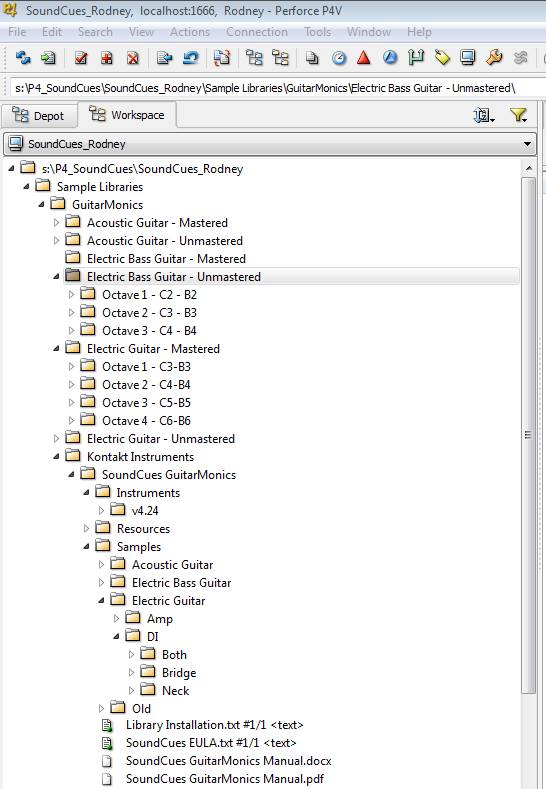
Here is a screenshot of the SoundCues depot:
Assembly in Kontakt
Native Instruments’ Kontakt is currently the reigning champion for sample libraries, so it was an easy decision to go with this platform. The full version of the software included with the company’s Komplete bundles provides developers with everything they need to create libraries within its interface and tool set.
Quick tip for Kontakt instrument patches – you cannot save them down to any other version, so if you create a library, be sure you do it in the version that will offer you the most flexibility! I found this out the hard way. Typically, sample developers create their libraries in an older version, if they are able, to ensure better compatibility for users who don’t play the upgrade game very often.
I knew that when I began to create GuitarMonics, which in essence is a simpler kind of library, consisting of “oneshot”-style sounds that didn’t require overly-complex scripting, it would be a good place for me to start. Advanced Kontakt scripting is definitely powerful, and I continue to learn more about it through websites, tutorials, forums such as VI Control and KVR, as well as YouTube programming examples, or sometimes by deconstructing “unlocked” libraries when I’m trying to achieve something specific (such as the default Kontakt factory library).
Setting up one of the instrument patches with all of the the dynamic layers and samples for GuitarMonics actually went pretty quickly, taking about an hour per instrument patch. I spent more time creating the art and GUI interface / scripting with the knobs and buttons than actually getting the samples playable!
I created the first Group in the Group Editor and starting dragging and dropping the samples down onto the Mapping Editor’s keys, starting with the loudest fortissimo (ff) samples. Once I finished up the first Group’s sample mapping, I copied and pasted that group (with associated samples) into a new Group and renamed it to be the next round robin Group. From here, I found I could increment the samples one by one to import the next sample within that same dynamic range pretty quickly (the ordering happened automatically due to the alphabetically-organized naming convention; a happy accident).
During editing, I had arbitrarily decided to name all of my accidental notes as sharps (#) which, as it turns out, is exactly what Kontakt does. Another happy accident. Not that it’s a big deal, but it was nice not having to translate every note in my head for a second before deciding Ab was actually G# when mapping the samples.
Once I finished all 5 Groups for the highest dynamic range that I wanted for round robin playback, I continued mapping all the way down through the lowest dynamic’s Groups until it was finished (ff – mf – pp), and set the velocity responses for each zone with some overlap, according to taste.
Once completed, the acoustic and electric guitars spanned a total of 4 octaves while the bass instrument covered 3. For some of the higher notes, to fill in some gaps, it required pitching up some of the samples from the previous octave (not in Kontakt, but pitch-edited samples in Sound Forge), though that was kept to a minimum as it decreased the file’s overall duration.
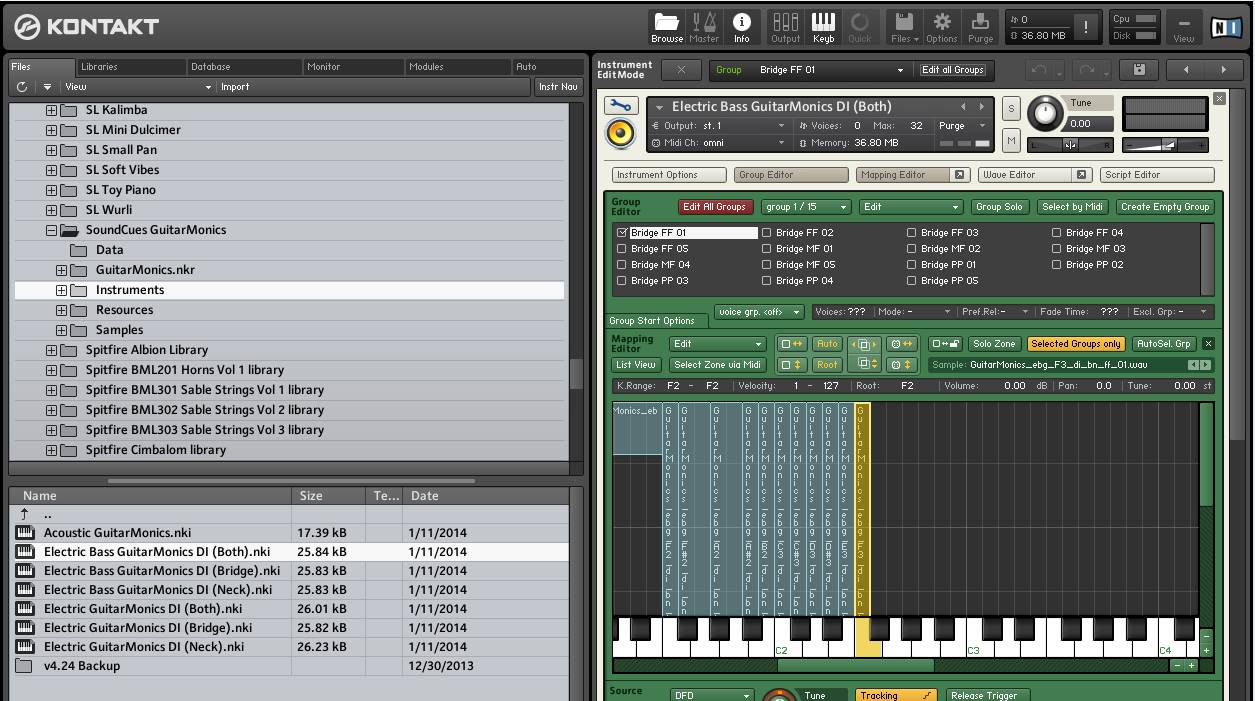
Although the actual harmonic note ranges span from C3 to C7, the notes mapped in Kontakt are C2 to C6 to make it more convenient for users without full 88-key controllers (my Edirol controller is only 61 keys and the entire library plays fine without needing to adjust the access range):
Here is a screenshot of one of the GuitarMonics patch assemblies in-progress:
I gotta say, getting everything imported into Kontakt the first time was a pretty exciting time. After months of listening to these individual tones over and over again individually, this was the time it was all going to come together. I felt a bit like Dr. Victor Frankenstein; the moment of truth had arrived on whether or not this was either going to brilliantly come alive or just lay there, dead. Those first few keyboard presses were like the lightning that zapped the creation to life! ;-)
Graphic User Interface
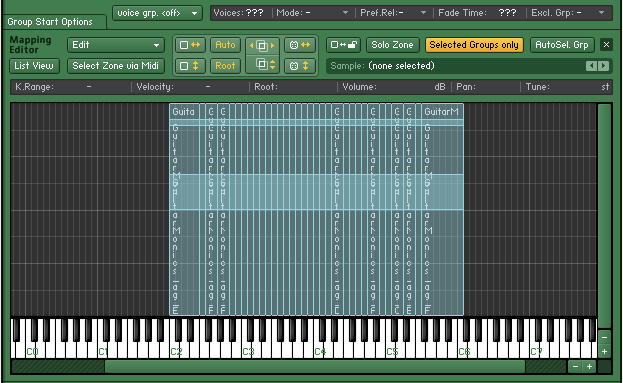
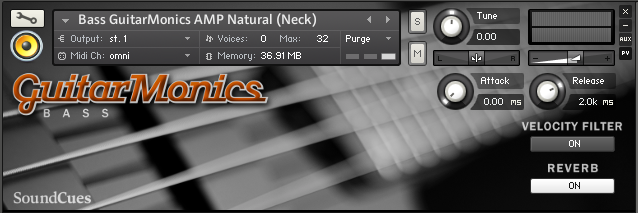
Now that the samples were set up, I needed GuitarMonics to look “nice”. The default instrument patch in Kontakt is, shall we say, a little dull:
Functionally, I wanted to keep the interface simple, with just a few buttons and knobs controlling a handful of things, due to the simplicity of the library. I wanted composers to be able to simply play it “out of the box” on their first load and have it sound great, rather than have to dial in the sound they’re looking for.
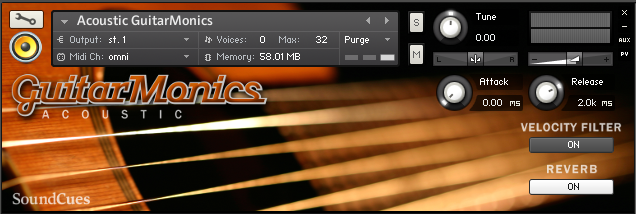
Here is how the GUI art turned out:
The artwork was created from some images I licensed and edited from iStock.com. Having a pre-press background from my former life of wholesale printing and design, I used some tools such as GIMP 2 (a free image editor similar to Photoshop) and Inkscape (a free vector art program like Illustrator), plus some fonts purchased from MyFonts.com to create the artwork for the GUI. It went through many, many iterations, of course; the simplicity you see today doesn’t show the work that went into getting there. :-)
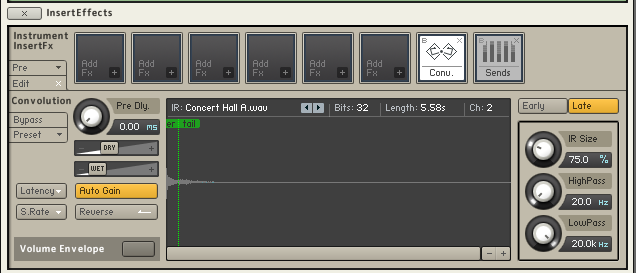
On the audio features side, Kontakt has some great DSP effects and tools built into the software, so I put them to use. The GuitarMonics samples were recorded dry, so finding a nice impulse response to use in the convolution reverb was important for adding to that polished, “out of the box” feel (I chose Concert Hall A). However, knowing that most composers probably use some kind of template in their DAW, with likely superior reverbs, I simply added an ON / OFF button to control it. I was careful about which patches had the reverb on and off by default, knowing that the intended use for the DI patches was to run them through an amp simulator of some kind.
Here’s a screenshot of Kontakt’s convolution reverb settings, as used in GuitarMonics:
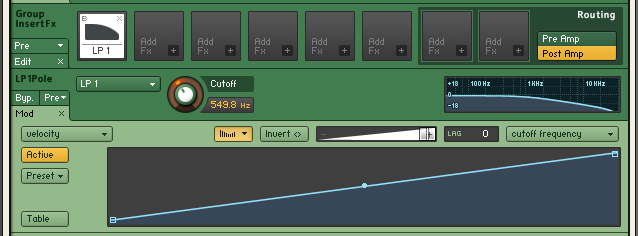
In addition, a suggestion made by early beta tester Phill Boucher, was to add a lowpass filter that responded to velocity, which subtly darkens the lower dynamic registers, and allows for the instrument to brighten up when played more heavily. This added a lot to the sound – kind of like having a piano’s lid closed versus open, but controllable by key velocity. I added another ON / OFF button for this, as this may not be desirable in all situations (though it is on by default).
Here is a screenshot of the lowpass filter settings used in GuitarMonics with it’s simple velocity envelope control parameter (the Cutoff frequency changes depending on the instrument, of course):
After quite a bit of testing, I set the default decay time to 2 seconds. This sounded pretty good to me, but I wanted the option to be available for quick adjustment by the user, as the mastered samples are actually around 10 seconds in length. I added Attack and Release knobs for this that adjust the sample playback duration in milliseconds (or fades in over the transient, which also sounds cool). The sustain pedal also allows the full duration of the samples to play back, similar to a piano.
Here’s the ADSR envelope setting used on all of the instrument patches:
Kickstarter
Once I had the first two instruments near completion (finished enough to receive some wonderful demos from esteemed composers interested in the project), I began looking ahead to finishing up the website and online storefront for SoundCues. I still needed to record and edit the bass instrument. I also started thinking about piracy.
Native Instruments unfortunately doesn’t offer a very robust copy protection system beyond their serial number activation, so I looked into other methods. The best option out there seemed to be Continuata.
Continuata was already working with many top sample developers, serving as their protection and delivery, using a proprietary watermarking method for tracking and, in some cases, even banning illegal users from their system that spread products around the torrent sites.
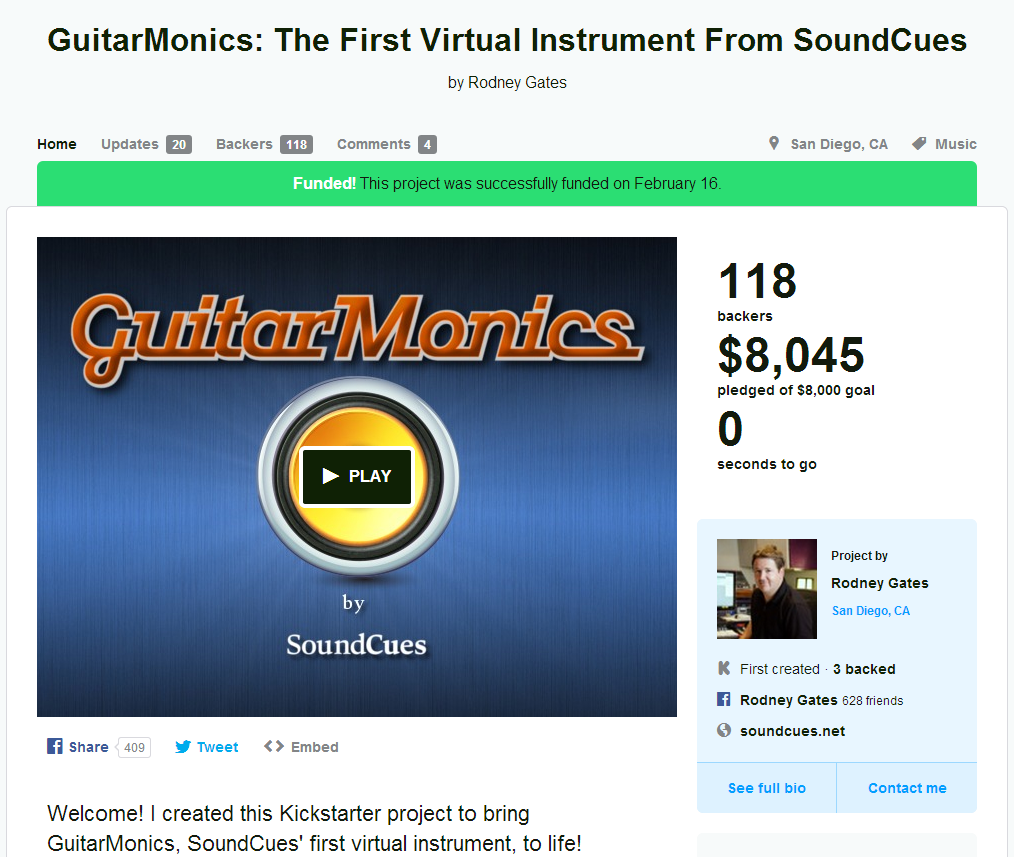
I decided to launch a Kickstarter campaign last January that would hopefully not only fund the Continuata setup, but also help me finish up the recording and completion of the libraries and website (as well as print and deliver the sweet SoundCues apparel offered in the campaign’s reward tiers).
Here is a photo of the intro video creation – just an iPhone video edited with Microsoft Movie Maker and a little music featuring GuitarMonics (of course):
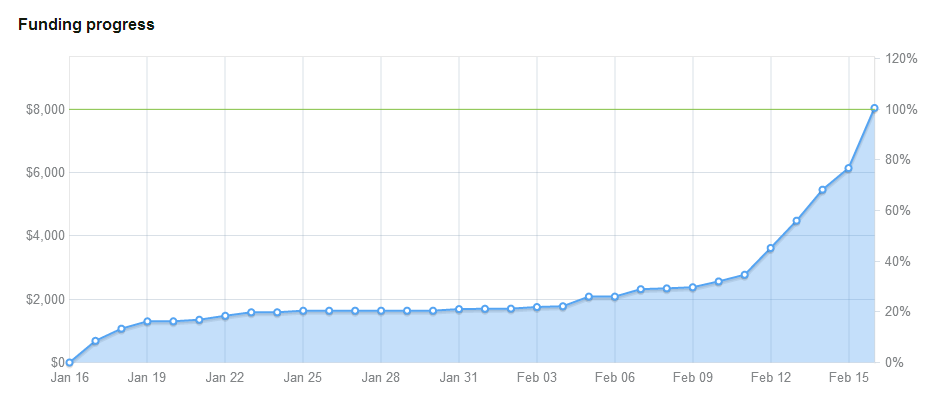
Many colleagues, friends and family members jumped in early. Despite their support, it was looking like it wasn’t going to make it near the very end (like so many Kickstarters), but right down to the wire, the funding finally came through, to my eternal gratitude. After all, if a Kickstarter campaign doesn’t reach the goal, it dies on the vine.
It was an exhausting campaign, and I no doubt bugged the crap out of everyone who had to deal with my incessant promotion. I’m not sure I would do this again, but it needed to be done to get GuitarMonics (and SoundCues) officially launched.
Here’s a screenshot of the successful campaign and the funding graph:
Released!
On May 30, 2014, GuitarMonics was officially released on www.soundcues.net and was received pretty well! The week prior to that date was filled with Kickstarter reward deliveries of whichever GuitarMonics products were pledged for from the now-functional Continuata delivery system, along with finalization of the website by the talented (and supremely-patient) designer, Rachel Gallop:
Since then, I’ve been taking a much-needed break while firing off various press releases and news updates, etc. Overall it’s gone pretty well, though I do realize it is a niche library and isn’t for everyone (if this were an orchestral strings library, people would be all over it, LOL). But it’s a start! I’m looking forward to executing the next library which I know will go much faster and smoother than GuitarMonics did. :-)
Post-Mortem
I’m going to keep this pretty simple. Consider it a “Tips and Tricks” section, if you will, with a few important things I learned along the way:
1) Do not sample every note. Kontakt does a very good job pitching samples up or down a half or a whole step without the need for this. You will save a lot of time by either recording every other note or simply sticking to “the white keys,” at the minimum, not chromatic. Over-recording introduces more risk for creating additional chances for poor note flow on playback once everything’s assigned in the sampler.
Case in point: recording the electric guitar in the beginning took weeks of my time. By the time I culled it down to what I really needed (using about 1/3rd of what I recorded), I was able to record everything I needed for the acoustic guitar at the studio in 6 hours.
2) Start simple! I thought that creating this library would be simple and I’d completed it in three months, but 3 separate instruments with every pickup selection, multiple dynamic layers, sampling every single note, plus round robin selections took me quite a while, especially working around a full-time job and busy family: 1-½ years from concept to completion. Mainly since it was mostly me doing everything. So – start simple!
3) Create your library in the earliest version of Kontakt you own, but only if you aren’t using any DSP / tool features that are in the newer versions. You cannot save your patches down to previous versions (like just about any other piece of software out there), so if you plan on releasing your instrument, you will regret it if you don’t do this. Most new libraries coming out today are still created in version 4.24 even though we’re well towards the end of version 5’s lifespan these day. This maintains compatibility with many more users out there who haven’t felt the need to upgrade.
4) Perform the noise reduction yourself. Going forward, I will probably move onto hiring external KSP programmers and GUI artists for new projects, but I will most likely always denoise my own libraries. It’s such a critical step; it’s time well spent.
5) Use Kontakt’s NCW format for your samples. This compression cuts your library’s disc footprint to about half of what it would be as raw .wav files, and it doesn’t harm fidelity as the samples decompress fully into Kontakt once loaded.
6) Tune your samples after noise reduction to achieve a more-accurate reading on the tuner, especially for the quieter samples in your library.
7) Kontakt uses sharp (#) accidentals in the Mapping Editor. Naming your samples with sharps instead of flats (b) speeds things up a bit.
In Closing
Designing GuitarMonics for Kontakt was quite a ride. I look forward to moving on to new libraries soon, with even more fun unique instruments (or unique ways of playing familiar ones), and I look forward to growing SoundCues into a great “second career” one day.
I hope you found this (excessively long) article interesting, especially if you have been thinking about creating libraries of your own. I would have loved reading something like this when I was starting out and library creation was brand new to me. ;-)
As always, feel free to look me up on Facebook or Twitter (@rodneygates or @SoundCues) if you have any additional questions or feedback.
Thanks for reading! And come check out GuitarMonics for yourself – lots of demos to hear:











WOW. Fantastic work, Rodney! Thank you for taking the time to write this and offer your experience and insight for everyone. I’ve been using Kontakt for a few years now and have kicked around the idea of making my own libraries just for fun and reading this has inspired me to explore it further. The recordings sound beautiful and hearing what other composers have done with all of your hard work has got to be an incredible feeling and reassurance that all the time editing and exporting was worth every minute. Thanks again for creating, writing, and inspiring. You absolutely nailed it with this library
Thanks so much! YOU are exactly the person I wrote this for. :-) I didn’t know squat about Kontakt beforehand (other than using it), so I just rolled up my sleeves, with a little advice along the way from friends (especially Alex at Embertone ), I was on my way.
Thanks again!
– Rodney
This article is fantastic, so so useful and informative. I have always wondered how people go about creating Kontakt libraries and your insight into your experience is a great read and I have taken a lot away from this.
Thank you for taking the time to write and share this article, it is greatly appreciated.
Also many congratulations on bringing this project and company from idea to reality. Amazing stuff.
Thank you, Graham – I’m glad you found it helpful and informative.
– Rodney
I was debating whether to purchase the GuitarMonics bundle in the current VSTBuzz sale. I’m always hesitant to purchase a library that doesn’t have a video showing exactly how the library works in use in a DAW. I strongly encourage every developer to make a video like that when promoting their libraries. However, I found this post and seeing the painstaking process you went through creating it written out in detail here has convinced me that your product will be a worthy purchase. I’ll be picking it up after work today. Cheers on a job well done! These harmonics will work perfectly in a video game soundtrack I’m working on right now :)
Thank you, Chris! Yes, I am a fan of demo videos as well; I simply haven’t had the time to put them together yet. Whenever contemplating a large purchase, I always looked to Daniel James’ videos (if not the developers’) since he would review them at length. I hope you enjoy them!
– Rodney
Yes! Daniel James’ videos are great. His videos have been extremely helpful in deciding between similar libraries in the past.
Wonderful article, such incredible detail covering every aspect of the process! Thank you so much for taking the time to write it, I added it to a list of articles when it was originally posted and finally got around to it, so glad I did.
I’ve built a few instruments in Kontakt, but always pretty basic, for personal use only and I certainly wasn’t as meticulous as you were Rodney. I was wondering what the reasoning for the 10ms head combined with a 5ms fade in on all the samples was. I understand why you might want a fade, but is there any reasoning behind having a head of silence that is greater than your fade prior to the initial transient?
Also, I’m wondering what you learnt from this process that you’ve been able to apply to your other work in audio.
Thanks again for writing such an in-depth reflection on your process.
Thanks for the kind words, Richard. The 10ms head on each file was simply for uniformity across the samples, with the 5ms fade-in placed to be sure every sample would never start with any kind of pop. Chalk it up to a little OCD. ;-) One thing I’ve learned since this endeavor is using cycle markers to export files from Nuendo, which I do all the time now with game audio. I may be able to skip the whole AutoHotKey script renaming phase on the next libraries.