My first exposure to noise reduction processing was with Waves X-Noise, working clip-by-clip, finding a snippet of noise in the clear, setting the noise profile, then processing the clip before moving to the next one. This offline processing method, while effective, would end up taking a lot of time, especially on long-form projects. Similarly, if you had a processed clip that needed its noise reduction altered, you would have to restore the un-processed version, find the noise print again, re-adjust the parameters, and then re-process it. When time is short (and when isn’t it?), real-time processes begin to look like a much better option. Unfortunately, plugins like X-Noise or iZotope RX Denoiser can’t be used effectively in real-time due to the enormous amounts of processing overhead required and the unmanageable latency added to the signal. With plugins like the new RX 3 Dialog Denoiser and Wave’s WNS and W43, real-time noise processing without expensive hardware is feasible, but it requires a change in workflow to utilize effectively. As I found once I started using the RX 3 Dialog Denoiser, putting one per dialog track was an inefficient use of CPU resources, and simply putting an instance on the main dialog bus proved problematic, especially when dealing with adjacent clips that had drastically different noise profiles.
Once I started using real-time noise reduction, I re-built my template to send the dialog through a single “DX Aux”, which sat between the dialog source tracks and master Dialog Bus. While this let me quickly drop in noise reduction and was very CPU-friendly, I had a lot of trouble dealing with scene and noise changes. After doing a few mixes, I started hunting around for a new way of working. I learned about “re-assigns” while reading through a few threads over at GearSlutz. With re-assigns, audio from the various dialog source tracks can be sent down any one of several dialog processing chains, allowing the mixer to quickly and easily clean up the dialog and deal with changing noises in real-time. Each dialog chain then has its own set of processors, be it EQs, de-essers, a Dolby Cat43 or Cedar unit, or even futz effects.
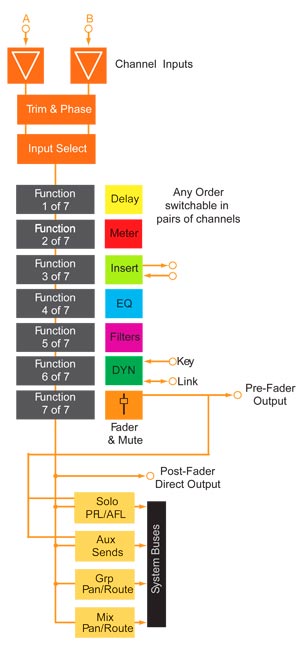
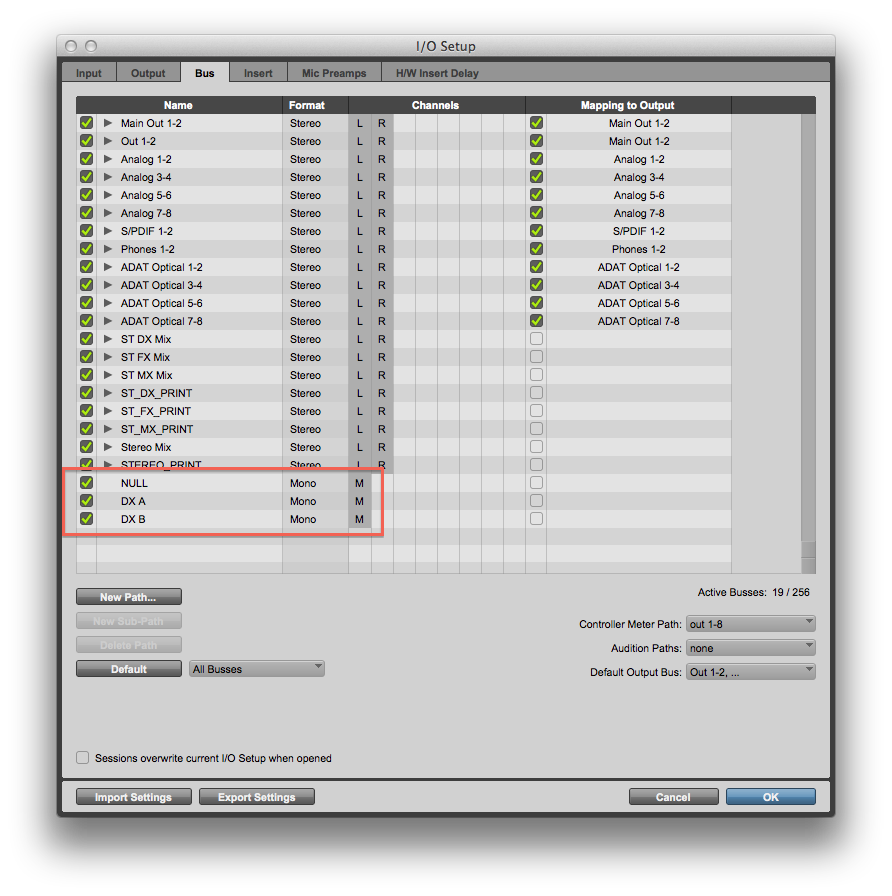
This is fairly easy to do on film consoles, which enable the user to automate channel output assignments. Unfortunately, Pro Tools does not allow you to automate the track output assignments, though this doesn’t mean that the re-assign workflow can’t be used when mixing in the box. Instead of using the track’s output assignment to send audio to the dialog chains, you can make use of some of the track’s 10 Aux sends. By taking a little bit of time to set these chains up in your template, you can quickly and easily apply processing to noisy dialog tracks, giving you more time to focus on your mixes. First, you need to create a few new busses in your I/O Setup. You need a “dummy” bus (mine is called “NULL”) and a few re-assign busses, as many busses as you will have processing chains. In this example, there are 2 re-assign busses, but you can make as many as you want/need. I’ve chosen to make the busses mono, meaning that panning is done at the re-assign before hitting the main dialog bus; you can make the busses wider to allow for panning at the source tracks, but you’ll use more active busses and your processors will run as multichannel plugins, which usually means that they’ll use more processing power. Before you leave the I/O Setup, be sure to label all of these busses accordingly, or else you’ll have a hard time when it comes time to routing!
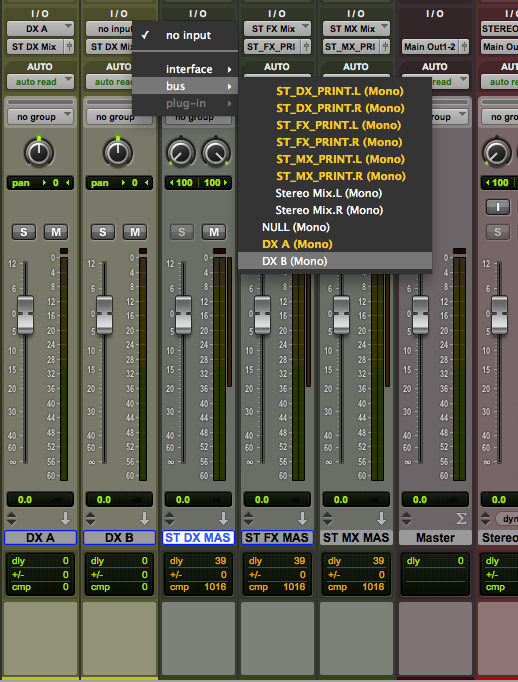
On your source dialog tracks, set your track outputs to the dummy bus. The dummy bus keeps the track routed to it active, as selecting “No Output” in Pro Tools will de-activate the track entirely; the audio passing through the dummy bus isn’t part of the mix, and doesn’t output anywhere (some mixers call their dummy busses “Nowhere” or “Nothing”). Create however many aux tracks you need (again, in this case it’s 2 tracks) and set their outputs to the master dialog bus. Set each aux track’s input to one of your re-assign busses, making sure not to use one more than once. Back on your source dialog tracks, create sends that feed into these newly created aux tracks via the re-assign busses you created, set them all to unity level, and then mute all but one of them.
On your aux tracks, create a processing chain of your choosing. In my templates, my dialog chains have an Avid Channel Strip, iZotope RX 3 Dialog Denoiser, and a Digidesign/Avid Dyn3 De-Esser. People with noise reduction hardware, like Cedars, will use Pro Tools’ Hardware Inserts to incorporate it into the signal path, while others add a “Direct” send right to the dialog bus to bypass the dialog chains entirely. Add-ons like this are completely up to you; do what works best for your particular situation or workflow.
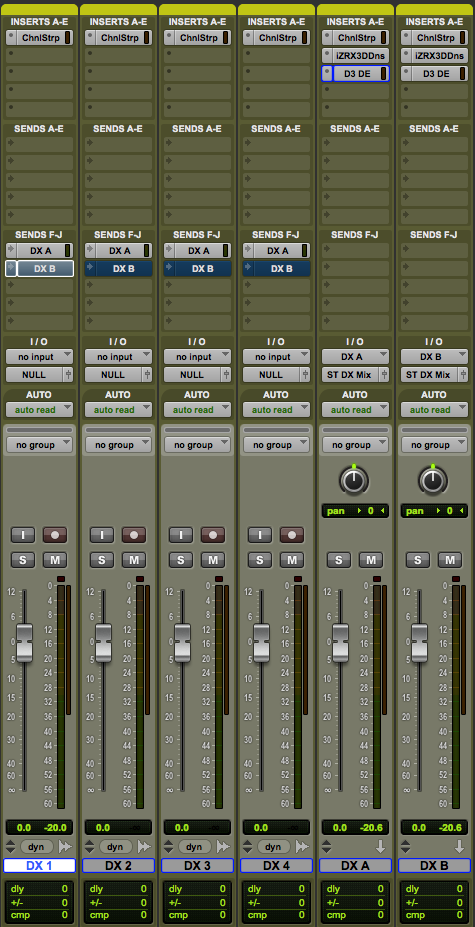
Congratulations, you now have multiple dialog processing chains that can be dynamically re-routed and changed throughout the mix! As you roll through the session, you can mute and un-mute the sends on the dialog tracks to send material to the different processing tracks. You can group similarly noisy clips to one of the re-assigns and quickly process them without having to wait for a render, leaving everything accessible and editable all the way up to the final mix. While there will still be situations where an offline process is required, like de-clipping or very heavy noise reduction/repair, the time spent doing those operations will be a fraction of the time spent doing rendered clip-by-clip noise reduction. Since adopting this workflow, I’ve found myself spending less time processing files and more time actually mixing, which has been a very welcome change.
This method can also be utilized elsewhere, like when working with complex FX signal chains, much like Charles Maynes’s Plug-In Vector Matrix idea. The possibilities really are endless. Give it a shot, and let us know how you fare!
Special thanks to re-recording mixer Mark Hensley for explaining this workflow in such detail on various forums.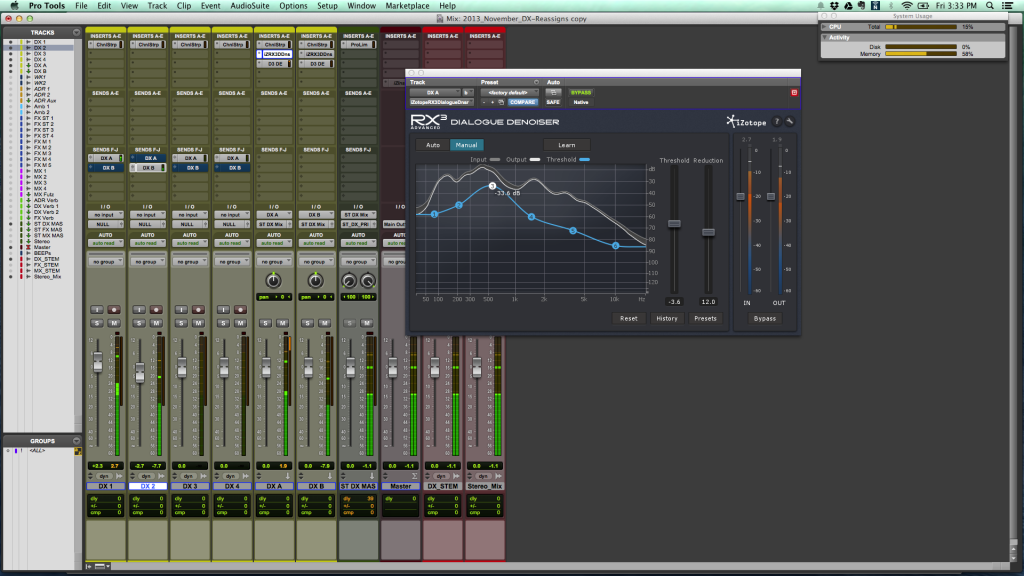
I see U-He’s Satin tape plug-in can do Companding. You can even choose the type. Looks to be interesting.
I have been doing some indie film audio recently and just got RX3 Advance. This is exactly what I needed! Thank you so much!
I think that perhaps a simpler method could be to use a stereo (or LCR, whatever) bus on each Dialogue channel output and simply pan for the different dialogue process chains. Ie, Have everything go out Dx Proc Bus (ST). Then have two mono aux channels, one assigned to Dx Proc Bus.L and one assigned to Dx Proc Bus.R. Using the panner, you can quickly move between the two…
Hey Randall, you can absolutely do it that way! You can also use wider busses to pan/route into a greater number of re-assigns (i.e. a 5.0 bus to route to 5 mono re-assigns). As a matter of fact, the Plug-In Vector Matrix that Charles Maynes wrote about earlier this year works just this way.
I myself prefer the more discrete routing using busses, as I probably won’t need to fade between two or more processing chains in my normal workflow. Also, if you’re using multi-channel re-assigns, which enables you to pan the dialog at the source tracks, the panner becomes unavailable for routing uses.
wouldn’t it be more efficient to have discreet audio tracks routed to the various processing auxes so that audio clips can be quickly moved to those respective tracks for on the fly changes / auditioning?
You can definitely work this way, and I’ve seen a few people who do with great success. However, you can very easily end up with a large number of dialog tracks feeding into each processing chain, which on larger mixes that already have high track-counts can be less than ideal.
Also, using the re-assign method, everything is addressable on a control surface, which isn’t the case if you have to move the clips around the timeline.
I’m doing something very similar with RX3 Advanced! I just changed my templates so my dialogue tracks out directly into a Dialogue Denoiser AUX and simply automating the reduction and threshold faders on Dialogue Denoiser. So far, I’m finding this to be a comparable solution to the multi aux send idea. This way, in the edit window I simply have automation lanes open to quickly adjust the threshold and reduction of Denoiser per scene. I’m finding this to be a very intuitive way to work thus far.
Had a question about using this when sending reverbs as well.
As per the article, you would be sending dialog tracks through DX A that are then bussed into the ST DX MIX, but if you had to also send them through a mono reverb aux (let’s say for example, for ADR), would the reverb aux also be sent through DX A, or directly to the ST DX Mix? If sent through DX A wouldn’t this double-gain the signal?
Thanks in advance!
The reverb aux would go right to the main DX bus (ST, 5.0, etc) and not through a re-assign because, as you point out, it would double-up the signal.
I’ve recently been putting sends on both the source tracks as well as the re-assigns, so that if I have a clip that’s requires a lot of processing in the DX chain, I can send the clean signal to the verb via the re-assign versus the noisy source.
Thanks for clarifying Samuel!