Guest contribution by Douglas Murray
I was inspired to finish this write-up after reading the feature list of the new Zynaptiq UNFILTER plugin. Their web site says:
You can also apply the measured filter response from one recording to another – placing the two in the same acoustic “world”. Or you can create roomtone to fill editing gaps, by applying a measured filter response to noise.
Then I read Shaun Farley’s tweet on the subject and saw that it was quickly followed up by Mike Thornton’s Pro Tools Expert YouTube video: Using Zynaptiq’s UNFILTER Plug-in To Create Room Tone From Pink Noise. I am looking forward to trying UNFILTER for this and its many other promising features. Meanwhile, there is another way to “create room-tone to fill editing gaps” which only requires a convolution reverb plug-in many of us already own.
My article describes how to use a convolution reverb to create unlimited air fill for dialog editors. I discovered this obscure feature as a side effect of playing with sound design uses of Altiverb. The technique is relatively simple, and Altiverb 7 is the ideal tool for this procedure, although any convolution reverb plug-in should work for this purpose.
First, a little theory: Convolution is a mathematical operation on two sounds: a short Impulse Response (IR) seed sound and a continuous input signal, producing a third sound that is the overlap or intersection between the IR and the input. Convolution works by calculating new samples from the input using all the samples of the IR for each sample of the input. It makes a great reverb when used with an IR that’s a recording of a loud click in a space. Each of the input samples is convolved to sound as if it were re-recorded in that space. An IR is a snapshot of a sonic transformation. Convolution is usually used to transfer temporal effects like reverberation onto the input sounds.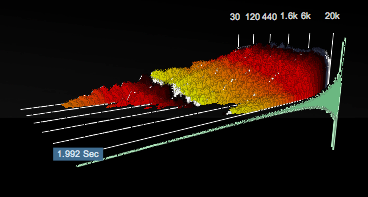 But convolution also will transfer the EQ and timbre of a sound used as an IR onto the input sound. This timbre transference is an almost magical power of convolution and is little appreciated. You can think of convolution as a kind of filter, whose bandpass curve is defined by the IR.
I stumbled upon this air generation technique when I was working on sound design for We Own the Night in early 2007. Experimenting with Altiverb using different short clips of sound effects and music as IRs, and with different sound effects as input, I was disappointed to find that convolving any input sound with an IR made from a sound with a steady level (rather than using the typical impulse with its rapid decay) came out sounding more like the IR than the input sound.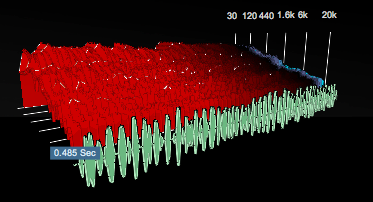 I wasn’t getting a magical hybrid sound as I’d hoped. What I got was the parts of the input sound effects that overlapped in frequency with the IR. Everything sounded like the IR. I played with using pink noise as the input, but the results were duller than the IR. Finally I tried white noise as the input signal…Voilà!
White noise is a random audio signal with equal power at all frequencies. When used as input to a convolution reverb plug-in, the output is an endlessly varying clone of the IR, it’s uncanny. I used this to create tonal atmospheric effects for We Own the Night from pieces of emotionally resonant sound. An example is the metallic quality in the air at Burt’s funeral scene that was made from church bells pealing. That was a pretty cool discovery and can be a useful sound design tool. After playing with this for sound effects work, another penny dropped and I realized that the same technique would work for the pedestrian task of creating the fill needed for editing production dialog.
We fill gaps between chunks of dialog to keep the scene from going dead, and we create overlaps between chunks with disparate noise profiles to smooth them out. The time-honored method of filling gaps in dialog tracks is to find pieces of “air” or “fill” from the same tracks as the dialog. The easiest, and best, method for this is to simply pull out the handles of a clip of dialog as far as possible, and keeping the pauses in the take while removing all the unusable sounds like speech, unwanted movement, the director saying “Cut!”, etc. Unfortunately, in a many scenes there are often slim pickings here. Looking at the entire take (or other takes from the same setup) usually reveals islands of useful air here and there in the takes. These can be trimmed and collected (Strip Silence can help here) and combined to create enough fill to serve the needs of the scene. Looping (often of the backwards/forwards kind) is used to extend insufficient material. However, in spite of these techniques it can still be well nigh impossible to find enough air to fill a scene without it sounding noticeably “loopy”. (Out of necessity, there’s a lot of loopy air in a lot of movies, especially those cut on magnetic film, which made it much more difficult to collect short clips of sound and loop them than our current tools allow.) My AIRFILL technique is different from, and serves as an adjunct to, these more direct conventional techniques.
Here’s the simple technique that can work in any DAW with any convolution reverb plug-in that allows you to load your own sounds as IRs. For the purposes of this article, I’ll describe how I work with Pro Tools and Altiverb (Using PT 10 and Altiverb 7).
Open your working dialog session in Pro Tools and set up a new aux input track: “SOURCE”. Create a mono bus: “AIR”. Set the output of new SOURCE track and the inputs of all your cut dialog tracks to AIR. In the first insert of the SOURCE aux track insert a signal generator plug-in and set it to white noise with a –50 dB output.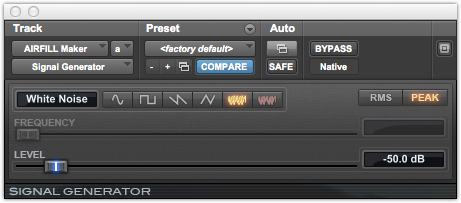 In the second insert slot put your convolution reverb plug-in, which in my case is Altiverb 7.
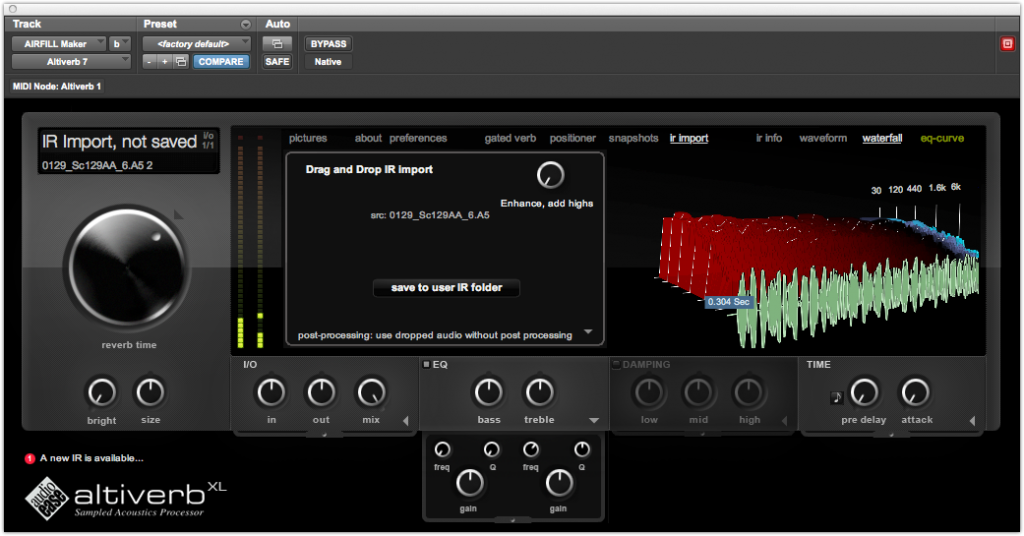 Finally, insert the EQ plug-in of your choice in the third slot, which you should leave in bypass mode; I’m using EQ7 for my EQ here. In theory you shouldn’t need the EQ, and most convolution reverbs have EQ of some sort built in, so this may be an unneeded step.
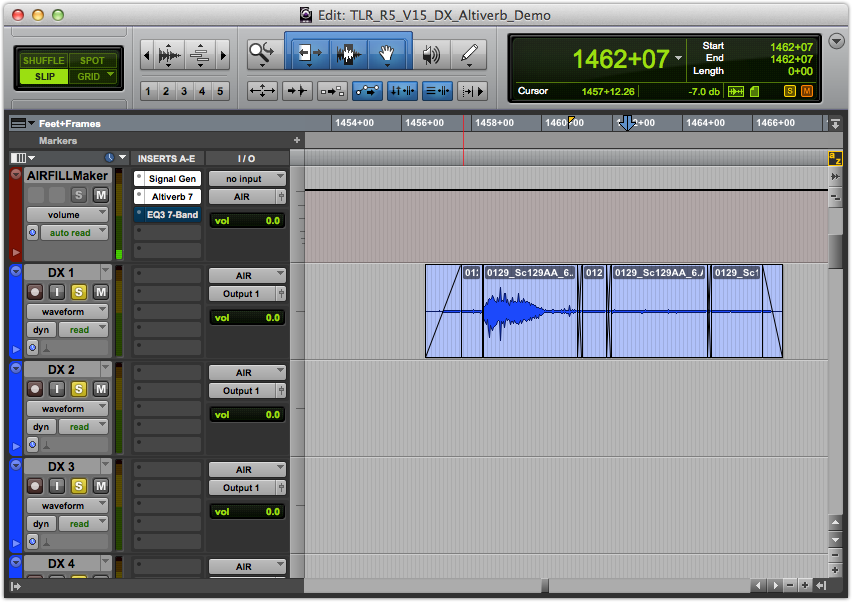 Enable Input on one of your cut dialog tracks and you should hear the sound of white noise hitting your reverb plug-in’s default preset reverb. Turn off the Input monitoring and you are now set up to make some AIRFILL. (I don’t really know what to call these files, but in order to keep the description unambiguous I’ll call the sound files we record with this technique “AIRFILL”.)
Now as you go about your dialog editing work you will eventually come across an occasion where you need more fill than you can easily find using conventional means. When you need to generate AIRFILL with this technique, first obtain a seed clip of the desired air fill from somewhere. This will be used to create an IR to load into the plug-in. The beauty of the technique is that the seed clip need not be very long, but it does need to be pure BG noise, lacking intermittent noise such as movement or breaths. The best matching noise is usually from as close to the place it will be attached to as possible. Backgrounds are always changing in subtle ways. So if you are looking for a tail extension of a clip of dialog, for example, look first at the spot after the last word and before the end of the clip.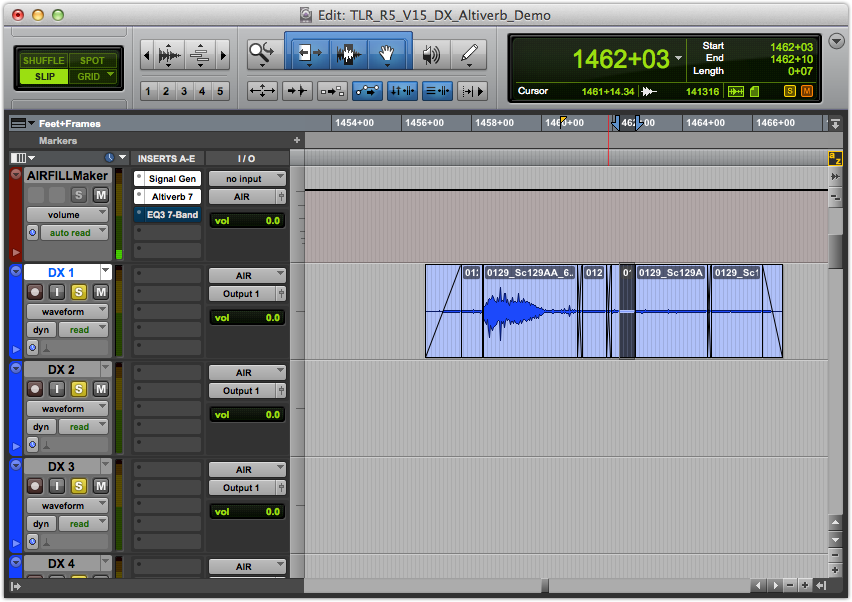 If there is no suitable audio there, look back between the last word and the one before it, and so on. You need to find a seed clip of about a frame or more in length. Finding the correct piece of sound is the critical part of the process. You don’t want momentary sounds within the clip. You are looking for a sample of just the background air which would include any ongoing ventilation, camera or other equipment noises, as well as environmental sounds like wind, rain, traffic, or walla in the BG. The process will take this sound seed and repeat it indefinitely with random variations. If the seed sound includes a footstep, cloth rustle, breath, or worse, that momentary sound will be added to the BG and smeared out to discolor the timbre of the results. With a little practice and careful listening you will soon develop a knack for finding the best bits.
Once you have found a good candidate seed clip, you need to get it into the convolution reverb plug-in as an IR. For this AIRFILL generation application Altiverb 7 gives great results AND is super convenient. (It’s also my go-to convolution reverb plug-in.)
If you have Altiverb 7 the next step is as easy as possible: With the plug-in window open and in “import user IR” mode, option-drag and drop your clip onto the target area of the plug-in.
If you are using TL Space, another good convolution reverb, the process is slightly more complex. Consolidate your seed clip (with no handles), the quickest way is to select clip and hit the shift+option+3 key combination. Then switch to the Finder (on a Mac – I can’t guide you Windows users but I trust it is similar) and copy the newly created file of your seed noise to wherever you keep your TL Space IRs. With TL Space this can be anywhere, and you can add a new directory at any time. Then, back in Pro Tools, update TL Space’s reference to the place you put the new file and load the new file as an IR. As always, it helps, when making new files, to name them for reuse later.
If you are using some other convolution reverb plugin use the method required by your specific plug-in. The goal is to load a user created IR.
Once your seed sound is loaded as an IR, you are almost done. Enable Record on your desired cut dialog track and you will hear the sound you are generating from that seed sound. Record as much as you think you will need and try using it.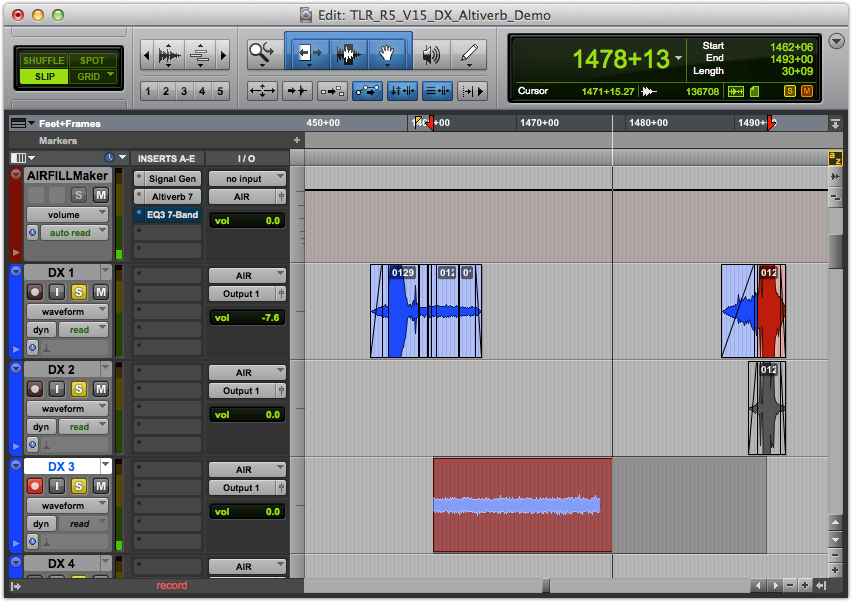 If it doesn’t match well enough, modify your seed sound by selecting a different bit of the take. Sometimes just trimming a bit off one of the clip ends and reconsolidating and reimporting is all you need to do. If you are sure you have the best seed loaded and the resulting AIRFILL still doesn’t match, you can tweak the timbre a bit with EQ. If your clip levels are consistently too hot or too low, adjust the level setting in the white noise generator. The level of each AIRFILL recording can be tweaked with clip gain to precisely match the dialog tracks you may wish to intercut the AIRFILL with.
 Here’s the sound of the section of the timeline shown in these screenshots with the AIRFILL bridging the space between two chunks of production sound, first a groan, then the AIRFILL, then a line of dialog.
[soundcloud url=”http://api.soundcloud.com/tracks/101714000″ params=”color=ff6600&auto_play=false&show_artwork=false” width=” 100%” height=”166″ iframe=”true” /]
The resulting AIRFILL will be constantly varying (and not loopy) at the smallest timeframes, but may seem unnaturally static and bland for a longer period. It’s usually a good binder, but scenes require movement and variation to live. I leave it to you to imagine and provide life to the air in the scene with production sound movement, Foley, or sound effects. Each situation is different.
I’d like to stress again that pulling out the handles on your dialog clips and searching in the location recordings to find air is usually the preferred technique. Those naturally occurring fill sounds are subtly changing and contain movement and breaths which can be edited and adapted to fill the scene out better than the less dynamic AIRFILL that results from this technique. Using synthesized matching AIRFILL as described here should be seen as an emergency fallback remedy when there is no location air from the takes that can be found in a reasonable amount of time that will do the job. (BTW, room tone recorded on set is not the same as this sort of fill, and usually doesn’t match the air from within the takes.)
Sometimes it is useful to make different AIRFILL recordings on different tracks and crossfade between them for more variety.
Even unpleasant fill that you may find in the various production sound recordings will have some life to it and can be used along with the clinically clean AIRFILL. Try mixing a little of the bad fill into the clinical AIRFILL to obtain some movement and life.
It’s good to name the AIRFILL clip with the take name it matches so you can find it again for reuse. If I am doing a lot of these I name the seed sound files “IR Take Name” and the AIRFILL recordings “AIRFILL Take Name”.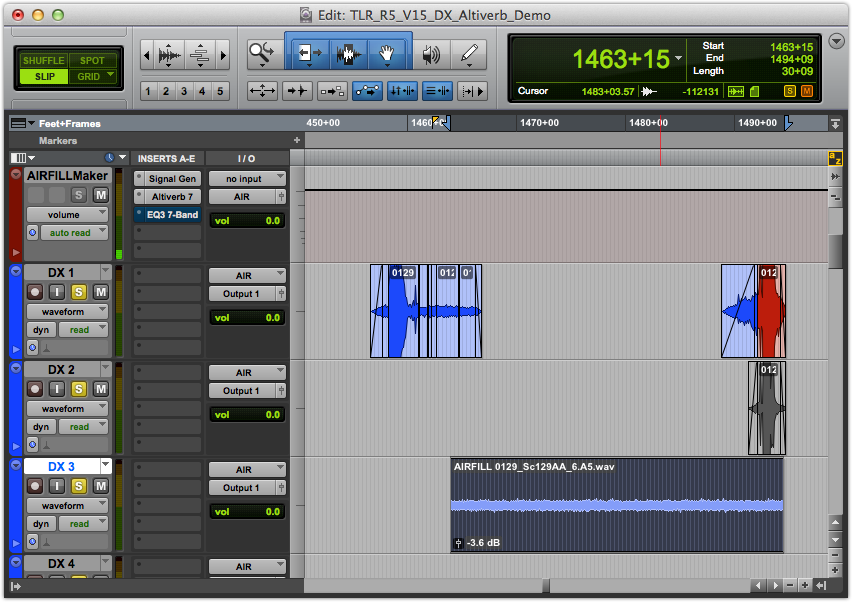 In Altiverb 7 you save and name the IR clips within Altiverb.
This technique is especially handy when producing fill from the meager sources available when creating Music and Effects masters for foreign language distribution.
That’s it, simple and handy. A caution: remember not to smooth away too much. A bit of crappy noise can sound more real than clinical AIRFILL. The messy world doesn’t always need to be tamed.
May the dialog tracks of the world continue to improve!
About the Author:
Douglas Murray is a sound editor, sound designer and sound mixer for feature films and sometimes television, principally at Skywalker Sound. He has won an Emmy for Hemingway and Gellhorn and a Golden Reel for Harry Potter and the Goblet of Fire for his sound editing, and has been nominated for nine other Golden Reels and two other Emmys, and also for two Cinema Audio Society awards for outstanding sound mixing.
He has worked on dozens of feature films in his thirty year career, including Twin Peaks, Fire Walk With Me; The English Patient; Contact; Ice Age, The Meltdown; We Own the Night; Cloverfield; Two Lovers; Let Me In; and The Lone Ranger.
Douglas loves to work with creative filmmakers, picture and sound people and musicians. Film sound allows him the creative and technical challenges and variety he enjoys.He occasionally teaches film sound concepts and techniques. He lives with his family in California.
http://www.imdb.com/name/nm0614924/
…and you can follow Douglas on Twitter @douglasmurray
a brilliant piece-
Hey,
great tip, thanks for sharing!
One question: I cannot drag’n’drop my clip in Protools onto Altiverb, just from the Finder.
What am I doing wrong?
Thanks!
You are probably doing everything right in Pro Tools 11. I understand that the drag and drop feature available in pre-AAX versions of Pro Tools plug-ins has been broken with the newer AAX spec. Dragging from the Finder is the only way to do this now.
That’s really a great technique and an awesome discovery. Very cool that you shared it with the community as well!
Cheers
Bill Mellow
Thanks for the very nice comments!
I’m very interested to hear what you think if you try this technique, especially if you’ve tried other methods to accomplish the same thing. How does the convolution reverb technique compare to using UNFILTER?
Thanks for the shout out. I am definitely going to try this out. Now we need a Pro Tools 11 friendly convolution reverb :)
Happily we have several now, with Altiverb and Space now available, as well as Reverberate (which I still haven’t tried), Waves, etc.
Thank you Doug for sharing your expertise !! I fully agree with your last note on the messy world!
thanks again
martin
You have changed my life. Thanks for the great tip. It’s saving the day on this particular film…
Great Post!
Build a Sound in Kyma based on this!
Visit my blog: kymaguy.com
i should mention that since i saw this post, i’ve used this many times. i couldn’t agree more with your thoughts- it just creates a ‘dead’ sort of fill, but in any case, it fits perfectly in terms of spectral content. i’ve been using liquidsonics’ reverberate to do it.
thanks for posting,
kyle hughes
Kyle,
I’ve been meaning to try out Reverberate. The modulation options sound like they’d be interesting for design purposes. Reverberate’s LFOs could even be useful in tiny quantities for fill, to take away a bit of lifelessness in the track. Have you tried that?
I am trying this out with Altiverb on a mix stage for a feature I’m working on and it is fantastic. The most convincing form of room tone generation I’ve tried so far. Thanks for sharing!
Glad it’s helping you out! Thanks for letting me know.
another thank you for posting – excellent idea and working well for my latest M&E feature I’m mixing right now.
Thanks, Laura. The technique is perfect for filling production for M&Es.
yes!, M&E!, its just almost to perfect when i had to edit a M&E from a film that didn’t have a lot of foley coverage at skywalker last week.
do you find the length is important?
i had some weird fluty background sound in a film from a refinery and longer clips seems toy emulate that better.
Definitely length makes a difference. It is important to get a representative sampling of the base timbre of the scene, with no little moves or other momentary bits. Some sounds can be well sampled with one frame of source for the IR. Better to be short than have transients. Sometimes trying a number of short sounds will lead to a better match.
Thank you thank you thank you! I owe you for all of the time I shall save using this brilliant technique when the dialogue only has snippets of tone available. You are my hero.
Dialogue is king!
Thanks. Technique works great.