Despite all of this, I’m still relatively new at Pure Data and the Max language. To those who chime in with corrections or clarifications in the comments, you are most appreciated! If you’re new to PD, make sure you check the comments section for clarifying info provided by generous souls.
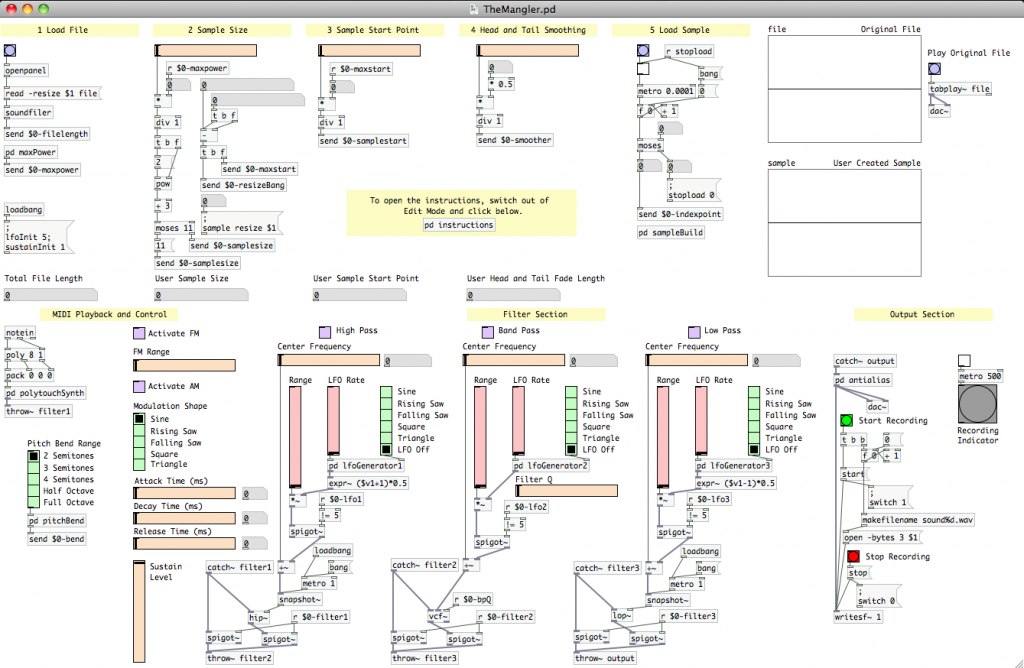
One of the reasons we’re covering DSP environments this month is to get more people exposed to the capabilities they can provide. If you have never used these tool sets before, we have no intention of leaving you out of the party. So, this is the first in a series of articles to help you get your feet wet. We’re going to be working with Pure Data, an environment that uses the Max language (much like MSP from Cycling 74), and is available as a free open-source tool. In this series, I’m going to walk you through the steps to build a wavetable synthesizer that will let you work from an imported sound file, has polyphonic and velocity sensitive MIDI controlled playback, ADSR envelope generation, and modulation and filtering…oh, and we’ll be able to record whatever we play in the synthesizer.
If that sounds like a lot…well, it is. The process will be broken down into individual steps that will be covered throughout the month. Each article will build on the work done in the previous. This one will cover a lot of basic user interfacing and manipulation that that I will not repeat in subsequent articles. So, first step? You may want to go download and install the latest version of Pure Data Extended.
We’re going to begin by building a patch that can import and playback a sound file. Because of the nature of the overall synthesizer patch we’ll be constructing, there will be some “suggested” restrictions on the type of file you import. We’ll touch on that later in this article though. The first thing we need is a space to start building in, so go ahead and create a new file (or “patch” as I’ll be referring to it from now on).
Before we truly begin, it’s important to remember that while this particular language is visually and flow oriented, it’s still very much a programming language. Every individual object that can be placed in a patch is called an “atom”, and each “atom” is like an individual line of code or command to the compiling system. Sometimes, there are multiple ways to do the same thing, and that’s the case with the first object we’re going to be placing…a [bang].
Everything you need to place an atom can be found in the “Put” menu. Go ahead and look in that menu and select “Bang”. A square filled with a circle will appear in your patch. You can position it with your mouse, and clicking will lock it down in place. Placing a new object in a patch automatically puts you into “edit mode”. The simplest way to identify which mode you’re in is to look at your mouse cursor. If it looks like a hand, then you’re in edit mode. To switch in and out of edit mode, use cmd+e (or ctl+e in Windows). While in edit mode, you can click and drag an atom to reposition it, or click and drag across the patch to select multiple atoms. So, if you don’t like where your [bang] just got positioned, it’s easy to change its location.
We’ve placed a “button” [bang], we’re going to place another [bang] using a “message” atom. Find “message” in the “Put” menu, or press cmd+2. After you’ve placed it in your patch, you’ll notice a cursor is flashing in it. Type the word “bang”, then click outside of the atom on a blank space of the patch. The atom will be de-selected. To edit the contents of the atom (i.e. if you mistyped “bang”), simply click on it while in edit mode. The contents of the atom will be highlighted. To select and move this atom, click and hold on an empty space in the patch. Then drag across the atom. The entire atom will be selected, instead of just its contents.
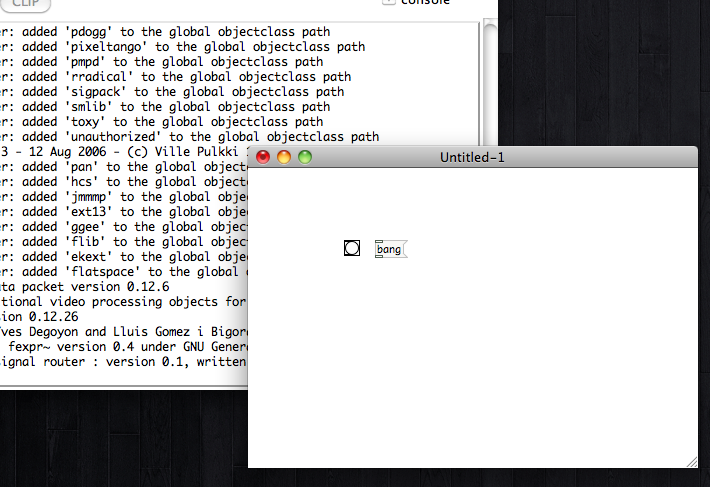
You now have two types of [bangs] in your patch. They both do the same thing. They tell PD (PureData) to run the code that they are attached to. Notice the two little rectangles on the left hand side of the “message” [bang]; one on the top, and one on the bottom. The top rectangle is an inlet, and the bottom is an outlet. These are how we connect atoms to one another. The “button” [bang] has these too, but they’re a little harder to make out. Make sure you can identify them. The button version of a [bang] provides a bit more flexibility, but can use a bit more in the way of system resources. In the grand scheme of this synthesizer patch, it’s not going to have a huge impact. So, we’ll stick with the button patch. Go ahead and select the “message” [bang] (using the click and drag method), and remove it from the patch with the delete key.
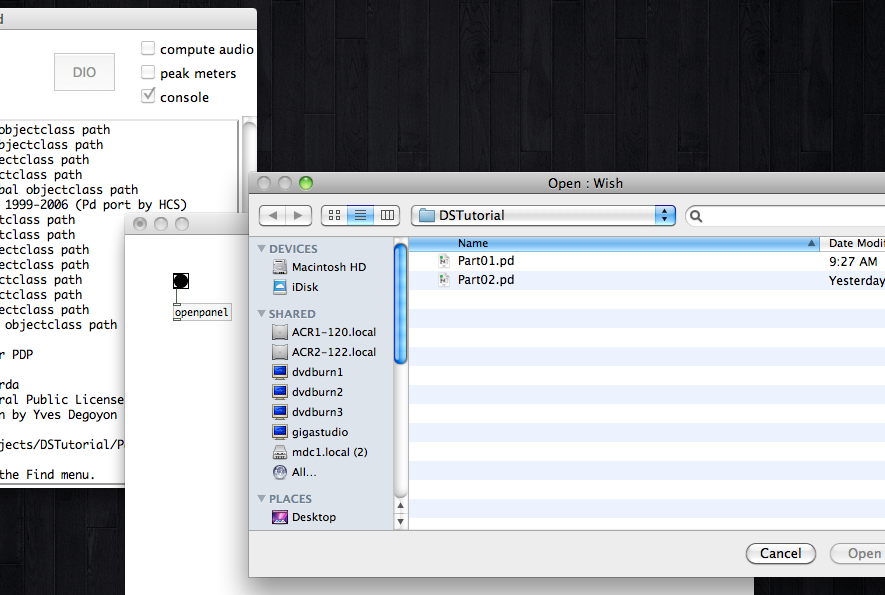
We’re going to use the remaining button [bang] to open up a file browser; so we can select which file we’re going to import. Using either the “Put” menu (or cmd+1) add a new “object” atom to your patch. Place it below the [bang], and type “openpanel” inside of it (all lowercase, no spaces). This atom also has one inlet (on top), and one outlet (on bottom). You should still be in edit mode right now. Hover your mouse over the outlet of the [bang]. If you’re in the correct spot, it will turn into a circle. Click and hold the mouse in that location, then drag to the inlet of the [openpanel] atom. When you reach the inlet, the cursor will turn into a circle once again. Release the mouse button to complete the connection. You should now have a line connecting the [bang] to [openpanel]. It’s as simple as that…no line, no connection. As I mentioned [openpanel] brings up a file browser. It only does so when it receives a “bang.” Go ahead and click the [bang] now, and confirm that it works. Then cancel out of the file browser, because we don’t yet have anywhere to store a file within our patch.
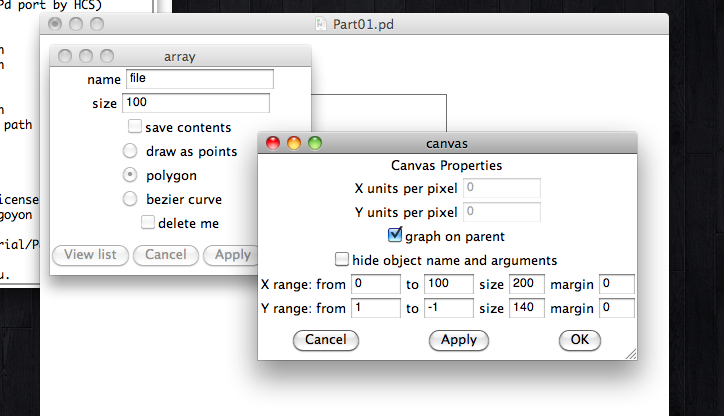
 To do that, we need to place something called an “array” into our patch. An array is also referred to as a “table.” You identify the number of items that will be stored (size), and it creates that number of index points. Go to the “Put” menu, and select “array” near the bottom of the list. A new window will open. This is the “properties” configuration for the array. Change the name to “file”, so that we have a good reminder that this will be storing our imported file. You can leave the size alone, because we’ll be using a method that’s a bit more complex to adjust that…simply know that that is one way you can adjust the number of index points in your array/table. Uncheck the “save contents” box. That tells PureData to store the array contents when you save the patch. It will increase the overall file size of your patch and isn’t really necessary for what we’re doing. The next 3 items that you can choose from (“draw as points”, “polygon” and “bezier curve”) simply defines how a representative curve in the soon to be created graph will look. “Draw as points” uses the fewest system resources, and “bezier curve” uses the most. I tend to use “polygon”, as it’s a good balance between a pleasant visual and overall system load. Choose whichever of these you like. Finally, leave “in new graph” selected and click “OK.”
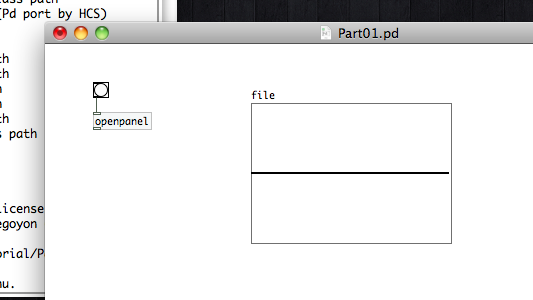 A graph box, labeled “file,” will now appear in your patch. Go ahead and place it just as we have everything else so far. It’s currently just a straight line, because we haven’t yet put any values into the array. Before we move on to that step, I’d like you to right-click the graph and select properties. Two windows will pop up; one labeled “canvas,” and another labeled “array.” The “canvas” properties simply let you adjust the visual qualities of your array/graph. The array window is basically everything we just selected through while creating the array. This is a handy way to make corrections, or even change the curve drawing if you don’t like your previous selections. There are a number of atoms where we can access a “properties” menu by right-clicking. We’ll be coming back to that in future articles, so remember this fact. [note: The “help” selection of the righ-click menu will load up the manual page for the particular atom you selected. This will give you details about how the atom works…another useful thing to keep in mind.]
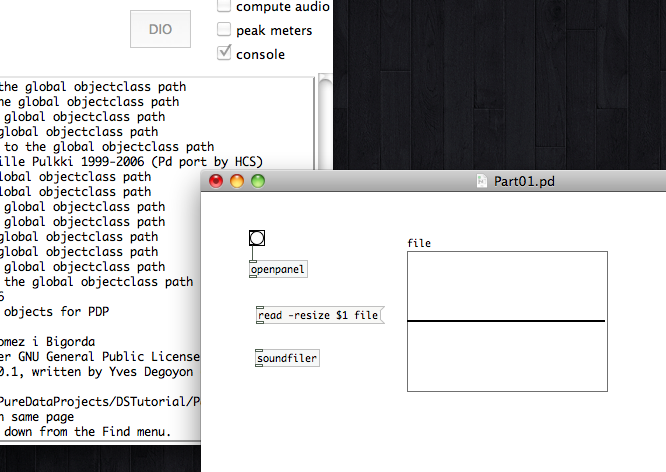
 Now that we have our array, we need to fill it with the individual samples of an imported file. To do that we’re going to use an object atom called [soundfiler]. Using the “Put” menu (or cmd+1) place an object atom in your patch and type in “soundfiler”. [soundfiler] is used to read and write sound files to arrays. It needs a set of commands, provided in the form of a message atom, in order to function properly. Create a message atom (“Put” menu or cmd+2) and type in the following contents: “read -resize $1 file” (this time, be sure to include the spaces, otherwise PD will give you an error message). “Read” tells [soundfiler] to read a sound file. “-resize” tells [soundfiler] to change the size of the specified array to match our file’s size. “$1” is a local variable. We could type the directory path in its place here, but we’re going to use the [openpanel] object to instead. When we select the file we want to import, the “$1” will store that directory path from the file browser for us…this simplifies things for the user. [note: We’ll talk more about variables and the dollar sign in the next article.] Finally, “file” is a reference to the array we created in our last step. It tells [soundfiler] which array to “resize” and where to store the the data from the sound file. If we had named the array “bobsyouruncle”, then that’s what we would have typed after “$1” in the message atom. [note: If you’d like to learn more about how [soundfiler] works, use right-click>help.]
 We’re going to take a short, but relevant, detour before we connect everything. You can set the sample rate of PD by accessing the “Audio Settings.” On Mac, it can be found in the PureData>Preferences menu. On Windows, you’ll find the “Audio Settings” under the “Media” menu in the menu bar. When we do finally import an audio file into this patch, make sure that it is less than a minute long and that its bit sample rate is no greater than 24/48. This is merely a safety precaution. [soundfiler] cannot work with files that are greater than 90 seconds in length. Keeping things lower will keep you from overburdening your system. Your PD sample rate does not necessarily have to match your file’s sample rate though. It’s totally up to you. Another important point that you’ll find in the [soundfiler] help file is that you should not use floating point .aiff files with it. If you encounter problems importing an .aiff file, that’s probably the reason. Convert the file to another format, and you should be good.
Now, let’s hook things up here. The first thing we need to do is feed the directory path to the command “message” atom. Click on the outlet of [openpanel] and drag to the inlet of [read -resize $1 file]. That will fill the variable in our message atom. Now connect the outlet of [read -resize $1 file] to the inlet of [soundfiler].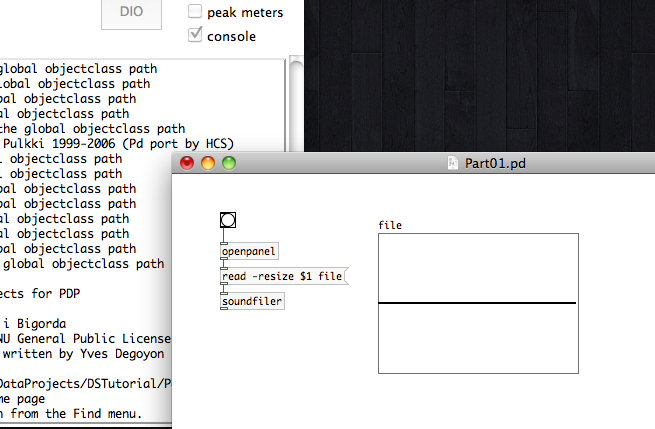 Here’s what happens now when you click on the [bang]. [openpanel] receives a “bang” and opens a browser, proceeding to output your chosen directory path when you have clicked “open.” The directory path replaces “$1” in our message atom. Message atoms also treat ANY input as a “bang.” This means that once [read -resize $1 file] receives the directory path, it’s going to output its contents. Those contents are the commands for [soundfiler], which will now chase down that file and load it into our array. Give it a shot. Load up a sound file and see what happens.
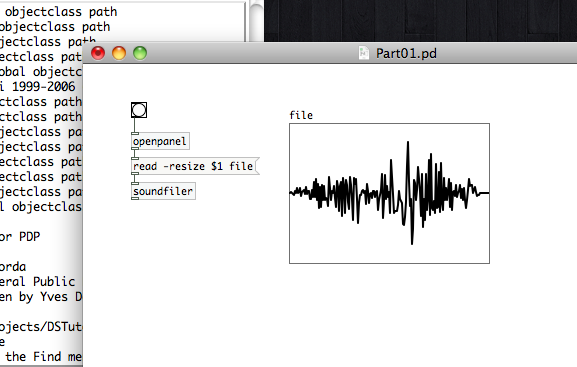 Your “file” graph should have filled in with a waveform reflecting the sound file you chose. That means you did it correctly! Now let’s work on playing that sound back.
Place a second [bang] in your patch, and then place a new object atom. Fill that atom with “tabplay~ file”. [tabplay~] is an object that plays back an array. In this case, we’ve told it that we want it to play back our array “file.” Go ahead and connect the [bang] to the inlet of [tabplay~ file].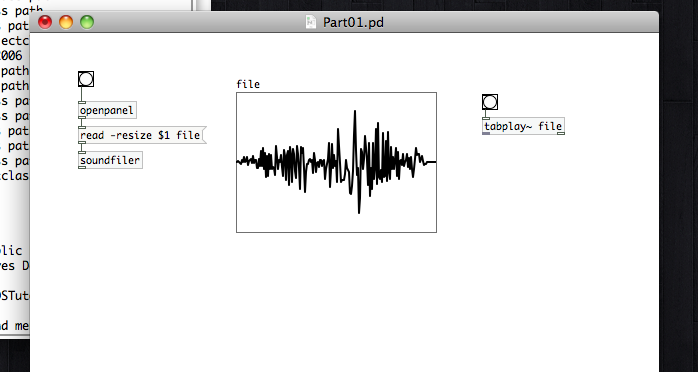 You may be asking, “What’s the deal with the tilde?” That’s just PD’s way of identifying that an audio signal is involved with an atom. You’ll notice that the left outlet looks different on this atom we’ve just created. Empty/white rectangles indicate that the inlet or outlet handles data…numbers, messages, etc. A gray inlet or outlet indicates it is a signal. So, [tabplay~] accepts a data input…in this case, a “bang”…then outputs an audio signal generated from an array.
That signal still isn’t going anywhere yet though. For that, we need one last object atom. Go ahead and create one, then type in “dac~”. Have you already guessed what [dac~] does? Yep, digital to analog converter. The number of inlets and where that audio signal goes depends on your “Audio Settings,” which we discussed a few paragraphs ago. If you’re still in the default, it’s going to give you two channels that will likely play out of your computer’s speakers. The left inlet on [dac~] is the left channel, and the right is the right. Pretty simple, no? Connect [tabplay~ file] to the left and right inlets of [dac~]. That’s right, one outlet can feed multiple inlets.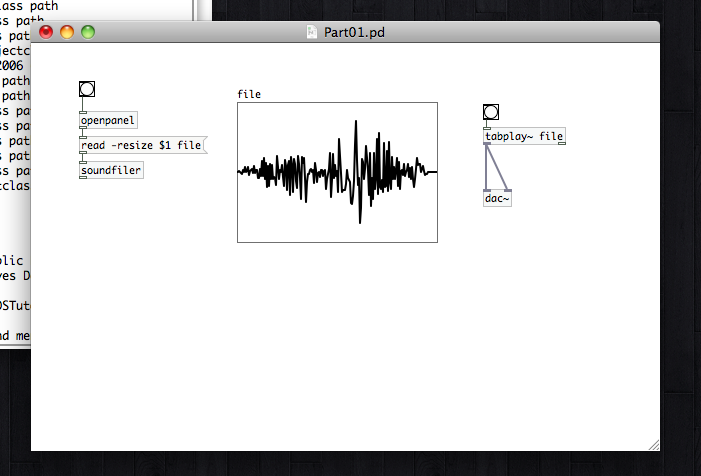 There’s always one last button to push. It’s entirely possible you clicked on the playback [bang] just a moment ago and heard nothing. That wouldn’t surprise me, as there’s one last PD configuration we haven’t mentioned yet. I’ve saved it until now, so that I can make sure it sticks in your head. I want you to take a look at the PureData console window. It’s the one labeled “Pd-extended.” At the top right of that window, you’ll see a little checkbox labeled “compute audio” (the check box on Windows is labeled “DSP”). There’s no check mark in it right now, is there? Activate that last little piece, and now click on your playback [bang].
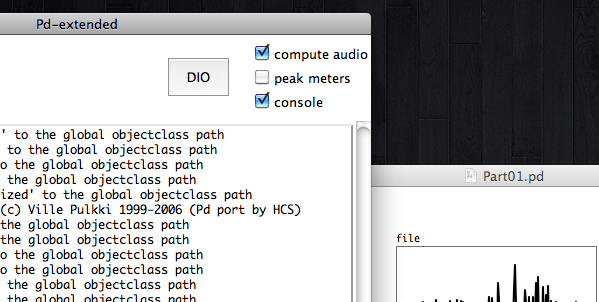 Glory and behold! We have sound! We’ve accomplished our first step in building our wavetable synthesizer. In the next article, we’re going to build a preliminary function that will play a major role in defining our wavetable sample out of the imported sound file. If you can’t wait to dig a little deeper into PD, I would suggest checking out the Pure Data tutorials over at Floss Manuals or Raphael Hernandez’s videos on Youtube.
See you next time.
In the future, all articles in this series will be aggregated here.
i asked for pd~/more dsp in the feedback.. and oh boy :) very pleased to see this!
Thanks for great intro! I followed every step from beginning to the end, but dac~ object cannot be created – in log window is just written “… coudn’t create” and on next line “dac~”. I tried to open example files included in PD which contains dac~ object, and still it has red rectangle instead of black one :-(
Audio setting is set to build in audio (mac book pro), level meter shows built in microphone real input level.
I downloaded version 0.43.4-extended for mac.
Any advice?
Thanks a lot!
hmmm…if you mistyped “`” instead of “~” (same key, missed holding down shift), that could do it. if you didn’t make that mistake, it’s entirely possible that something has just gone a little screwy. i’ve seen it happen before where objects go red for no reason. try restarting your computer. if you still have problems, try reinstalling PD (save your patch though, it’s probably fine). after that, i’m stumped.
Wow! I wish i had this when i had to design my 1st MAX patch for a sound installation…
Thanks for the great intro!
I found floss manuals to be a valuable resource for learning pd – http://flossmanuals.net/pure-data/
That link was provided at the end of the article, Simon. ;)
Thanks for the tutorial, I am having a problem using Pd Version: 0.43.4-extended, in the final step, the pd-extended window doesn’t have the “compute audio” checkbox, it has a checkbox with “DSP” and checking this gives a continuous sound unaffected by clicking the playback bang!
Not sure of my mistake here?
Any help or explanation would be greatfully received, thanks.
Matt
I neglected to mention that “Compute Audio” is replaced by “DSP” on Windows. Sorry for not mentioning that before. You can e-mail your patch to shaun at designingsound.org, Matt, and I’ll take a look to see what your problem is.
I’m using Max/MSP for an assignment at uni and was wondering how much of what these Pure Data tutorials can be transferred across?
Thanks,
Fred
Very much of it should translate, Fred. Both Pure Data and MSP use the Max language. Max/MSP is a little more user friendly, but nearly every atom I’m using has its equivalent in MSP…though they may have different names (take a look at Varun’s latest post for a list of some).