 For those of you who just want to play around with the finished project, there is a download link at the bottom of the article. Despite all of this, I’m still relatively new at Pure Data and the Max language. To those who chime in with corrections or clarifications in the comments, you are most appreciated! If you’re new to PD, make sure you check the comments section for clarifying info provided by generous souls.
Last time, we implemented a three stage filter section with independent LFOs to sweep the center/cut-off frequency of each one. Today, we’ll finish up this patch by adding two last features…an anti-aliasing filter and the ability to record to the hard drive directly out of the patch. If you’re somehow just finding this series of tutorials, or you haven’t finished the previous steps, might I suggest you look those up here? This will also be the last time I’ll remind you to setup your MIDI controller in Pure Data before opening your patch. ;)
First off, disconnect your [dac~] atom from [catch~ output], and move it a bit off to the side for now. Create a new sub-patch – [pd antialias]. Now, because I’m not nearly knowledgeable enough to properly construct an anti-aliasing filter, we’re going to cheat on this part…BIG TIME! Go to the “Help” menu in the program menu bar and select “Browser”. Click on “Pure Data/”, then on “3.audio.examples/” and scroll down to “J07.oversampling.pd”. Double click that patch to open it, then open the [pd 16x] sub-patch. This is an anti-aliasing filter that someone else has built, and we’re just going to use it in our patch. Copy everything in in that sub-patch and paste it into your [pd antialias] sub-patch. Now that we’ve copied this code into our patch, you can close the “J.07…” patch. [There are a lot of other useful patches and code examples throughout the help browser. Explore it sometime to see what cool things you can find.]
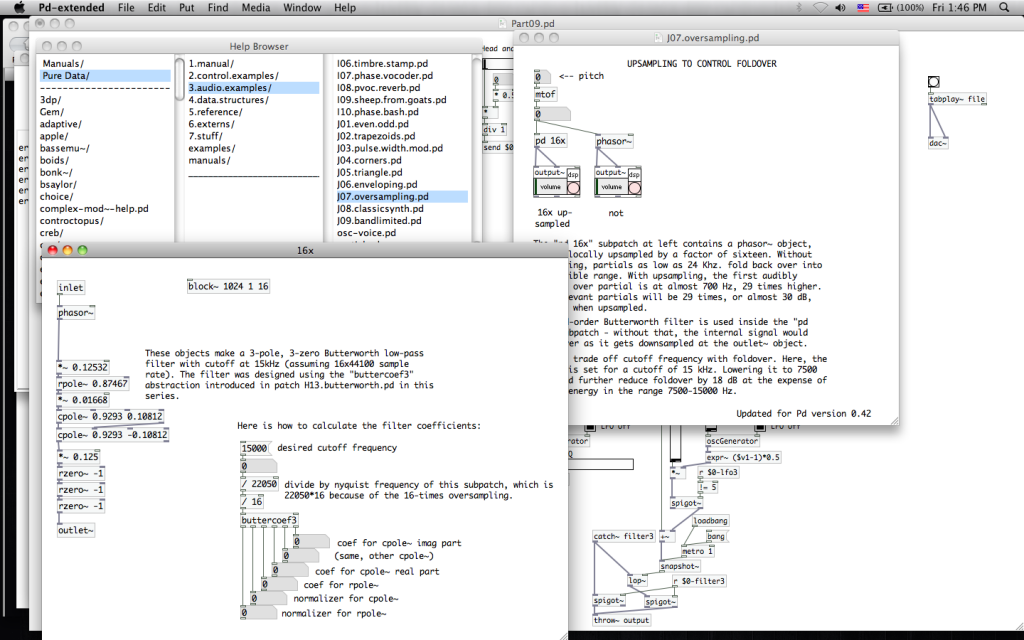 This filter is currently configured for 44.1 kHz, with a cutoff frequency of 15 kHz. If you’d like to change it to fit 48 kHz, with a higher cutoff frequency first click on the [15000]message atom, then note the values in each of the number atoms beneath [pd buttercoef3]. Identify where each of those numbers have been placed in the string of atoms on the left, because you’ll need to replace them in the proper locations. Change the [15000] message atom to hold the cutoff frequency you would prefer (i.e. 18000), and replace the “22050” in [/ 22050] with “24000”. Switch out of “edit mode” and click the message atom. The number atoms will update with the values that you will need to use in the atoms on the left (all between [inlet~] and [*~ 1]). Keep in mind that you will also need to change the sample rate in the “Audio Settings” of PD (Pd-extended > “Preferences” on Mac, “Media” menu on PC). Honestly, I’ve just left my filter at the default settings. Close the sub-patch and connect it to the outlet of [catch~ output] and the inlets of your [dac~].
It’s time to start building the record function. Create the atom [writesf~ 1] and connect it too to the outlet of [pd antialias]. Leave lots of space between the two atoms, though. We’re going to need it.
 [writesf~] is a command to create a sound file. The argument you provide determines how many channels the audio file should have. We’re not working with a multichannel signal, so “1” will serve us just fine. Take a moment to view the “help” file of [writesf~ 1] by right-clicking on it. You’ll notice that this atom requires multiple messages and pieces of data to work properly. It automatically records to the same directory as the patch. Note that you can record to a sub-directory if you like, but you’ll need to create that directory before actually attempting to create a file.
We’re going to set this up to generate a file with a common name, but an iterated number. That way we won’t have to edit the file name in between each recording of a session. Also, we can use [start] and [stop] message atoms alone…but adding a button [bang] for each will make things a little more clear cut for the user, and will help us control some other useful features as well.
Create a [bang] (button style) and connect it to a new [t b b] atom. We’re going to use this [bang] -> [t b b] combo to control the order of operations, so that we don’t need to remember to create our file name and “open” the file before starting the recording. First, let’s build that iterative number with the old stand-by “counting machine” we’ve used in the past; [f 0] <-> [+ 1]. To give ourselves a way to manually reset the counter though, let’s create a [0] message atom and connect it to the cold inlet of [f 0] as well. Connect the inlet of [f 0] to the right outlet of [t b b], then create a new [start] message atom and connect it to the left outlet of [t b b]. Connect the [start] message atom to the inlet of [writesf~ 1].
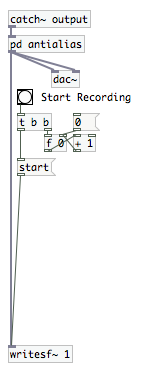 So, our counter fires first, then the “start” message is sent to [writesf~]. Remember though, that PD will complete all code in the right-most path first. If we build our file name creation and “open” argument directly out of [f 0], that means that all of that will be completed before the [start] atoms receives its “bang.” Create the atom [makefilename sound%d.wav]. [makefilname] does exactly what it sounds like; it simply generates a file name as a “symbol”. We haven’t spoken about “symbols” at all, but you can think of them as strings of text. They are not recognized as commands, floats or arguments on their own…but you can send a “symbol” to a variable where one of those is expected. If you have a symbol atom (cmd+4) [13] and fed it to a [float], [float] would output the integer value “13”. So, a symbol is not a value, command or argument…it is simply a string of characters…but it can be read as a value, command or argument when applied in the right situations. Let’s continue by looking at the argument we created in this atom, “sound%d.wav”. The “%d” is a variable specific to [makefilename] that will allow you to insert an integer number into the file name string. [For more on the variables for this particular atom, view its “help” file.] If we connect [makefilename sound%d.wav] to our [f 0] <-> [+ 1] counting pair, we’ll end up with a new file name every time we click the [bang] to start recording: “sound0.wav”, “sound1.wav”, “sound2.wav”, etc. This greatly simplifies the record process within a session. You can easily replace the “sound” portion of the argument with your own custom name. If you’ve created a recording sub-directory (we’ll use the directory name “recordings” as an example) within the directory that houses your patch, you would change “sound%d.wav” to “/recordings/sound%d.wav”. That simple.
We’ll feed this filename (with possible sub-directory if that’s how you’ve configured it) to the “open” command required by [writesf~]. Create the message atom [open -bytes 3 $1]. If you read through the help file for [writesf~] carefully, you may already have a clue to what all of that means: “open” tells [writesf~] to create a new file, “-bytes 3” tells it to create a 24 bit file, and “$1” accepts the symbol from [makefilename] and uses the character string for the file name. The way we have it set up right now, PD will record the file in whatever sample rate it is currently set to. If you’d like to ensure that you’re always recording in a specific rate (we’ll use 48 kHz as an example), you’ll want your message atom to look like this: [open -bytes 3 -rate 48000 $1]. [If you do this, don’t forget that you’ll want to adjust the values in your [pd antialias] sub-patch.] Connect this new atom to the outlet of [makefilename sound%d.wav] and the inlet of [writesf~ 1].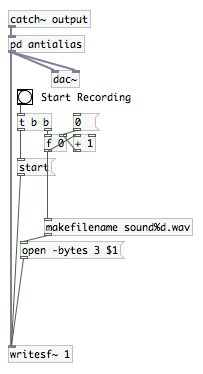 Next, we need to be able to stop our recording. Create another [bang] (button style), then a [stop] message atom. Connect the [bang] to [stop], then connect [stop] to [writesf~ 1]. Our recording controls are now finished!
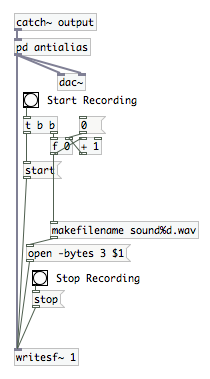 Let’s finish up by doing a few things to help the user out. First, we’ll make a “recording indicator”. Create a [toggle], connect it to a new [metro 500], then connect that to a [bang] (button style). Let’s make that new [bang] really easy to see though. Open its properties, and change its size from “15” to “50”. That’ll be attention grabbing, won’t it? Create two command message atoms with sends over “switch”, and values of “1” and “0”. I want you to connect the first, [; switch 1], to [start]. The other, [; switch 0], should be connected to [stop].
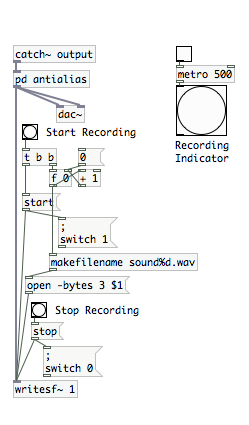 Open the [toggle]’s properties, and set its receive-symbol to “switch”. Test out the recording indicator by switching out of “edit mode”, and clicking on [; switch 1]. The large [bang] should start flashing. Click on [; switch 0], and it should stop.
The only other thing that I would suggest you do now, is go through and add some color to all of the controls that the user should be concerned with. If you open the properties window of any visual atom (bang, slider, radio, etc.), you’ll see the color selections at the bottom of the window. If you want a reference as to what the important controls are, just have a look at my finished project below. To get those nice fancy rectangles behind the text “comments” use the “Put” menu (or shift+cmd+c) to place a canvas in the patch. You’ll need to adjust its size and color in its properties menu. You may run into the issue that it passes over your comment. If that happens, “cut” the comment (the usual cmd+x) from the patch, and paste it in again. you should have no trouble placing the text over the canvas now.

We are now done! I hope this project has given you enough confidence in PD to start playing around on your own. If nothing else, you’ve got a fun little noise-maker that might turn into a useful tool in the future. Thanks for reading this far! ;)
If you’d like to compare your finished patch to mine for troubleshooting purposes, or don’t have the time to build this whole digital contraption and just want to play around, you can download the three files here (make sure you keep them all in the same folder). [disclaimer/don’t sue us note: These files are provided in support of this series of tutorials. The download and use of them is done entirely at your own risk.]
Plugging in an antialiasing filter this way does not work. The way you do it, you generate sound at the normal samplerate, then upsample and filter, but the aliases are already created the moment you generate the sound. As soon as you try to generate a frequency that’s over half the sampling rate you’re working in , it get’s aliased, and once the alias is there, you can’t get rid of it anymore.
So what you should do, is to oversample the whole sound generating part, filter that, and downsample then to the output sampling rate.
Thanks for the info, Kristof!
I can’t get this to work. Following the instructions, I get “moses: no method for ‘bang'” error when the file is loaded. I have no idea how to get this thing working!
Thanks