
Despite all of this, I’m still relatively new at Pure Data and the Max language. To those who chime in with corrections or clarifications in the comments, you are most appreciated! If you’re new to PD, make sure you check the comments section for clarifying info provided by generous souls.
So far we’ve imported a file, created the controls necessary to select the parameters of the wavetable sample we’re going to pull out of that file, and actually constructed the sample we’re going to use for playback. We’re finally ready to implement some MIDI control and listen to what we’ve done thus far! As before, this is all assuming you’ve read and completed parts 1 through 4. Before we open up our patch, we need to configure PureData to look at our MIDI controller.
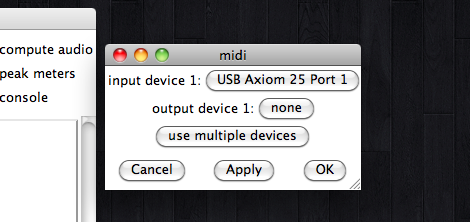
Open PD, but don’t load your patch yet. We need to access the MIDI Settings window to assign a MIDI controller for PD to follow. If you’re on a Mac, you’ll find it in the Pd-extended > Preferences menu. If you’re on Windows you’ll find it under the “Media” menu in the menu bar. It’s probably obvious, but you’ll need your MIDI controller to be turned on and connected to the computer in order for it to show up in the settings window. Open the MIDI settings window, and select your input device.
 Now we’re actually ready to get started. Open up the patch you’ve been working in, then create a new object atom, [notein], and 3 number atoms. Connect each number box to one of the [notein] outlets. Press a key (or whatever the interface type is on your controller) and check out what happens in the three number boxes.
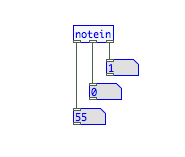 [notein] receives MIDI note data and routes each of the primary elements out to separate channels. The left-most outlet gives the MIDI note number, the middle outlet routes out the note velocity, and the right outlet transmits the channel number. [notein] is how we will control the basic playback of our wavetable sample.
I’d like you to try something else now. Press and hold one note/key on your controller. While holding, watch the number atoms as you press another. Notice that first and second atoms only display the data for the most recently pressed key. [notein] is monophonic. We need to apply some additional methods to achieve polyphonic playback. To do that we’re going to use the object atom, [poly] with the two arguments, “8” and “1” (we’ll need a space in between each argument).
[poly] take accepts a stream of MIDI note number and velocity pairs, and assigns a “voice” number to them. The arguments you provide to [poly] determine the number of voices and assign “voice” stealing. In our patch [poly 8 1] will allow us to create 8 note polyphony, and voice number 1 will be “stolen” should the need arise. This last bit means that if a ninth note is played while the original 8 are still active, the note assigned to voice 1 will be dropped and the new note will be assigned in its place. I’ve simply chosen 8 voices for the purposes of this tutorial series. You can create as many or as few voices as you like. The cold inlet of [poly] receives the MIDI velocity, and the hot inlet receives the MIDI note  number. The outlets, from left to right, output the voice number, the MIDI note and the MIDI velocity respectively. Connect the note and velocity outlets of [notein] to the appropriate inlets of [poly 8 1].
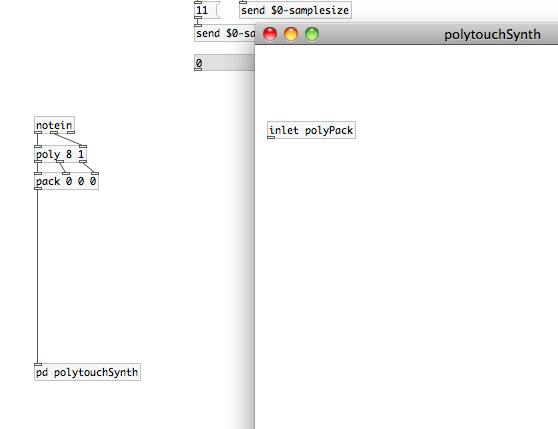
So, we have now added a voice number to the MIDI data for each note that comes in from our controller. What I’d like us to do now is pack all of that data into one single container. That way, we’ll be able to keep the visual clutter to a minimum, and save some space in our patch. The [pack] object atom does just that. It takes a number of arguments and packs them into a “list” that it outputs. In order for it to know how many inlets it needs (how many “items” it will pack into the list), we need to provide it with some initial arguments. [pack] can be used to combine any type of elements…messages, floats, bangs, etc…but we’re only going to be concerned with floats in this implementation. Also, we don’t want our synthesizer to be playing any notes if we’re not actually pressing any keys. So, our initial arguments are going to be “0 0 0″…making our poly object look like [poly 0 0 0]. This will create three inlets. Connect the outlets of [poly 8 1] to these inlets in series. This means the first number (or float) in our output “list” will be the the voice number, the second will be the MIDI note, and the third will be the MIDI velocity.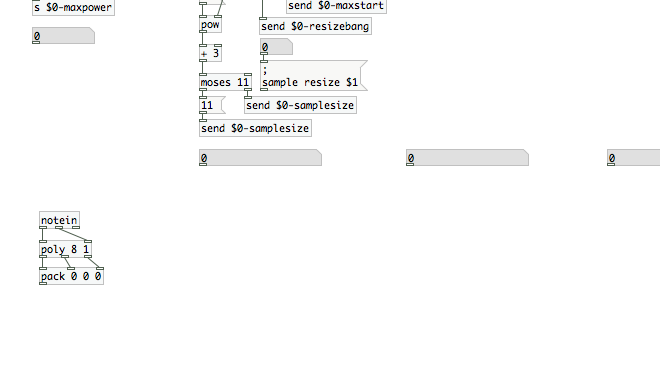 The next few pieces of code are going to take up a fair bit of real estate. To save space, we’re going to create a sub-patch that we’ll call “polytouchSynth”. Create the object [pd polytouchSynth] and, when the new sub-patch canvas opens up, create the object [inlet polyPack]. Click back over to your main patch window, and route the outlet of [pack 0 0 0] to the new inlet of [pd polytouchSynth].
 Before we go back into our sub-patch, we’re going to build something called an “abstraction.” An abstraction (or ‘independent”) is somewhat similar to a sub-patch, in that it can act like an object atom inside a PD patch. However, it’s different from a sub-patch in the fact that it is its own PD patch. Think of it as a standalone patch, saved on the hard drive, that another patch can access and use. If you’re confused at all, don’t worry. It will make perfect sense in a few minutes.
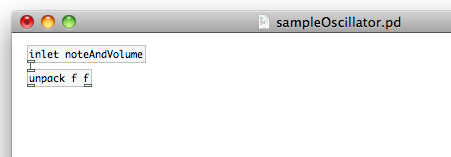
Go to the “File” menu in PureData and select “New” (or just press cmd+n). This will create a brand new patch for you. I want you to save it in the same directory as the patch you’ve been building up to this point, and save it with the name “sampleOscillator”. In this patch, we’re going to create the code that will be used by each “voice” of our poly-touch synth, to play back our wavetable sample. Because we’re not going to use this patch as a component of another, we’re going to need an inlet to accept MIDI data. Create an object atom, [inlet noteAndVolume]. This inlet will accept portions of the list created by the [poly 8 1] -> [pack 0 0 0] signal chain. We’ll strip the voice number off before it reaches this inlet, leaving only the MIDI note and velocity values. Those two values are still in “list” form though, and we need to separate them. To do that, we’ll use the [unpack] object atom. We need to provide it arguments to identify how many outlets it will need, as well as what type of data will be output. We’re dealing with numbers exclusively in this situation, so we need the argument “float” (or simply “f” for short). So, our object will look like [unpack f f], and its one inlet will be fed from the [inlet noteAndVolume] object atom we just created a moment ago.
 Now we need a method to play back our wavetable sample in a way that will map over our MIDI control surface. We could construct a playback method to output each individual sample of our “sample” array in sequence at PD’s sample rate, but we could [would] end up with interpolation artifacts. [I tried it one time, just for the heck of it. ;)] Fortunately, PD provides a much simpler way, the object atom [tabosc4~]. Remember that the tilde (~) implies that audio is involved. [tabosc4~] treats the contents of an array like an oscillator, playing it back at a speed defined by a signal or value. Create the object and provide the argument “sample”, because we need to tell it what array to play back. Your object should now look like [tabosc4~ sample].
We have a small issue between our MIDI note and [tabosc4~ sample] that needs resolving. All oscillators in PD (this includes [sin~], [cos~], [phasor~], etc.), expect to see either an audio signal or a frequency value at their inlet (notice that the inlet on [tabosc4~ sample] is grey, not white). MIDI note values, on the other hand, range from 0 to 127. That’s not exactly an effective use of the range of audible frequencies. We need to convert the MIDI note values to an actual frequency number or signal, and we can do that with the object [motf~] (“MIDI to frequency”). It will take a MIDI value, and convert it to an audio signal of equivalent frequency. Handy that they have that built right into PD, isn’t it? We’re going to place that in between the left outlet of [unpack f f] (the MIDI note) and the inlet of [tabosc4~ sample]. Now we’re feeding the wavetable sample oscillator the value it needs to control pitch. 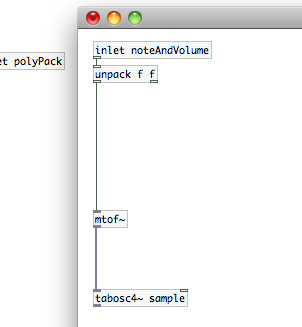 Of course, we’re not done yet.
It would be nice to have that MIDI velocity control the actual volume of playback, wouldn’t it? To do that, we need to keep in mind that the PD measures amplitude on a scale of 0 to 1. The easiest way to scale our MIDI note velocity to that range is to divide by the maximum value…127. 0 divided by 127 is 0, and 127 divide by 127 is 1…meaning that all values between 0 and 127 will fall between 0 and 1 after applying that division process. Create a new [/ 127] math atom to handle that division. We now have our velocity controlled scalar value for volume. We’re all set to apply that to the output of [tabosc~4 sample]. If, however, you’d like to convert the MIDI volume range to a logarithmic scale, we can use a similar process to that applied in the [pd sampleBuild] sub-patch from the last article:
- Create a [t f f] atom
- Create a [*] math atom
- Connect the right outlet of [t f f] to the cold inlet of [*]
- Connect the left outlet of [t f f] to the hot inlet of [*]
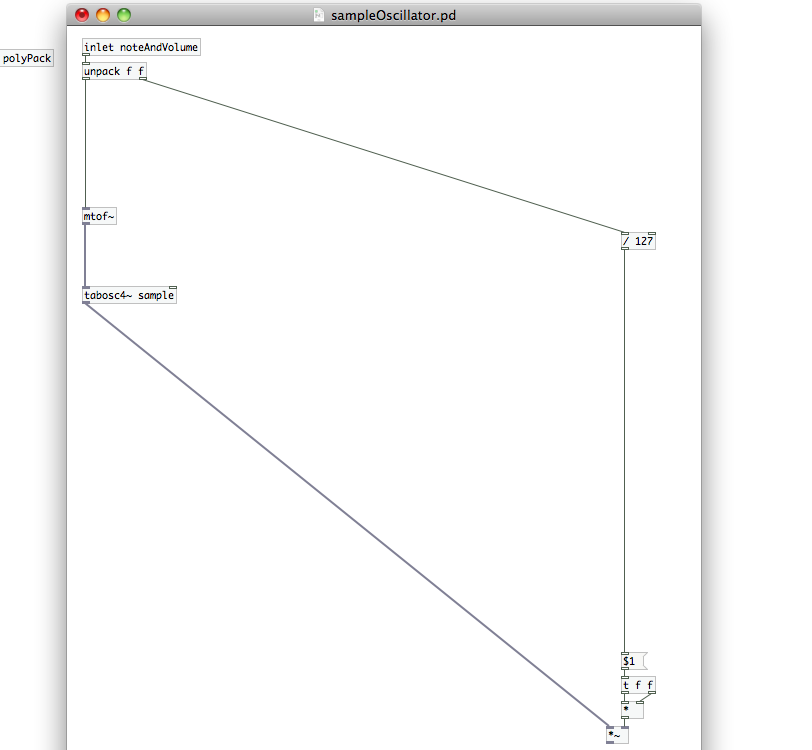
To apply the scalar value we just derived to the output of [tabosc4~ sample], we simply need to use a math atom. [tabosc4~] automatically outputs the maximum amplitude of its target array. If we multiply it by that volume range (0 to 1), we will scale its output to the appropriate level to match our MIDI velocity. Keep in mind that we’re dealing with an audio signal though, this means we need to add a tilde to our simple math atom. Create [*~]. connect the outlet of you MIDI velocity path to the cold inlet, and connect the outlet of [tabosc4~ sample] to the hot inlet.We’re nearly done with our “abstraction” patch now. The final thing we need, is a way to send the audio back out of it. Perhaps you’ve guessed already.
We’ve already worked with [outlet]s before in sub-patches, and we know that atoms that handle audio need a tilde attached. So, we’ll create a new object, and fill it with “outlet~”. This will pass our audio back out to whatever patch utilizes this abstraction patch. Connect [outlet~] to [*~], save this patch (remembering to keep it in the same directory as your primary patch), and feel free to close it.
 Switch back over to your sub-patch now. [note: Remember, you can open a sub-patch back up by switching out of “edit mode” and clicking on the sub-patch atom.] Once we’re back into the sub-patch, we need to send the data from each of our voices to the patch we just created. Here’s where we experience the strength of abstraction patches. Create a new object and type “sampleOscillator” into it. [Make sure to match the name of the abstraction patch we just built exactly. If you used a slightly different name, or used different letter cases…use that instead of what I just typed.] If your abstraction patch is in the same directory, which it should be, PD will create the [sampleOscillator] atom with a data inlet and audio outlet. Copy this object atom, and paste it into your sub-patch seven more times, as we need one of these for each of the voices. By setting this up as an abstraction, rather than a sub-patch, each of these new object atoms will exist independently of one another within the patch. We can also open the abstraction up from here, just as we would a sub-patch. You can go in and make edits in one, and all other instances will be updated as soon as you “save” the patch. This will be a useful feature in the upcoming articles as we add more playback features.
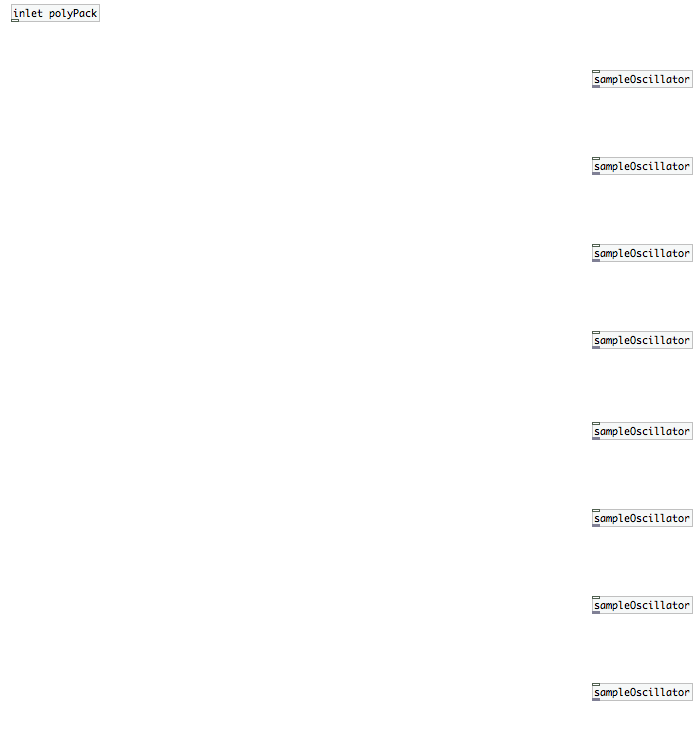
So, we now have one oscillator for each voice (8 total). We just need to route each voice to its own oscillator. We’ll use the [route] atom for that. [route] sorts and distributes any type of data based on the arguments you provide it. Unlike [pack] and [unpack], it works with actual values and symbols, rather than general data type. We have 8 voices, and we know that the numbers 1 through 8 are being assigned to the head of the “lists” of MIDI data thanks to [poly 8 1]. So we’ll create [route 1 2 3 4 5 6 7 8]. Before we go further, I’d like you to count the number of outlets that have been created on this atom. You should come up with a count of nine. Why is there an extra outlet? That final outlet is for routing data that does match any of its arguments. That means that the outlet for “8” is the second from the right, not the right-most. Remember this as we begin making connections.
Connect the outlet of [inlet polyPack] to the inlet of [route 1 2 3 4 5 6 7 8]. Underneath the [route] atom, I’d like you to create 8 “send” atoms. We’ll need to create a variable for each of these. Let’s use $0-1 through $0-8. Connect these to the outlets of [route 1 2 3 4 5 6 7 8], but remember that we don’t want to connect to the right most outlet. Above each of your [sampleOscillator]s, create “receive” atoms to catch this data. Using the variables $0-1 through $0-8 we just created, attach each receive to one [sampleOscillator] only. Now, as the individual data packets for each MIDI key press come in, [route 1 2 3 4 5 6 7 8] will strip off the voice number and route the data to the appropriate [sampleOscillator] instantiation, which will unpack the MIDI note and velocity and play back the “sample” array.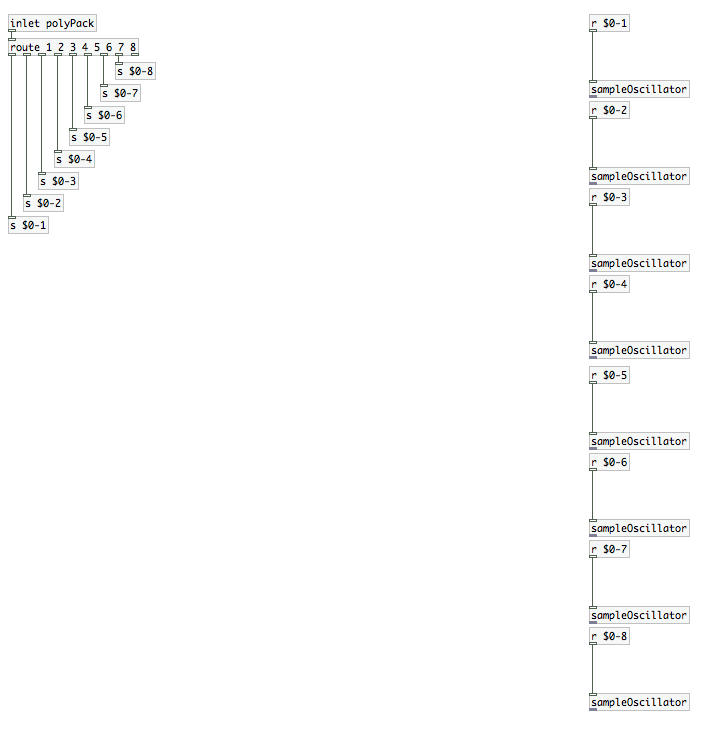 To finish off this sub-patch, we need an audio outlet to carry the [sampleOscillator]s’ outputs back to the parent patch. We’ll do this the same way we did in the abstraction patch, with [outlet~].
 We’re almost done. Just one more thing to actually hear our wavetable playback! We’re done in the sub-patch, so go ahead and close that. If you look at the [pd polytouchSynth] atom, you should now see a gray outlet. That’s right, we’re going to attach a [dac~] atom to that. Make sure to connect to both inlets of the [dac~] (just like in the photo at the head of this article), and that “compute audio” is checked on the PD console window. If you’ve done everything correctly, you’re now ready to import a file, generate a sample, and play it back with your MIDI device.
[note: If you don’t have a MIDI controller, you can connect number atoms to the hot and cold inlets of [poly 8 1], instead of [notein]. Just be sure to open up the “properties” window of the number atom connected to the cold inlet and set its “upper” limit to 127. You may want to set the “upper” limit of the other number atom to 20,000, but that’s up to you. Switch out of “edit mode” and click and drag up or down on the number atoms to change values; or click once on a number atom, type a value, and press return/enter.]
Have fun experimenting with this now that you can actually hear what it does. Next time, we’ll implement some of the pitch effects that can be controlled with our MIDI device.
Hi, I’ve followed your tutorial from start to here but I can’t hear the wavetable. Can hear the file playback fine and everything looks like it should be working. I don’t have a midi controller so followed the last step as well, but still getting nothing. Any suggestions?
Just to confirm…you have two number boxes to feed each of the inputs on [poly 8 1], yes? Have you opened the properties of each number box to change the upper limit to 127? Try this. change the 8 in [poly 8 1] to a 1…so that you now have [poly 1 1]. That will ensure that you’re always using the same voice. Also remember that the “hot inlet” receives the “bang”. Try setting the volume first (number atom feeding the cold inlet), then setting the MIDI note (number feeding the hot inlet). No volume changes will occur if you haven’t changed the “note” value after the volume. you can fix this by adding a [bang] that connects to the inlet of your “note” value number atom. Then you can change the volume and click on the [bang] to update the signal without actually changing the note value.
Let me know if this solves the problem for you.
Hi, nice post. I’m just wondering if you can tell me how you did the head-tail smoothing. in your first image I saw that you are sending that variable.
I created a looper in PD using tabwrite~, tabread4~ and phasor~ but it’s becoming hard to create an envelope to smooth the beginning and end of the loop because I don’t have any way to synchronise the “smoother” with the phasor~. There is no way to tell whe phasor~ output is 0. It would be great if you can give me a hand with that. Thanks!!!
I covered the head/tail smoothing in Part 3 of this series of articles (https://designingsound.org/2013/04/pure-data-wavetable-synth-part-3/). If that post doesn’t answer your question, let me know.
Hey! Awesome tutorial so far, and it looks like the best stuff is still coming in the next couple sections (I read ahead a bit). I’m pretty new to synthesis in general and definitely PD, but I at least seem to be making head way on the PD part. I have some samples that I’ve been loading into the synth and they seem to sound OK when I bang [tabplay~ file], but when I input from my midi device (simple keyboard), the sound doesn’t seem to be the same. Do you know why this is? My first guess was I messed something up when creating a sample, but the graphs seem to be close to identical.
Hi, Steve. It sounds different because PD is playing back the sample at a different speed based on the MIDI note; not to mention the fact that you may be playing back only a portion of the full sample (depending on how you set things up). This patch is really designed for mangling your source sound. To play it back in the way you’re thinking would require a far more complicated patch than this tutorial is designed to be.