 Despite all of this, I’m still relatively new at Pure Data and the Max language. To those who chime in with corrections or clarifications in the comments, you are most appreciated! If you’re new to PD, make sure you check the comments section for clarifying info provided by generous souls.
We’re finally going to build our wavetable sample today. Once we’re done with this component, we’ll actually be able to start building the playback system, which is where the real fun begins. As before, I’m working under the assumption that you’ve read the previous articles.
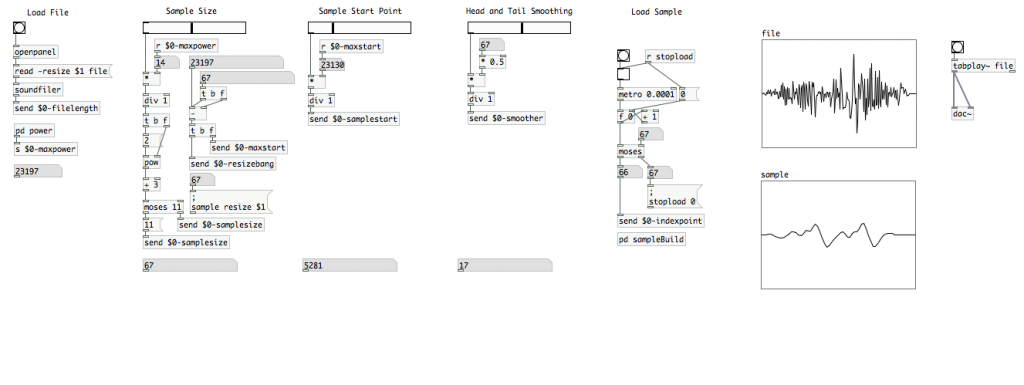
The picture above should give you a good indication of where we’re going. The new section that we’ll be working on today is labeled “Load Sample,” and the bulk of the visible code should look very familiar to you. It’s remarkably similar to the little sub-patch/function we built to calculate the maximum exponent that can be used to construct the sample out of our original file. [We did this in the second article.] Let’s review what’s happening in this code.
We have a [bang] feeding a [toggle], which starts [metro 0.0001]. The bang is not configured to “receive” any variables. We’re leaving this one purely manual. In [metro], we’re using the argument “0.0001” so that we can load up the sample very fast. You’ll appreciate this if you decide to build a very large wavetable sample. Remember that the smaller the argument value, the faster [metro] sends out “bangs.”
[metro] controls our “counter” [f 0] <-> [+ 1]. If you don’t remember how these three atoms work together in this situation, refer back to the second article. We feed the out put of our “counter” combination to the hot inlet of [moses]. The cold inlet is fed by a number atom, whose “receive symbol” field in the “properties” menu is set to “$0-samplesize”…which receives it’s value using the horizontal slider and subsequent code we created early in the third article. If the the “counter” value is less than the value transmitted over “$0-samplesize”, it passes to the [send $0-indexpoint] atom that’s been created. We’re going to access this variable in our sub-patch. When the “counter” value matches the sample size, an internal command message tells PD to send the value “0” over “stopload”. We have the [r stopload] atom near the top of this “load sample” code. Just as before, we use this variable to turn off [metro 0.0001] via the [toggle], and it resets the counter value back to “0” through the use of a message atom. In this case, we want the counter to reset to “0”, because we are using it to send index points for our wavetable array that we’ve previously labeled “sample.” Remember, computers count from 0 up, not 1. This is also why we’ve set [moses] to stop the process as soon as the “counter” value matches “$0-samplesize”. The range {0 to 10} is actually 11 values, if we count the 0…which the computer does. {0 to 11} would actually be 12 values; one more than we earlier re-sized our “sample” array to. By setting the [moses] argument to 11, through use of the cold inlet, we’ve ensured that 11 won’t pass to our “$0-indexpoint” variable. We’ve stopped the process at 11 values…right where we need it to.
I’ve kind of blown through that section. If you’ve been keeping up on the earlier articles in this series, then you should have been able to follow along and construct all of that code without the detailed explanations…and you do have the image at the head of the article for reference. If you had some trouble, article two in this series goes through the construction of nearly identical code. Add the sub-patch [pd sampleBuild], if you haven’t already. This is where the meat of today’s tutorial resides, and it’s going to be a bit more complicated than anything we’ve done yet. We’ll spend the rest of our time in this sub-patch.
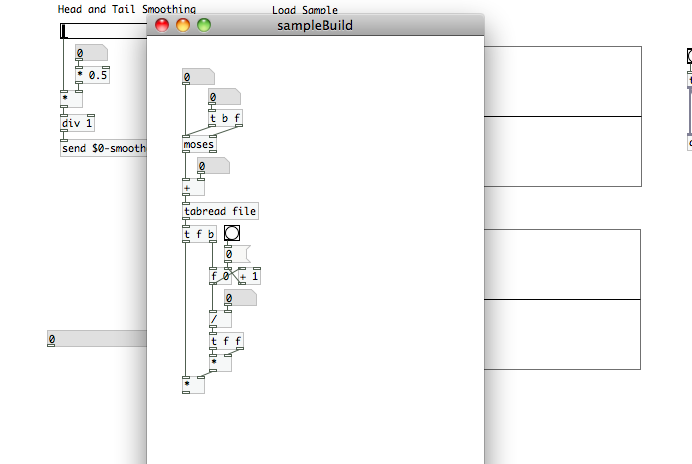
We’re actually not going to create any inlets or outlets for this sub-patch. First, we need two number atoms. Through their properties menus, set one to receive “$0-indexpoint” and the other to receive “$0-smoother”. Remember that these two variables we’re dealing with can pass to and from sub-patches. Create a [moses] atom and a [t b f] atom. Here’s how we’re going to connect them:
- “$0-indexpoint” number atom goes to the hot inlet of [moses]
- “$0-smoother” number atom goes to the inlet of [t b f]
- The right outlet of [t b f] goes to the cold inlet of [moses]
- The left outlet of [t b f] (the “bang” message) goes to the hot inlet of [moses]
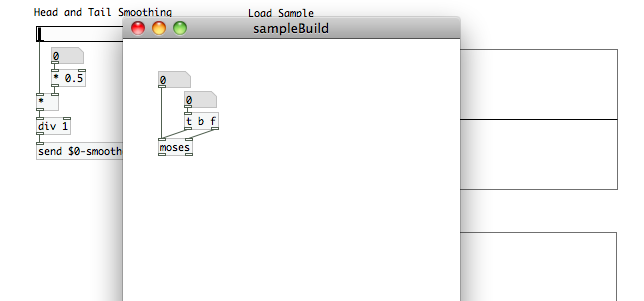 Just a quick note about our use of [moses] in this sub-patch. We’re sending the “$0-smoother” value to the cold inlet and a “bang” to the hot inlet well before [moses] actually starts receiving index point values to sift through. The PD console window will probably give you the error, “moses: no method for ‘bang’.” Everything is OK, and this error won’t break anything. It’s simply letting us know that there are pieces of data, required for this sub-patch calculation that haven’t been generated yet. It will all work in the end once we actually trigger this code…if built correctly, of course. ;)
Remember that the variable “$0-smoother” is carrying the number of samples over which a fade will be applied to our wavetable sample (to prevent non-zero crossings). We’re using [moses] to create a process where that fade will be applied at the head. We’ll also be using [moses] once more, shortly, to leave the body of the sample at nominal and apply a fade on the tail. Also remember that the “$0-indexpoint” variable is carrying the index points of our sample array; it’s not referring to our imported file at all. That’s what we need to establish next.
Create an object atom, and turn it into the math atom [+]. Create a number atom, and assign the “$0-samplestart” variable to it’s “receive symbol” field. The new number atom feeds the cold inlet of [+] and the hot inlet is fed by the left output of [moses]. By adding the two values, we are now referencing the user defined start point within the imported file. If the start point was sample 3,283, that’s where our code will now find the value (in the “file” array) to assign to the first index point of the “sample” array. We’re equating the “sample” index point “0” to the “file” index point “3,283”. Create a new object atom and type in “tabread file”. Connect it to the outlet of [+]. [tabread] tells PD to output the value stored at the index point of whatever value it receives (the number fed to its inlet). The argument tells PD which array to read from. In this case, we’re reading from the array “file”, which is holding our imported sound file.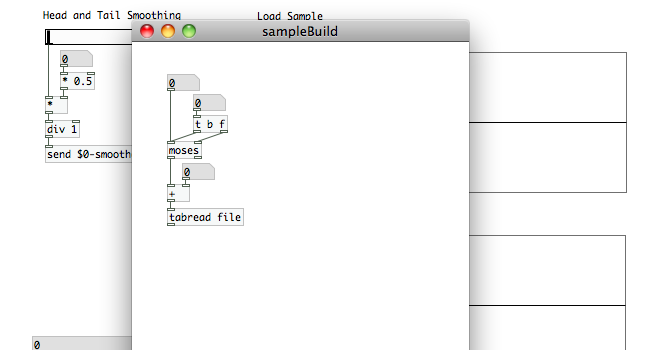 Once we have the value of a given index point, we want to scale it to via a value appropriate to its point along the fade (remember, we’re still just looking at the code that is used while we’re in the “head” of the wavetable sample). Let’s start off by creating a [t f b] atom. This one is different from the previous [trigger] atoms we’ve created. I’ve switched the order of the float and the bang. We want the “bang” to output before the float, so we’ve put it to the right this time. Don’t screw up the order; otherwise, this won’t work! Next, create a [f 0] <-> [+ 1] counter pair as we have in the past. The right outlet of [t f b] connects to the hot inlet of [f 0]. Let’s also create a button style [bang] and a message atom [0]. Open the [bang]’s properties menu, and assign “stopload” to its “receive symbol” field. Connect that to the [0] message atom, and connect the message atom to the cold inlet of [f 0]. This will reset the counter once our sample is built…readying it for the next calculation process, should the user decide to define a new sample.
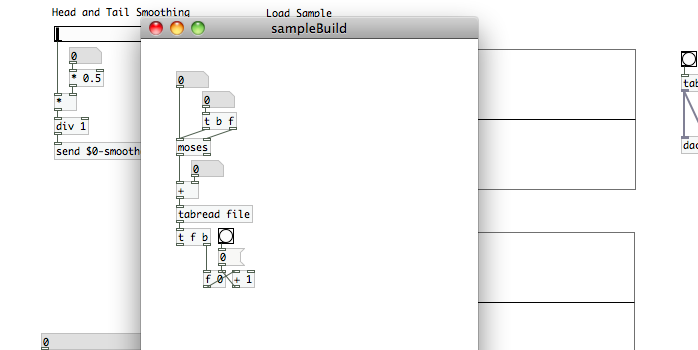 Create a new number atom, and set it’s “receive symbol” to “$0-smoother”. Create an object atom and turn it into a [/] math atom. The “$0-smoother” number atom goes to its cold inlet, and the output of our “counter” goes to the hot inlet. This is how we define our fade. Dividing the float number (which is increasing with every new index point) by the “fade length”, we are outputting a value between “0” and “1”. This is exactly how we’ve scaled values in the past, we’re just automating it over multiple values. Near the start of the fade, the scalar quantity will be close to “0”. As it reaches the end of the fade, the value will be closer to “1”. If you’d like a linear fade, then you’re all set with this piece. If you’d like an “audio taper”(logarithmic) fade instead, which I think sounds better, then follow these steps:
- Create a [t f f] atom (trigger with two float outlets)
- Create a [*] math atom
- Connect [t f f] to the outlet of [/]
- Connect the right outlet of [t f f] to the cold inlet of [*], and connect the left outlet to the hot inlet
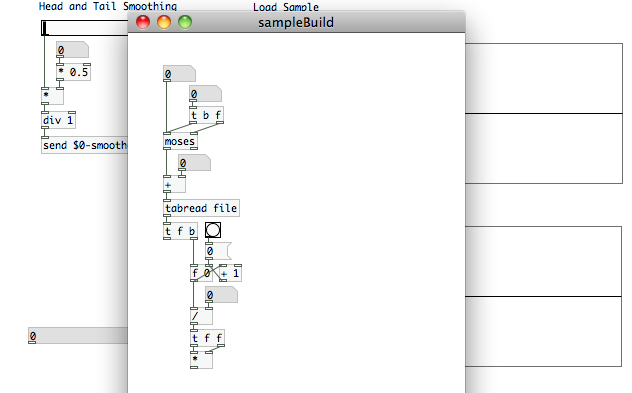 We now need to apply this scalar quantity to the value of the index point we read using [tabread file]. Create a new math atom, [*], and connect the outlet of the final math atom in your fade calculation code (either the [/] or the [*], depending on which type of fade you chose) to the cold inlet of the new [*]. Connect the left outlet of [t f b] to the hot inlet of [*], and we’re now done with the code for creating the “head” of the wavetable sample. It’s time to move on to the body.
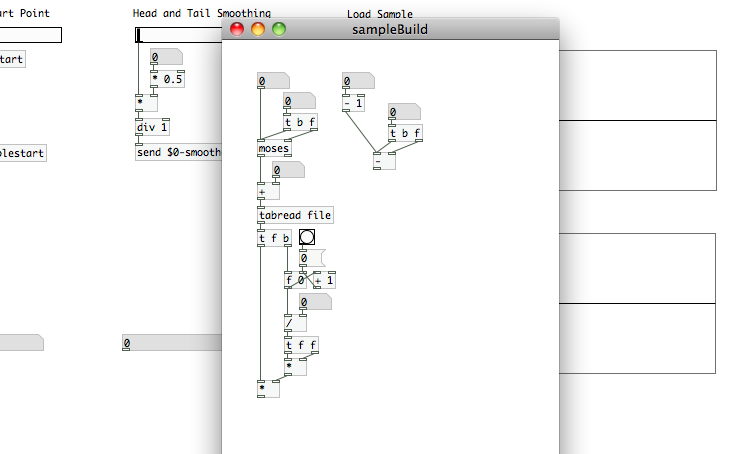
 Create two new number atoms…one to receive “$0-samplesize”, and one to receive “$0-smoother” (set in their “properties” menu). We’re going to use these to calculate at what index point the fade out needs to begin. Remember that “$0-samplesize” is giving us the total number of indexes in the user defined array, which is one integer higher than the number of the final indexpoint…because the first index point is 0. Create the math atom [- 1] and connect it to the output of the “$0-samplesize” number atom. This will now output the identifier value of the last index point. Create a [t b f] atom (note the order of “b” and “f”!) and connect it to the outlet of of the “$0-smoother” number atom. Create the math atom [-]. Connect the right outlet of [t b f] to the cold inlet, and the left outlet to the hot inlet. Also, connect the outlet of [- 1] to the hot inlet. This will produce the index point at which the fade out of our sample should begin.
 We’re going to feed this to the cold inlet of a second [moses] object. The hot inlet of this new [moses] will be fed by the right outlet of our first [moses]. Copy the “$0-samplestart” number atom, [+] math atom, and the [tabread file] atom from underneath the first [moses], paste them all beneath the new [moses] atom, and connect the hot inlet of the [+] atom to the left outlet of that new [moses]. Since this is the body of the sample, where we aren’t applying any fades, we don’t need to build anything additional underneath it. It will simply output the value read at the index point.
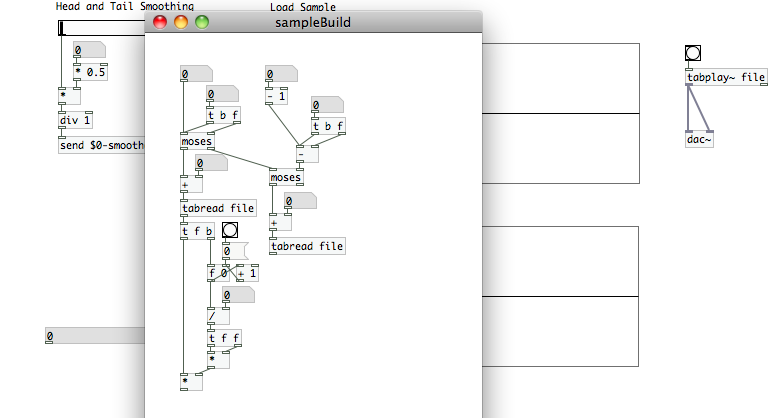 The number atom -> [+] -> [tabread] should still be in your clipboard. Paste that group once more (this will now be its third appearance in this subpatch) and connect the right outlet of your second [moses] to the hot inlet of [+] in the newly pasted group. Next, copy everything under your first [tabread file] (the “fade in” portion of the code) and paste it under your third [tabread file]. We’re going to make a few subtle changes to this bit of code we just pasted into the sub-patch.
First, disconnect the [0] message atom from [f 0], but don’t get rid of it. Modify the [f 0] atom by removing the “0” (and the space); making it simply [f]. Create a new message atom with “$1”. In this way, a message atom can pass a value that it receives at its inlet. Create a number atom that receives the “$0-smoother” variable, and create a math atom [+]. The “$0-smoother” number atom will feed both the [$1] message atom and the cold inlet of [+]. The [0] message atom will feed the hot inlet of [+], and the [+] outlet will connect to the [$1] message atom as well. Connect the [$1] message atom to the cold inlet of [f]. This message atom is a bit superfluous here, but it’s a good way to introduce you to this particular use. It also helps us keep track of what we’re feeding to the cold inlet of [f]. Finally, we need to edit the [+ 1] atom. Turn it into [- 1].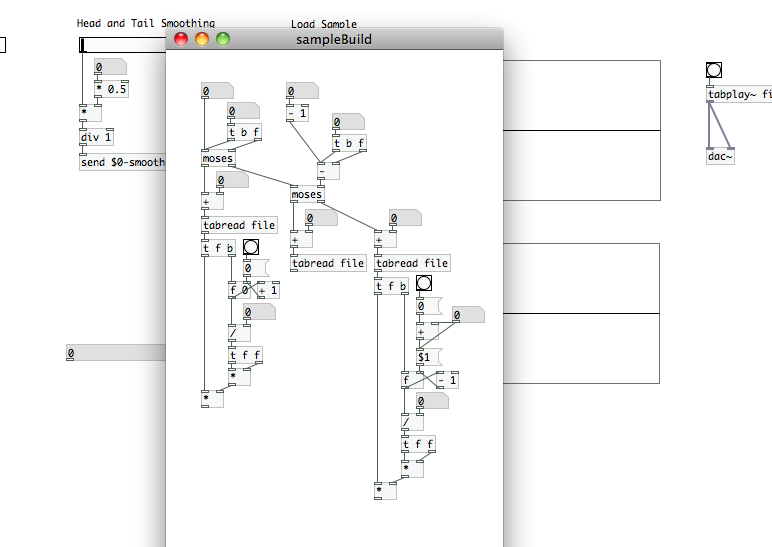 What the heck did we just do here? Well, we just created a way for the tail fade to mirror the fade we applied at the head of the sample. [note: Again, if you want a linear fade, you don’t need the [t f f] -> -> [*].] This time we’re starting with a large number and counting down for the division. This gives us larger values at the start of our fade, and smaller values at the end…ensuring that we ramp down from the scalar quantity “1” to “0”. We had to make the adjustments to the code above [f] <-> [- ], to make sure that we reset [f] to the maximum value of “$0-smoother” when calculations are completed. Again, this is to make sure that the calculations perform correctly if the user decides to create a new sample.
Are you ready for this? We’re nearly done. Here’s what this sub-patch does. As it receives an index point, it checks…via our two [moses] atoms…if the index point is part of the head, body or tail of our wavetable sample. If it is in either fade zones, it applies scaling based on the index point’s position relative to the user defined fade length. If the index point is not identified as being part of the head or tail, it simply passes out the unscaled value. All we need to do now, is write those values to our sample.
Create a number atom that receives the variable “$0-indexpoint”. Then create an object atom, and fill it with “tabwrite sample”. The [tabwrite] object tells PD to write the value it receives at its hot inlet to the index point it has received at its cold inlet. Just like [tabread] the argument tells it which array to write the data to. We want it to write to the array “sample”, which we created earlier to house our wavetable sample. So, the “$0-indexpoint” number atom connects to the cold inlet of [tabwrite sample] to make sure we write to the correct index point, and the outlets of our three sections connect to the inlet. Since they only are outputting values when the [moses] atoms send data down their respective code lines, we don’t have to worry about [tabwrite sample] receiving multiple values per index point. That just won’t happen. [Again, provided you’ve build everything correctly.]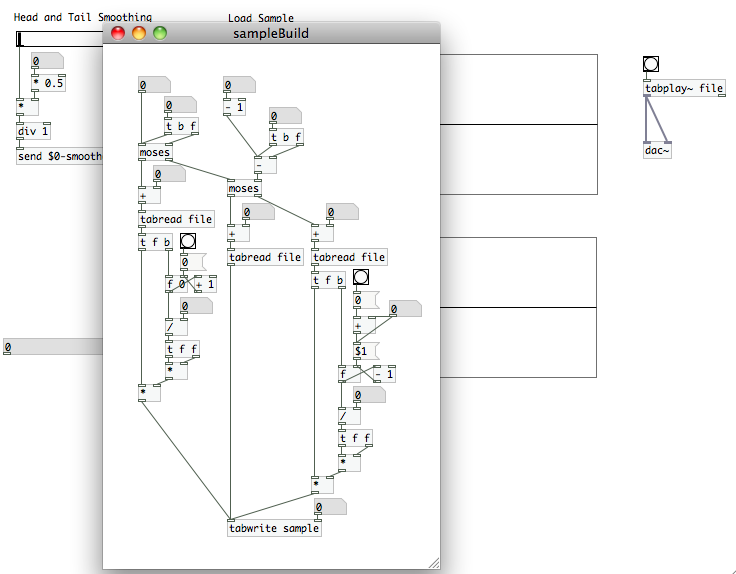 Close the sub-patch, save your patch, and test everything out. Load a file, set the parameters, and then click the [bang] in your “load sample” section. If you’ve done everything correctly, your “sample” graph should fill. If you’ve set head and tail smoothing to anything other than zero, you also have a nice clean zero crossing at the start and end of the sample.
 In our next article, we’re finally going to hook up a MIDI device and start playing back that sample. I hope you’re looking forward to it!
Hi Shaun,
i start feeling a bit embarrassed about commenting all of your articles.
Another PD object which could simplfy your patch is the uzi. It emits a precise number of bangs as fast as possible.
You can use it to exactly extract the number of samples you want from the sound file. You just need to feed its right inlet with the $0-samplesize.
As regards the samplebuild subpatch, I would rather use expr objects to calculate the sample value based on the smoother and indexpoint and original value (using 2 expr objects in series for the head and tail parts, or one big imbricated if).
It also allows you to specify any mathematical function for smoothing directly in the expr.
If i could attach some file to show you what I did, i would…
Cheers,
Ulysse
Don’t be embarrassed at all. I haven’t come across [uzi] in Pure Data yet, so I appreciate the mention. I appreciate the feedback, as I’m in no way an expert in PD. I’m happy to have someone else take a look at my code and point out areas for improvement. All of this information is also useful to the people who are starting to go through these tutorials. So, don’t stop. ;)
Thank you for your great tutorials!!! :-)
I think uzi is not a standard object of PD Vanilla, and I would appreciate to continue using only use standard PD objects for a broader use, for example with libPD, or other libraries.
What I do, when I use send/receive symbols, is to simply copy the send/receive symbol to the atoms label, then the patch is more ‘readable’, being able to see which variables come in/out to/from which atoms …
[uzi] isn’t part of Pd Vanilla, but [until] is and has the same functionality.