
Playing samples straight through will get us there, but it sounds so much nicer if we have options to shape the sounds. A good first step is volume envelopes. In this lesson, we’ll make an attack-sustain-release (ASR) envelope and modify our sampler to use it to modulate the volume.
Lesson 2 – Envelopes
What’s an Envelope?
If you’re familiar with using synths, samplers, and effects in a DAW, chances are you already know how an envelope works. It’s a way to describe how some parameter changes over time. Common uses include changing volume, filter cutoff, and pitch, but it could really be any knob or slider you can think of.
ASR Envelope
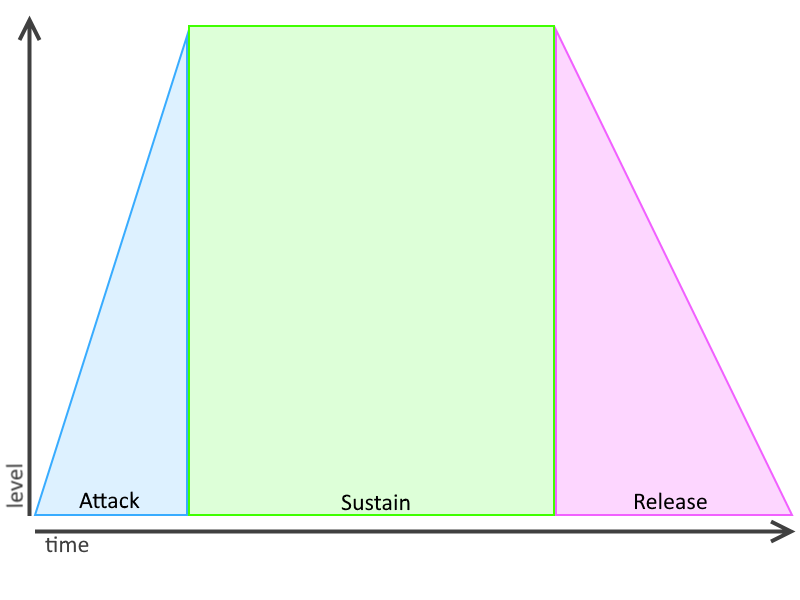
To get started, let’s define our parameters. We’ll want to define an attack time, which is how long it takes for the level of the envelope to go from zero to full volume. We’ll also define a sustain time, which is how long it should stay at full volume. And finally, we’ll define a release time, which is how long it takes to go from full volume back down to zero. So, our envelope graph will look something like this:
Since we want this to be sample-accurate, we’ll convert the attack time and release time into an increment per sample. Or in other words, we’ll find out how much the level should change for each audio sample. The formulas look like this:
attackIncrement = 1.0 / (attackTimeInSeconds * samplesPerSecond)
releaseIncrement = 1.0 / (releaseTimeInSeconds * samplesPerSecond)
And for the sustain time, we’ll want to know how many samples we’ll be holding at max volume. That formula looks like this:
sustainSamples = sustainTimeInSeconds * samplesPerSecond
In all three cases, we’re multiplying the time in seconds by the sample rate to get a duration in samples. So, seconds * samples/seconds = samples. For the attack and release, we want the change in level per sample, so we invert the duration.
In order to get the level for each sequential sample, our GetLevel() function will:
- Start at 0.0
- Increment the level using the attack increment until the level reaches 1.0
- Stay at 1.0 until the sustain sample count reaches 0
- Decrement the level using the release increment until the level reached 0.0
Hooking it Up
Now that we have our envelope code, we’ll need to hook it up to our sampler. First off, we’ll add an envelope to our SamplerVoice class:
private readonly ASREnvelope_Lesson2 _envelope = new ASREnvelope_Lesson2();
Then we’ll modify our Play function to take some additional parameters:
public void Play(AudioClip audioClip, double attackTime, double sustainTime, double releaseTime)
{
  sustainTime = (sustainTime > attackTime) ? (sustainTime - attackTime) : 0.0;
  _envelope.Reset(attackTime, sustainTime, releaseTime, AudioSettings.outputSampleRate);

  _audioSource.clip = audioClip;
  _audioSource.Play();
}
Note the safety check to make sure we don’t get a negative sustain time.
And finally, we’ll use the OnAudioFilterRead callback to apply the volume change to the playing audio. OnAudioFilterRead gets called every time a new buffer of samples gets passed on from the AudioSource, and includes the sound from the sample we’re playing. In order to apply the volume, we’ll iterate through each sample in the buffer and multiply it by the level from our envelope:
private void OnAudioFilterRead(float[] buffer, int numChannels)
{
  for (int sIdx = 0; sIdx < buffer.Length; sIdx += numChannels)
  {
    double volume = _envelope.GetLevel();

    for (int cIdx = 0; cIdx < numChannels; ++cIdx)
    {
      buffer[sIdx + cIdx] *= (float)volume;
    }
  }
}
Note that if we get a multi-channel sound, we only want to get the volume from the envelope once for all channels.
Our Sampler code doesn’t have to change much to support the new volume envelope on the SamplerVoice. We’ll just add three fields for the attack, sustain, and release time:
[SerializeField, Range(0f, 2f)] private double _attackTime;
[SerializeField, Range(0f, 2f)] private double _sustainTime;
[SerializeField, Range(0f, 2f)] private double _releaseTime;
And then we’ll pass those values on to the SamplerVoice when we play a sound:
_samplerVoices[_nextVoiceIndex].Play(_audioClip, _attackTime, _sustainTime, _releaseTime);
(view full code)
Try it out in the editor, and you should hear your envelope parameters changing the shape of the sound!