Guest Contribution by Rob Warren.
One of the most important aspects of audio production is the workflow.
No matter which DAW you use, workflow is critical to creating smooth and fast production. Setting up and accessing pre-made templates is easily one of the most effective ways to save time and effort, which in business, is money.
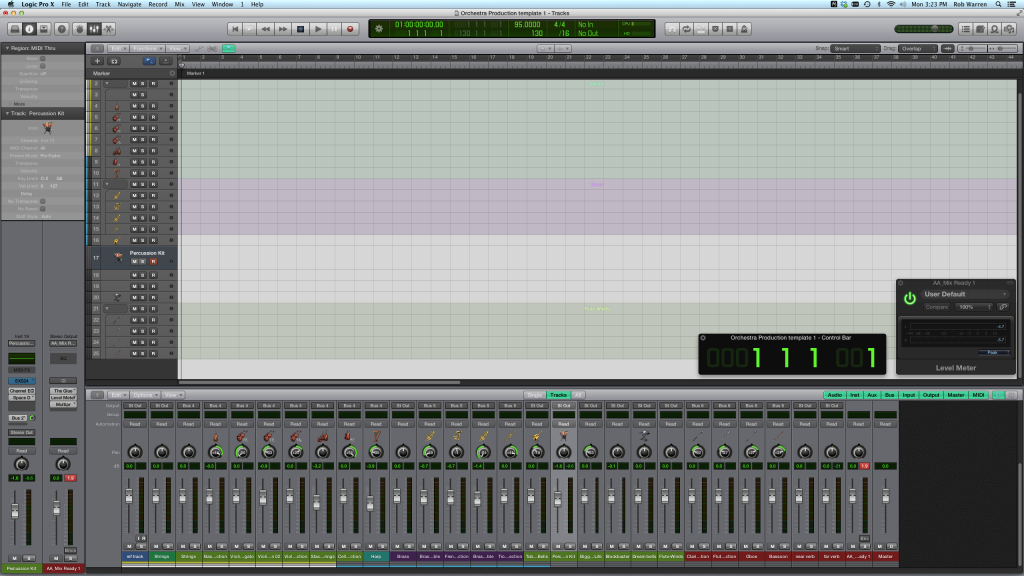
Workflow can be described as the fastest, most fluid means of getting from point A to point B. I have several different types of workflow that I use when I’m working, and I use different DAWs, depending on the job at hand. For example, if I’m composing music, I typically use Logic Pro, and I have probably 30 or so pre-designed templates based on what type of music I’ll be writing (orchestral, rock, electronic etc). The tracks within the templates are generally organized by instrument or instrument types, and then placed in Track Stacks (Logic’s term for bus groups). These group tracks act as busses, so any effects are added to the group and used as needed. I also have a “near” and “far” reverb on separate aux busses, to use for giving a distinct sense of depth to various instruments, which helps to “position” them into a simulated live orchestral setting, or just to create a choice of “space” for any production (see fig. 1).

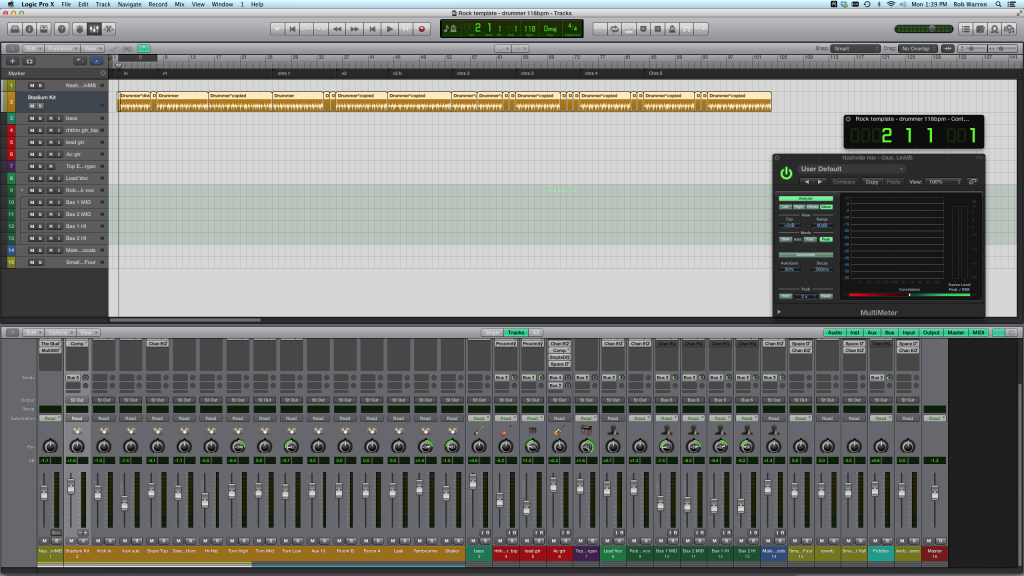
This next template (see fig. 2) is a rock template where I have all the probable instruments I’ll need for a rock track, and it includes a basic Drummer track (from Logic Pro X – but you can use whatever drum sample instrument you prefer) set to 118 bpm, so that when an idea pops into my head, I can load and be tracking a rough guitar part within a few seconds, and there will already be an existing basics drum groove to play to.

I typically have around 5 or more templates for each style of music, and I try to name them as concise as possible, to help decide which one to select for what I need. For example, I have one Electronic template that I named “Electronic-dubstep_style_135bpm”, and so on. I may not be doing dubstep, but I need that type of instrument palette, and maybe something close to that tempo, so I’ll start with that template. When I composed the soundtrack for Tiger Woods PGA Tour ’11 and ’12, I used a single template for about 70% of the tracks, with some small variations per track. This gave the soundtrack a real sense of unity from track to track, and sped up my workflow in a big way.
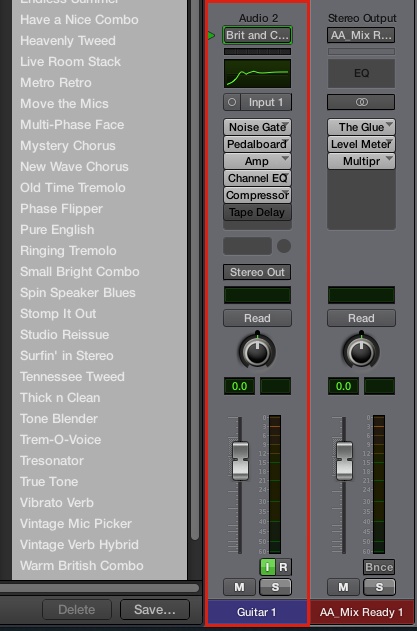
Most hosts will allow you to save your individual instrument and track parameter settings as a Channel Strip, which comes in handy when you need to quickly add tracks that aren’t in your template (see fig. 3).

I have tons of channel strips available – each time I create a unique track setting, vocal strip, guitar patch, sound design instrument, aux bus, master fader processing setting, or whatever, I save the settings as a channel strip for quick access later. Not only will the individual instruments’ specific settings be saved, but the entire rack (all instruments and effects) will be saved as well. Huge time saver. Even if I end up tweaking the strip settings as needed when I load them up, it’s much quicker to have that previous setting combo as a starting point, then I’ll save the new one as a different channel strip (and name it accordingly).
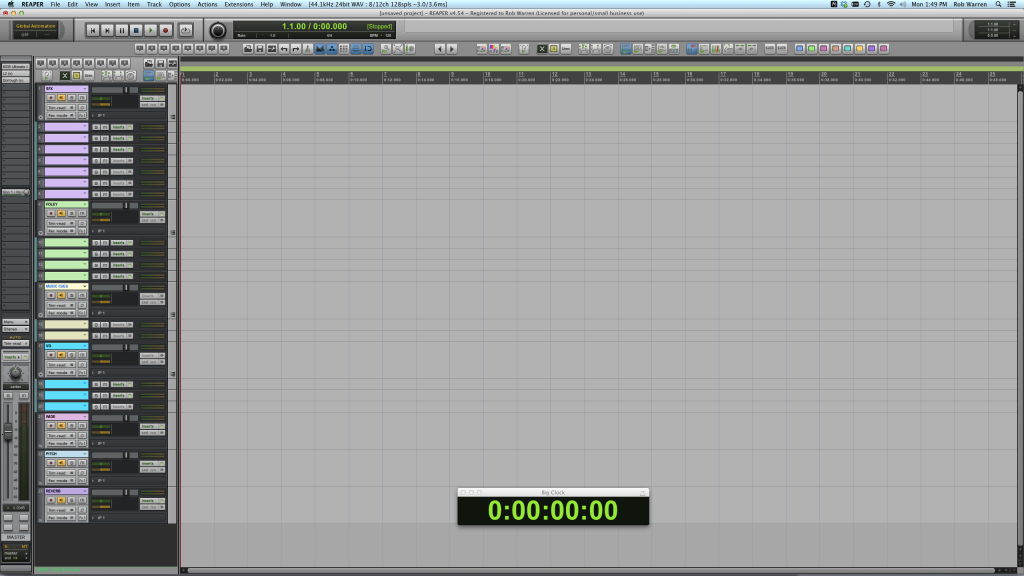
When doing sound design, or sound for picture, I typically use either Reaper or Pro Tools. For me, Reaper is king of customizability, so I lean towards it more. Sometimes I may start with Logic to do the actual sound creation, but once I have a handful of useful sounds built, I’ll export them into Reaper, where I start compiling, tweaking, adding (track or object-based) effects, and prepping them for batch rendering (another huge time saver that Reaper offers, as does Nuendo). Again, I start off with one of probably 50 or so templates that I have saved, which are typically broken down in a similar structure as my Logic templates, except they are separated by Folders instead of Track Stacks. Reaper has a fantastic folder system that allows me to drop folders within folders as many times as I like or can keep track of, which is super helpful when I have a ton of tracks to deal with, and when I want to make quick aux tracks. And if it’s sound design work, then the track/folder groupings and channel strips will be set up in a post-production scheme instead of music, and named and grouped accordingly. The image below (see fig. 4) is a template that I use for doing commercials, so I have a folder of tracks for various dialog, foley, SFX, and music cues, as well as a few tracks that are dedicated to various effects, like reverb, wide stereo enhancement (I use the very cool free plug-in Proximity by TDR Labs), and I have a pitch shifter on another track.

I don’t use this often for commercials, but I do a lot of pitch shifting automation when I’m doing sound design or other effects related projects. Every once in a while though, I’ll do a logo wipe or something that needs a pitch dive, so I keep it handy. Reaper also allows me to load any pre-saved project media bay data, even from other projects, so I can have a large palette of sounds available immediately to draw from (great for sequels or projects that have a similar look and feel). I have Reaper set to load a default effect chain with each new track (the chain can be edited or saved any way I like), so I usually have it load the Waves SSL G-Channel plug. And, with these templates already worked out for the most part, I can just open one up and pretty much immediately get to work dropping in sounds or importing rendered Logic regions. I do most of my sound file indexing and searching using Audio Finder, which is a very useful tool that is a viable (and less expensive) alternative to Sound Miner.
I generally mix and master within the same session that I’m working, especially when I’m working on game audio, which usually requires rendering out tons of finished files from the same session. Again, for me, Reaper’s completely customizable workflow is a game-changing time saver. The batch rendering is very convenient for making revisions, even global ones, and then very quickly spitting out some or all of the finished tracks in my session, pre-named, sometimes hundreds of them. For this type of work (games), I can’t imagine doing without this functionality at this point. And equally as important is the setup work, which involves creating and using templates so that I can open up a session and dig right in, spending far less time prepping the session, and more time doing the heavy creation.
Whatever DAW you use, spend some time between projects creating an array of templates and channel strip settings for quick access when you’re working. One thing I usually do is when I’m done with a project, after making sure to save a backup, is I clear out all the actual audio files and then save the blank session as a template. I keep the tracks, effects, aux/folder/group tracks, and just clear out any audio or midi regions, and save as it a template. This is a great way to speed up your workflow, and to hit the ground running when you start something new.
Rob Warren is a music composer and 2012 Telly Award winning sound designer for games, film, and television. Some of Rob’s credits include Tiger Woods PGA Tour, Warhammer Online, Madden NFL, Outlaw Golf, Dragon Tales, You Don’t Know Jack, NHL ’13, Dance Dance Revolution, Essential Sounds III loop library for Sony Acid, and NCAA Football, to name just a few. Rob worked for EA sports from 2005 – 2012 and is currently owner of Rob Warren Music and Sound in Orlando, Florida.
Nice article Rob! Templates are a huge time saver, and I cringe when I think of the time spent working during my non template days. Thanks for the pics of the templates, and cool idea with the near-far verbs. Going to try that out myself!
Thanks Craig – glad it helped. the distance reverbs have been a big help to me as well – it takes some experimenting but it does work.
Thanks a lot for this great article. I work with Logic since the Atari time, where Logic was called Notator from the german company Emagic. Since they introduced templates I became a big fan of using them.
But what really impressed me in your article was the way you changed colors in the new logic X GUI. Can you tell me how you managed to do that, ‘cos it looks way better than the original one.
Thanks in advance.
OK I googled a bit and found the information about changing the gui colors.
Thanks anyway.
Yeah there are some great GUI mods being made for Logic X. For those who haven’t found them yet, they are here
http://logicxinterfaces.wordpress.com
And here is a great thread on Gearslutz that kind of started it all……
http://www.gearslutz.com/board/logic-pro-x/857146-custom-logic-x-guis-thread.html
Please Please sir….tell me which theme that is! It looks like the absolute perfect mix of logic and pro tools! I’ve been searching everywhere for something like that!
thanks in advance :)
more specific…the theme in the first picture :)
Hi – thanks. Yeah I like it for the same reason…..Logic/Pro Tools combined. I got it here – http://logicproxthemes.blogspot.com. The guy has a lot of great themes. There’s a small fee but to me it’s worth it, he does great work, and since I’m staring at the DAW all day long, I want it to be easy on the eyes.