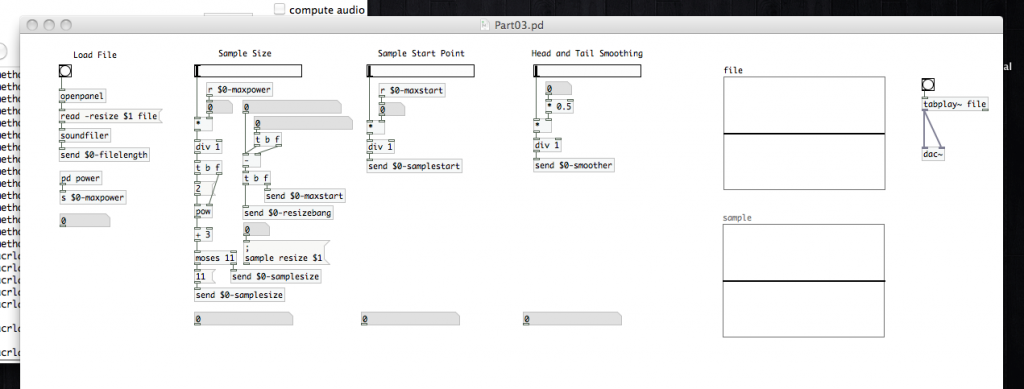
 Despite all of this, I’m still relatively new at Pure Data and the Max language. To those who chime in with corrections or clarifications in the comments, you are most appreciated! If you’re new to PD, make sure you check the comments section for clarifying info provided by generous souls.
In the last article we created a background calculation process to make sure that our wavetable sample is optimized for the playback process, and that it will not exceed the length of the imported file. Today we’ll be creating the controls to select the parameters of our wavetable sample…How long will it be? Where should the sample begin? What kind of fades should we put on the head and tail of the sample to prevent non-zero crossings (and the clicks that come with them)? Again, I’m assuming you’ve read and completed the previous projects.
Because we’re creating a computer program, and computer programs do explicitly what they’re told to do…regardless of whether or no it will cause an error, we need to make sure that we don’t let our sample do anything invalid. We’ve already ensured that, at its most basic, the sample can’t be larger than imported file.
Here’s what else we need to be careful about:
- We’ll want to set a minimum sample size.
- Neither the start point, nor the end point of the of the wavetable sample should exceed the end point of the imported file.
- The head and tail fades applied to the sample should not be longer than half the total sample.
- All of these parameters should be whole integer values…not decimal.
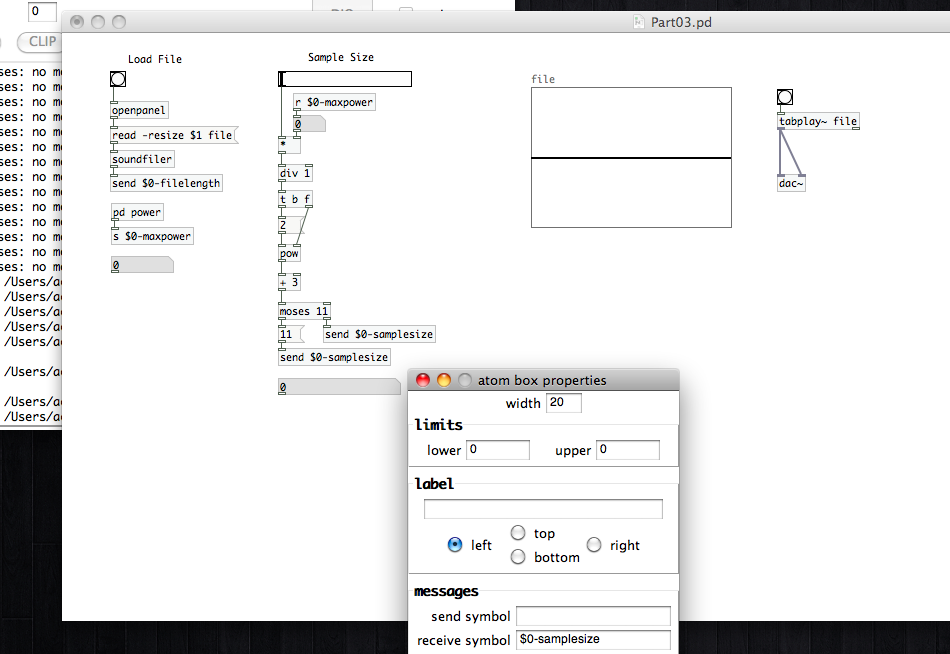
So we’ve already determined the maximum exponent we can use to define the sample size, and we’ve “sent” it over the variable “$0-maxpower”. Let’s create an object atom [r $0-maxpower] to receive that value. We’re going to use that, an atom called a “horizontal slider”, and a little bit of multiplication to make a simple (for the user) control to set the sample size. Once you have that [r $0-maxpower] atom, look in the “Put” menu for “Hslider” (or use shift+cmd+h). Drop that in your patch and open up its “properties” window (still a right-click on the atom). We need to adjust the output range of this slider. On the “left” we want it to be “0”, and on the “right”…”1”. What this is going to let us do is scale the value of our maximum exponent value. To do this, we need a new object atom that we’re going to turn into a math process. Create an object atom and fill it with “*”. Connect [r $0-maxpower] to the cold inlet of [*], and connect the outlet of the horizontal slider to the hot inlet. If you want to have a way to verify that you’ve got a working value coming over that variable, simply drop a number atom in and connect it to the outlet of [r $0-maxpower]. [note: The number atom has been placed in series in the image below. You can do this, replacing the connection between [r $0-maxpower] and [*], or have it be an additional connection (as just described).] Now, when the slider is all the way to the right, we’ll be outputting the maximum exponent value that is valid for our imported file.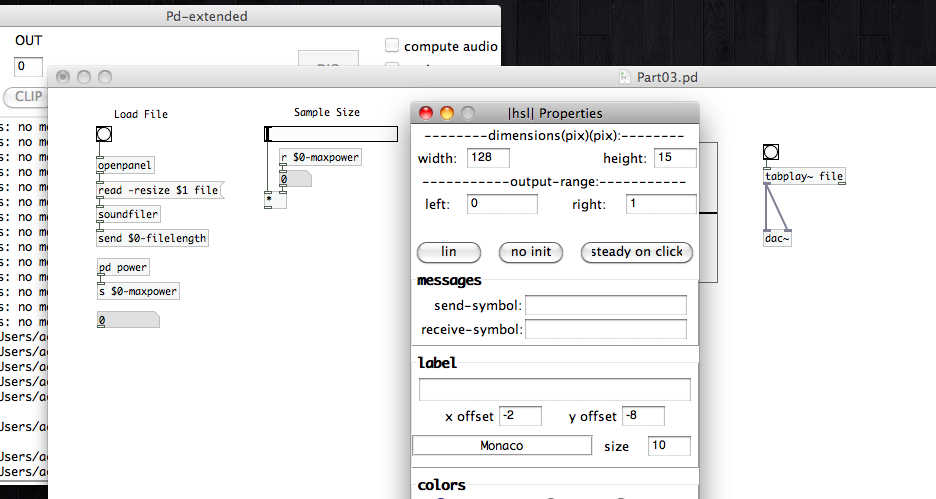 This leaves us with the issue that we aren’t necessarily outputting an integer value from [*]. We can use another math object atom, [div], to correct that issue for us. [div] will take a number input to its hot inlet and divide it by another (either an initial argument or a number fed to the cold inlet), then output the integer value without the remainder or decimal. We want our [div] to output the integer value without doing any additional scaling, so we’ll give it the initial argument of “1”…making [div 1]. This way we divide by 1, keeping our value where we want it. If [div 1] receives 19.78, it will output 19. If it receives 67.2, it will output 67. Go ahead and connect that to [*].
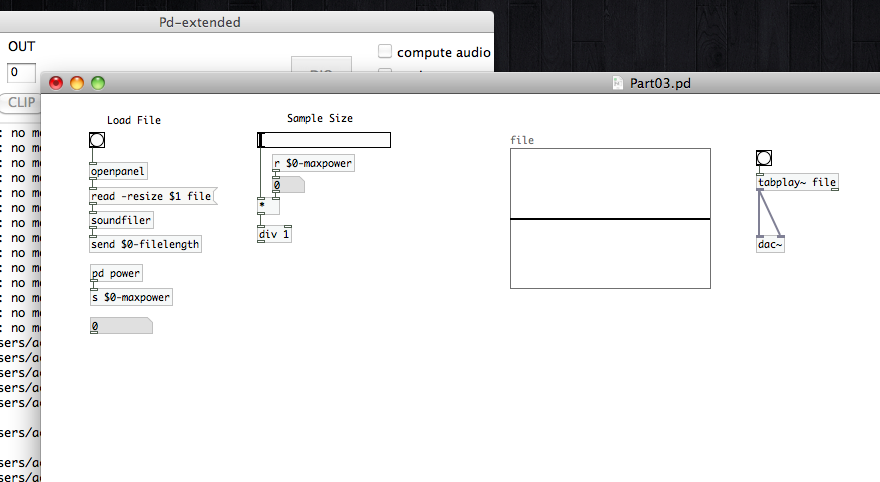 We’re going to steal the next part of our sample sizer from the [pd power] sub-patch we built last time. Remember how we actually processed the results of [2 to the power of ‘n’]+3? That’s right, place an object atom, [t b f], a message atom, [2], another object atom, [pow], and one last math object atom [+ 3]. Do you also remember the order of connections? [t b f] connects to the outlet of [div 1], [2] connects to the the left outlet of [t b f], the cold inlet of [pow] connects to the right outlet of [t b f], and the hot inlet of [pow] connects to [2]. Then connect [+ 3] to the the outlet of [pow].
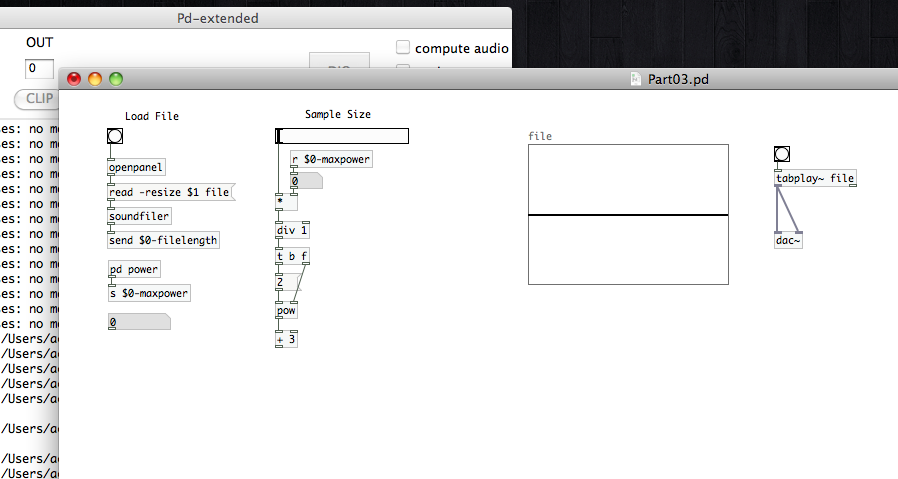 We’re going to continue to steal from the [pd power] sub-patch now by adding a [moses] atom with an initial argument of “11”, which we’ll connect to the outlet of [+ 3]. We’ll place a message atom, [11], that we’ll connect to the left outlet of our new [moses 11], then we’ll create another object atom, [send $0-samplesize]. Select that [send $0-samplesize], then copy and paste it into the patch. So we’ve got two of those now. One will connect to the outlet of [11], and the other will connect to the right outlet of [moses 11]. In this way we’ve ensured that we won’t have a sample size smaller than 11, but we’re always sending the sample size over the same variable. Just so we’ve got some way to monitor what we’re doing, why don’t we also drop in a number atom. Open its properties window and type “$0-samplesize” into the “receive symbol” field.
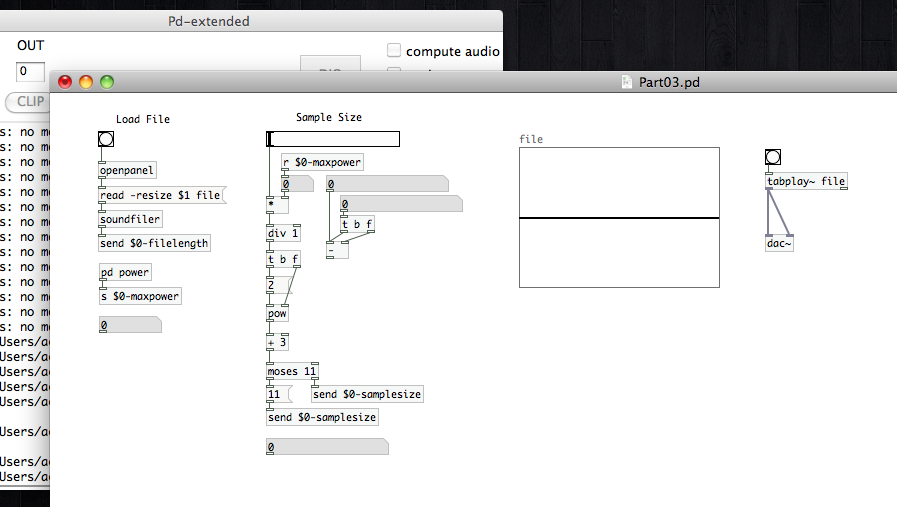
 Now that we’ve prepared to set our wavetable sample size, we need to make sure that we don’t let our start or end point exceed the end of the original imported file. The first thing we need is a pair of number atoms. In the properties windows set the “receive symbol” of one to “$0-filelength”, and set the other to “$0-samplesize”. What we want to do is subtract the the sample size from the master file length. That will give us the maximum point in the master file where our sample can begin. To do this, we’re going to need to use a [trigger] atom again. Create another [t b f] and connect it to the outlet of the “$0-samplesize” number atom. Create a math object atom, [-], connect the right outlet of [t b f] to the cold inlet, and the left outlet to the hot inlet. Then connect the “$0-filelength” number atom to the hot inlet of [-] as well. This may seem confusing, but remember that the [-] atom will process the subtraction every time it receives a new value or bang. We’ve set the “$0-filelength” variable as soon as we imported the master file. Unless we import another file, it won’t change. We’ve used the “bang” from the [t b f] object corrects that for us. Whenever we adjust the samplesize, a bang will be sent to the hot inlet of [-]. The great part about this is that [-] will receive the bang, then use the value from “$0-filelegnth” for the subtraction process. It does not recognize a value from the “bang”, only the fact that it’s supposed to perform the math function.
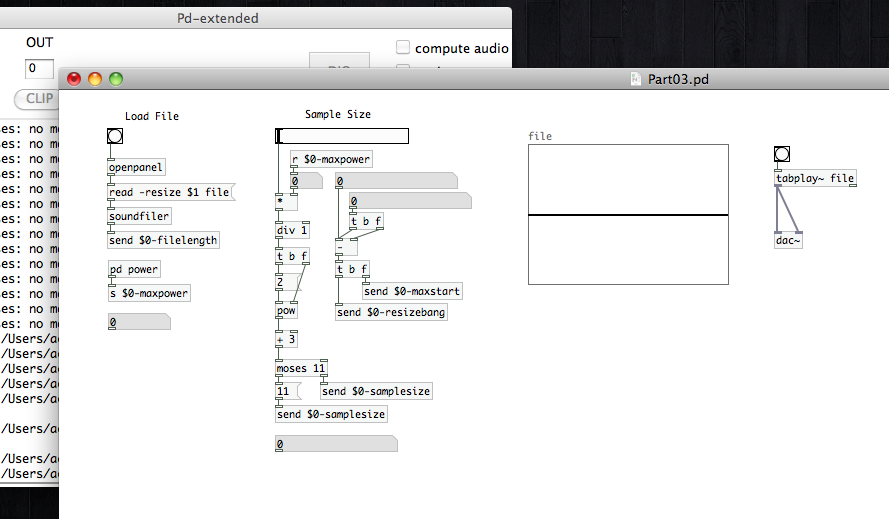
 Now we need to send this value out for use in selecting the sample start point. There’s another consideration we need to keep in mind, but it will make more sense if I explain it once we’ve moved on to the start point parameter. For now, just go with this. We’re going to create another [t b f] and connect that to the outlet of [-]. Create a new [send] atom with the variable “$0-maxstart” and connect that to the right outlet of [t b f] (the “float” outlet). Create a second [send] atom with the variable “$0-resizebang”. We’ll come back to explore this variable shortly.
 Before we move on to defining the sample starting point. We’re going to set up one element for the task we’ll be tackling in the next article. Create a new array. Label it “sample”, and uncheck “save contents.” Place the graph somewhere out of the way for now. Now, create a number atom and open it’s properties window; assign “$0-samplesize” to the “receive symbol.” Create a new message atom. We’re going to use this to send another internal command for PD. In that message atom type “;”, press enter/return and then type “sample resize $1”. Finally connect that message atom to the number atom we just created. With these two atoms, we’ve created a way to re-size our wavetable sample array (which we labeled “sample”) to match the user-defined sample size. This is kind of like what we did for the “file” array during the audio import process.
 We’ve finally finished messing about with everything we need with regards to sample size. We’re well beyond half way done with today’s tasks. The next two parameters should be incredibly easy at this point. Let’s move on to the “sample start point.”
We’re going to do this much the way we began with the “sample size” parameter. Place a horizontal slider, and open its properties window. Set the range to be from 0 to 1 (0 in the “left” field, 1 in the “right”). While we’ve got that open…let’s assign “$0-resizebang” to the “receive symbol” field, then click “OK”. Create a new [receive] atom with the variable “$0-maxstart”. Create a math object atom, [*], connect the [r $0-maxstart] to its cold inlet, and the horizontal slider to the hot inlet. [note: You can place a number atom again for confirmation, if you like…as shown in the image below.] We’re going to feed the result to another [div 1], because we’re referring to integer index points in the array. Finally create a [send] atom with the variable “$0-samplestart”. If you like, create a number atom to display the value of “$0-samplestart”.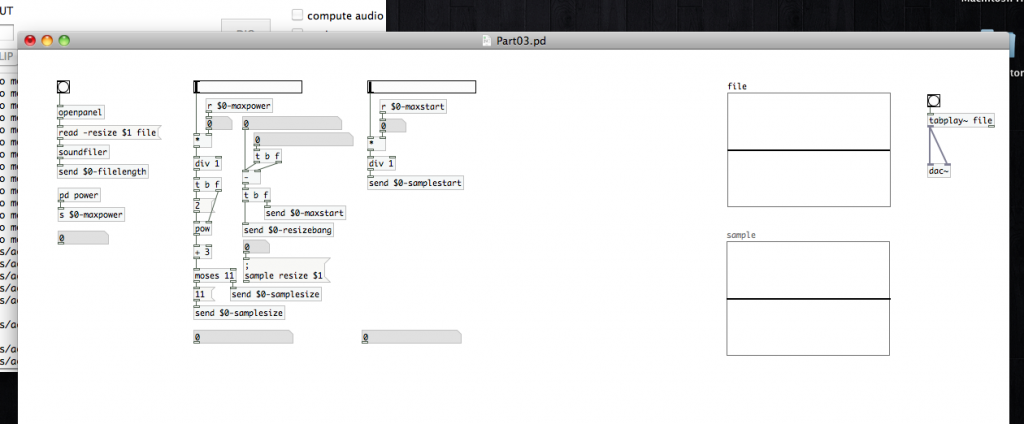 Now let’s talk about that “$0-resizebang”, which we created during the sample size portion, that’s feeding the new horizontal slider in the “sample start point” section. Remember that the variable is being fed from the left outlet of a [t b f] we created during the “sample size” section; meaning that it’s simply receiving a “bang” message. We’ve set it up this way to automate things a bit for the user. Say you created a wavetable sample and have been playing around with it. Now you’ve decided you want to change the size of the sample and see what that sounds like. Thanks to that [t b f] we setup, the “$0-maxstart” variable is updated first, then a bang is sent to the “start point” slider. When the slider receives a “bang”, it simply outputs its current value…triggering the multiplication process through the appearance of a value at the hot inlet of [*]. Remember that we’re multiplying the value of “$0-maxstart” by a range of 0 to 1 to ensure we don’t start at a point where a portion of the sample will extend beyond the actual file size. [note: Computers count from 0 up. The first index-point in our array is actually labeled 0, not 1. This will be an important idea to remember in the future.] That variable is feeding the cold inlet of the [*] atom. If we didn’t provide some sort of new input to the hot inlet, changes to the “$0-maxstart” variable would not actually update the “$0-samplestart” value…meaning we could have a wavetable sample that overruns our master file. We solved this by giving that horizontal slider a bang after updating the “$0-maxstart” variable. As an alternative, we could have set up a [t b f] atom in the same way as the one feeding the [-] atom over in the code that generates the “max start” value…there are a lot of ways to get things done in PD. This “bang” over a variable is going to let us reset our next value as well. That means we have less code in our patch, making it just slightly more efficient.
Our final section today is to create the head and tail smoothing parameter. This will determine the length of the fades (in “number of samples”) to be applied to the head and tail of our wavetable sample. To begin, you can copy and paste the code from the “sample start” section! Once you’ve done that, delete the [r $0-maxstart] atom (we won’t need it), and disconnect the number atom from the cold inlet of [*]. Open the properties of the number atom, and add “$0-samplesize” to the “receive symbol” field. Create a new atom, [* 0.5], and connect it to the outlet of the number atom. Then, connect [* 0.5] to the cold inlet of [*]. We’re using this [* 0.5] atom to make sure that the fades will not exceed more than half the length of the sample. We could use [/ 2] instead, but computers are more efficient at multiplication than division. It’s a minor point. So, feel free to use [/ 2] if you prefer (or if it’s less confusing). In the [send] atom at the bottom, replace “$0-samplestart” with “$0-smoother”. Note that the horizontal slider is already configured to operate over the range of 0 to 1, and that it is also configured to receive the “resize bang.” Copy and paste made creating that section a lot faster. Do you have a number atom to display the length of the fades? If you copied it from the “sample start” section, did you remember to update the variable in the “receive symbol” field?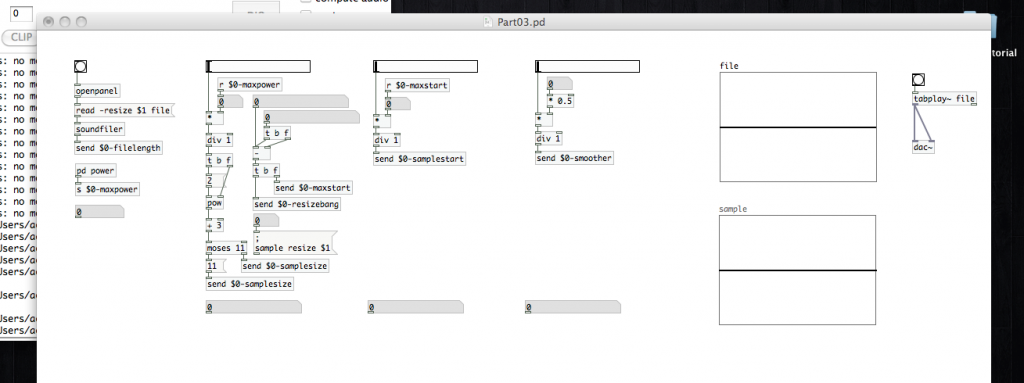 We have now set up methods to define all of the parameters we’ll require to generate our wavetable sample. The only thing you might still want to do is label each section. You can do that by adding “comment” atoms to your patch. Found in the “Put” menu, or placed using cmd+5, comments are simply non-code text strings. Label your sections however you want, and we’ll finally put them to use in the next article.
Hi Shaun,
I chose to use the expr pd-object to copmute the sample size.
It simplifies things alot.
expr if ($i1 > 3, pow(2, $i1) + 3, 11)
This object takes care of the casting from float to int, the pow calculation, the +3 and the minimal value of 11.
You can even remove the dead part of the slider caused by the 11 minimal value by adjusting the slider range. You need to give the slider a receive name (i used s_size) and then send it a message with ; s_size range $1 1
to compute the minimal value which will produce 11 once processed, compute 3/maxpower, feed it to the message ($1).
Once the range is adapted, you can even drop the “if” part of the expr, and leave only pow(2, $i1) + 3. :)
cheers,
Ulysse
I introduced pretty much all of this in later tutorials, Ulysse. Trying to ease people into it. ;)