This article was born out of an idea for a GDC audio talk proposal. Another one of my proposals was selected so I thought I’d turn the core idea of this one into a DS post in case it’s of use to the community.
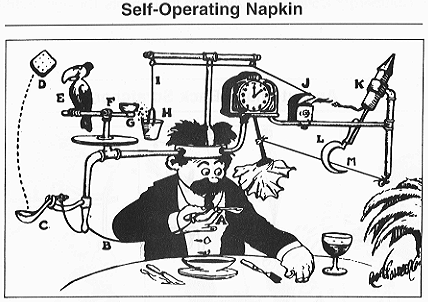
Do you use macros in your music/sound production? If the answer is yes, then this article isn’t for you. Given January’s theme is all about time management, I feel duty-bound to say you should make better use of your time and read one of the many other fantastic articles here on this site. If however, any of the following apply, read on!
- “I don’t know what a macro is”
- “Macros are just shortcuts right, like CMD C to copy?”
- “Macros are only used by programmers.”
What’s a Macro?
In computing, a macro “is a single instruction that expands automatically into a set of instructions to perform a particular task”, and you’re probably already using this principal without knowing it. Do you ever use an email signature or template to save you typing every letter again and again? Do you ever batch process audio files or use a rename function to make them all uniform? These are essentially macros that we use to perform repetitive tasks to save us time.
Here’s a classic example of a real-world macro:
[youtube]https://www.youtube.com/watch?v=Qc9h6FC6QgU[/youtube]
Types of Macros
In the digital world, macros exist in a few different forms including those that are program specific in software such as in Reaper or Microsoft Excel. Both these programs have their own system to build and run macros to control the parent program. Then you have pieces of macro-specific software that have greater potential control over your system as they can act outside the parent piece of software. The basic concepts of both are the same but I will be dealing more with the latter using a piece of software called Keyboard Maestro (KM for short). KM is Mac-only but there’s numerous choices for windows including both paid-for and freeware options. Here’s a good compairson table of several products: https://en.wikipedia.org/wiki/Comparison_of_macro_recorder_software
While I’ll be using KM to run my macros, the concepts and principals in this article should prove useful and relevant to anyone hoping to build their own macros.
Why make a Macro?
The core reason to build a macro is of course to save time that would otherwise be spent doing repetitive tasks. Some people leave it at that and use a little economic theory to do a cost-benefit analysis to figure out if the time spent making the macro will be less than the time saved using the macro.
For example:
Macro example A
Task Time Without Macro: 12m
Task Time Using Macro: 2m
Time saved per use: 10m
Probably number of macro lifetime uses: 4
Total time saved over macro lifetime: 40m
Time spent building Macro: 80m
Sum Time Saved: -40m
Macro example B
Task Time Without Macro: 6m
Task Time Using Macro: 1m
Time saved per use: 5m
Probabl number of macro lifetime uses: 600
Total time saved over macro lifetime: 3000m
Time spent building Macro: 120m
Sum Time Saved: +2880m
Now obviously there’s a lot of estimation going on as you won’t know precisely how much time you’ll be saving each time you use the macro until you build it. Also, the number of lifetime uses is hard to predict. That said, the principle of evaluating whether or not you’re really going to save time is worth keeping in mind.
I find this approach a little dry however, and in the process of making and using macros, I think it’s worth considering the following potential benefits, even when you might not be saving time.
- Macros can be fun to make
- If you make more macros, you’ll make faster macros… faster
- They can impress clients / colleagues / yourself
- They personalize your system to your own approach
Elements of a Macro
So you’ve decided to build a macro, what does it consist of? Well there are a couple of staple building blocks that all macros typically have.
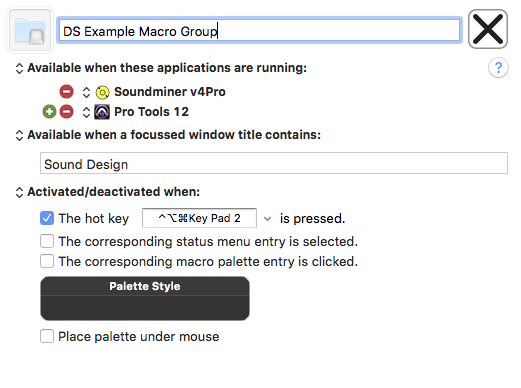
In KM, macros are housed in Groups, and the Groups have Conditions which make all the macros within the Group either available or unavailable for use.
For example, you can create a Group that only allows its macros to run in certain programs, or when certain program combinations are running.
This is really useful as it prevents you from firing off your Pro Tools macro while you’re in MS Word, or if your macro utilizes two pieces of software and only one is open, it can prevent you from running it.
You can also disable or enable the Group in KM either by manually clicking on the big tick/cross, or by assigning a hotkey or some other trigger. Note that this doesn’t trigger a macro, it just makes the macros within the Group available for use or not.
Triggers are what initiates the macro itself. At their simplest they can be a hotkey, but they can be more complex. You can use typed strings to trigger a macro, opening a specific folder, simply logging into your system, MIDI notes, mounting volumes, even plugging in a specific USB device can act as a trigger.
You can even combine these triggers by using macros with if/than statements to create a series of variables which all must be true to trigger another macro.
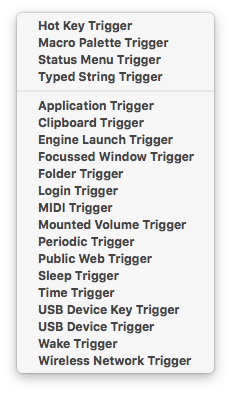
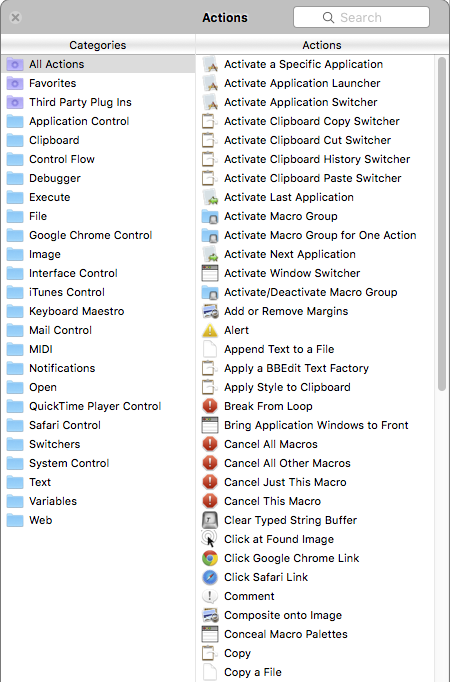
Actions are the series of instructions you provide which the macro carries out when it’s triggered. There are dozens of potential actions in KM which you can sequence and combine as you see fit, and you can also pull or prompt the user for information which can be used as a variable to define further parameters or actions.
An example of a simple and commonly used action would be KM’s “Type a Keystroke” which simply inputs whatever key combination you assign to that object. Others are more complex such as “Move or Click Mouse” which has several functions including the ability to move the mouse to a point on the screen based on its similarity to an image you provide.
Put all this together and you might be starting to see how potentially powerful macros are. It’s kind of like putting a robot in front of your computer. It’s not intelligent, but it can follow basic instructions. It’s not conscious of the context of those actions, but it will carry them out precisely.
You can find a full list of KM’s available triggers and actions here: https://www.keyboardmaestro.com/documentation/7/features.html
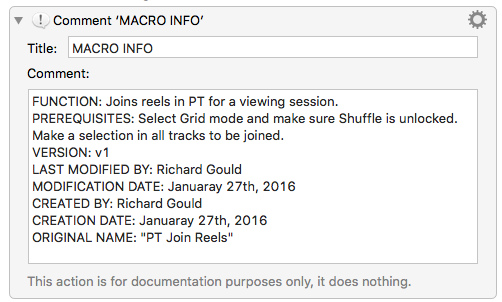
Though not standard by any means, I find it really useful to embed some form of documentation into more complex macros. In KM I use the “Comment” action and place it at the head of the macro. By including information such as what the macro was designed to do and the prerequisites you need before launching it (such as being in grid mode in Pro Tools) it makes it much easier for others to interact which (if I share a macro with a colleague for example). It’s also helpful in the event that software updates break a macro or if I find one without a descriptive name and I’m not sure what it’s function is. In this instance, good documentation saves me from having to read through the actions as I try and figure out what the hell it was designed to do.
Building a Macro
So if I were to design the “Chitty Chitty Bang Bang” breakfast example as a macro, it might look something like this..
Conditions
- System time is after 06:00am but not before 11:00am
- Power switch on
- Eggs in cradle
Triggers
- Pull bell cord
Actions
- Prompt for user input, “how many mouths to feed?” input defines variable ‘mouths’
- Push ‘mouths’ # of plates forward
- Repeat following actions ‘mouths’ # of times
- Raise plate
- Deposit sausage
- Deposit egg
- Raise heater
- Pause 3m
- Lower heater
- Repeat following actions 3 times
- Release plate
Single Action Macros
Single action macros are those that when triggered, use a single action. They’re pretty simple to make but sometimes they’re my most useful and commonly used macros. Where possible I will use the F13 key to trigger them so you can see in the video examples at which point the macro is triggered.
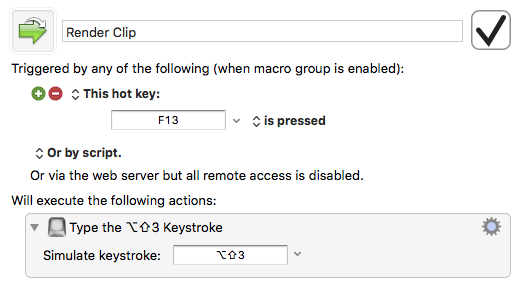
1. Render Clips
This macro simply replaces the typical render / consolidate clips shortcut in Pro Tools (usually shift, option, 3) to a single key. I use this shortcut all the time when adding sounds to a library to consolidate any fades I have on files before exporting them. I found the old shortcut was quite painful over time so this macro had a medicinal purpose!
[youtube]https://www.youtube.com/watch?v=UQ5VL1WuGr0&list=PLOVoyBjzq1AVeJk-8tRtajLoJ30psMFr3&index=1[/youtube]
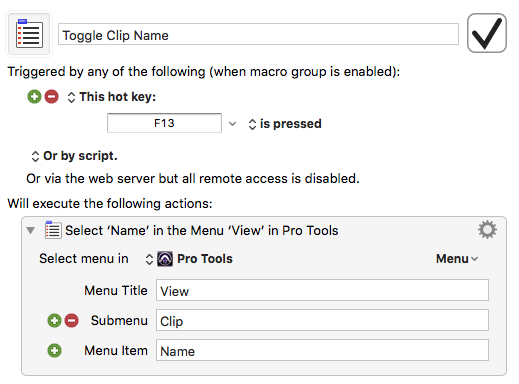
2. Toggle Clip Names
Another simple one, this macro uses KM’s ability to access menu items in a program that otherwise might not have a shortcut assigned to them.
[youtube]https://www.youtube.com/watch?v=LuFdm6hEMss&list=PLOVoyBjzq1AVeJk-8tRtajLoJ30psMFr3&index=2[/youtube]
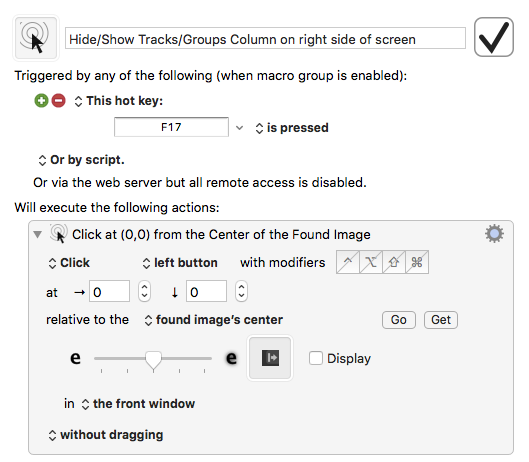
3. Toggle Side Bars
Another simple macro, this time utilizing KM’s ability to move and click the mouse based off of an image you provide. In this case, the arrow you click to show and hide the side bins in Pro Tools.
[youtube]https://www.youtube.com/watch?v=v62SCDautI8&list=PLOVoyBjzq1AVeJk-8tRtajLoJ30psMFr3&index=3[/youtube]
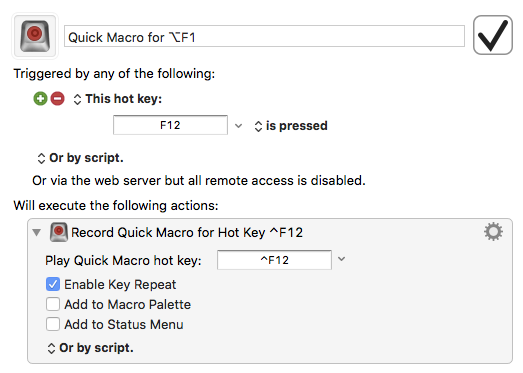
4. Recorded Macro
KM has a library of inbuilt macros, one of which allows you to record a temporary macro quickly and execute it. The macro isn’t stored anywhere so when you make a new recording the old one is replaced. As such, this is best used for short and simple actions you might carry out once and never again, making a traditional macro redundant.
[youtube]https://www.youtube.com/watch?v=jkLHR0p9mcc&list=PLOVoyBjzq1AVeJk-8tRtajLoJ30psMFr3&index=4[/youtube]
Multi Action Macros
The following macros utilize more than once action and so are a little more complex. The action chains can get very long so I’ll just share notable aspects for each one.
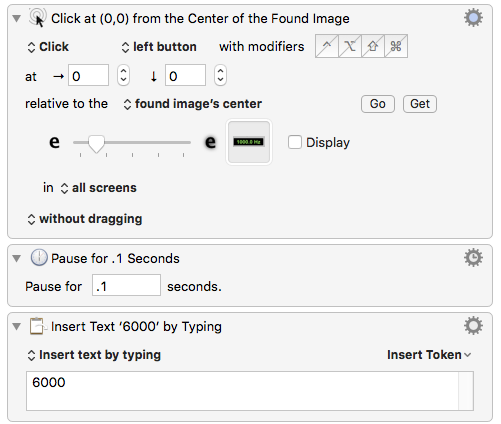
5. Plugin Render Settings
This macro again uses KM’s ability to click on a location based off of an image, but this time we follow it by entering a value into a settings box on a plugin, after which we have the mouse click the “render” button.
[youtube]https://www.youtube.com/watch?v=X-Mma6X_eEE&list=PLOVoyBjzq1AVeJk-8tRtajLoJ30psMFr3&index=5[/youtube]
6. Flip Stereo Clip
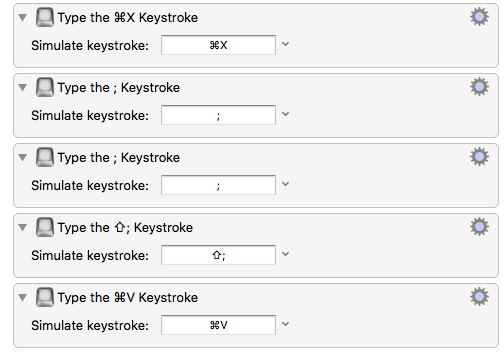
This was the first macro I made. Occasionally I find I have a stereo file such as a pass-by for which I want to flip the channels. This macro will generate three mono tracks below the selected stereo track and flip the channels of a stereo clip for me. It’s mostly a series of key entries such as here where the stereo clip is cut, moved to the lower mono tracks and pasted, from where the mono clips are then flipped and retuned to the original stereo track.
[youtube]https://www.youtube.com/watch?v=7BBt0ObE80Y&list=PLOVoyBjzq1AVeJk-8tRtajLoJ30psMFr3&index=6[/youtube]
Variable Input Macros
These macros utilize KM’s ability to prompt for user input which then can define variables to be used within a macro.
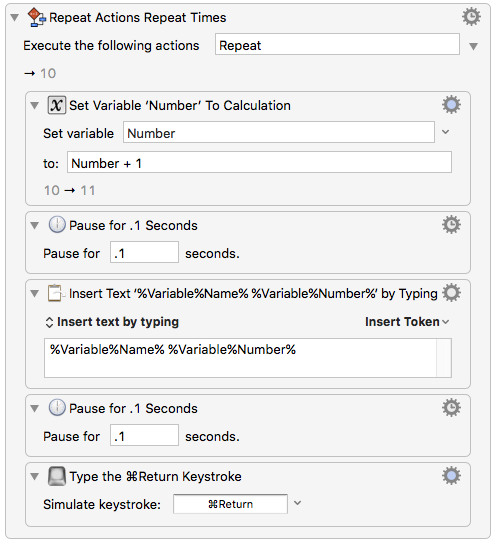
7. Rename and Renumber Tracks
This macro can rename tracks in a flash. It asks the user for three values. The “Name” of the tracks, the “Number” of the first track (i.e. “name_1”), and the number of times it should “Repeat” (i.e. total number of tracks you want renamed). Here you can see this action is told to repeat the set of actions within it a number of times, in this case “10”, which is what the user put into the “Repeat” field. It also increments the “Number” variable each time it loops so we get “name_1, name_2, name_3” and so on. Lastly you can see where it pulls the “Name” variable and the current “Number” variable to insert that as text into the current track name window.
[youtube]https://www.youtube.com/watch?v=KFIfMzHDm8o&list=PLOVoyBjzq1AVeJk-8tRtajLoJ30psMFr3&index=7[/youtube]
8. Tail Pop Marker
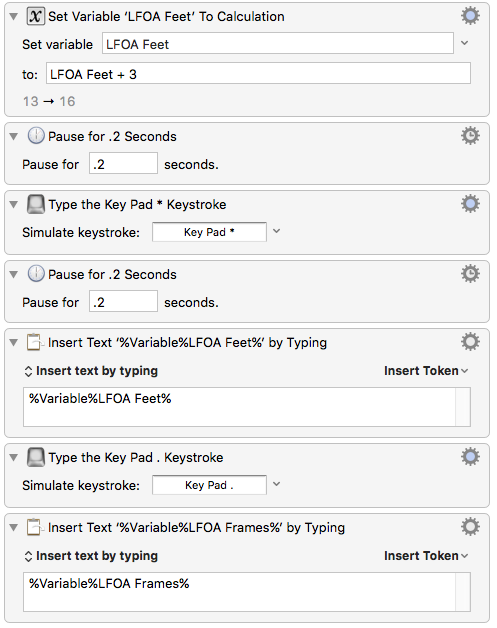
This macro generates a memory location called “tail pop” three feet after the LFOA footage value which the user is asked for. You can see here the “LFOA Feet” variable is changed to add an additional three feet so that when we input it as text into the main counter (accused by the Key Pad * action), it has the correct value.
[youtube]https://www.youtube.com/watch?v=n_10fjqaJ9E&list=PLOVoyBjzq1AVeJk-8tRtajLoJ30psMFr3&index=8[/youtube]
9. Consolidate Multiple Clips
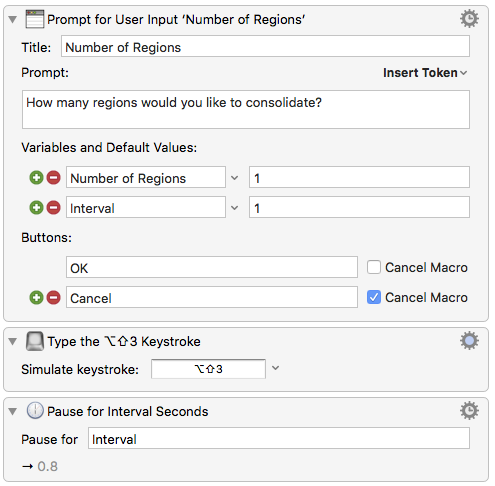
Similar to the first macro I showed you, this one consolidates clips. I use this particular one when I have a long line of clips on a single track that need consolidating and I want to leave my computer to it for a while. KM has a “Pause” action which is useful to allow time for any actions which aren’t instantaneous, such as consolidating a clip. The “Interval” variable in this case defines how long the pause will be. If all my clips are short single gun shots for example, 0.5s is probably long enough. If they’re long ambiences, I might want to use a much higher value. Again, macros have no context for the action they’re carrying out so it’ll keep on ploughing though its orders even if it will break whatever process you intended.
[youtube]https://www.youtube.com/watch?v=pSTjRSDdQJ4&list=PLOVoyBjzq1AVeJk-8tRtajLoJ30psMFr3&index=9[/youtube]
10. Define Selection and Shuffle Delete / Insert
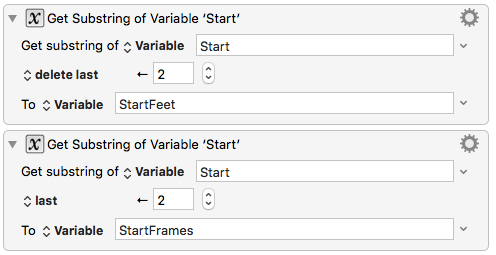
This example actually comprises of three separate macros that I use for conforming. Two relatively simple ones simply switch into shuffle mode then either delete or insert silence before switching back to grid mode. The main macro is the one that defines the selection. You’ll notice in the video when the feet and frames values are entered, the usual ‘+’ is omitted. I do this because it’s faster and because KM allows me to easily parse out and define new variables within a macro itself. So rather than having a variable for the feet and another for the frames, I can have the user put all the numbers in and then delete the last two numbers (the frames) and have the result be defined as a new variable called “StartFeet”. The same goes for the frames where we just take the last two values and define them as “StartFrames”. These values are then used to define our selection.
[youtube]https://www.youtube.com/watch?v=D2ycEIOrPeg&list=PLOVoyBjzq1AVeJk-8tRtajLoJ30psMFr3&index=10[/youtube]
11. Join Reels
This macro is able to join reels together by removing, from all reels, any header/leader and tails following a LFOA so you get a viewing session. It’s fairly involved but one of the new elements in it is this If/Than action. The user will be asked how many reels are in the project, from which KM will direct the macro to run a specific set of actions that will carry out the joining of the reels for that specific number of reels. In this case, the macro bypasses all the action groups except for the “5 REEL SHOW”. From there it prompts the user for just the right number of LFOA values, and then uses that information to cut and shuffle delete the reels together.
[youtube]https://www.youtube.com/watch?v=OGQYX2T-nz0&list=PLOVoyBjzq1AVeJk-8tRtajLoJ30psMFr3&index=11[/youtube]
What now?
Obviously you can use macros for anything, not just audio production. I use them for music composition, implementation and general life tasks that don’t even relate to work.
Don’t be afraid, give it ago, start simple. If you’ll forgive my combining analogies, the slope is slippery once you’ve gotten your feet wet!
Once you’re comfortable doing some simple processes, you can experiment with the more complex stuff and even combine other productivity apps such as having KM control and work with the many tools out there available to us including Alfred, Text Expander, Quicksilver, Better Touch Tool and Launch Bar.
I’ll leave you with this pretty convoluted but clever use of KM I found with Apple’s Automator to get your system to read you your daily calendar events to you, out loud!
[youtube]https://www.youtube.com/watch?v=N5L1o5Vlz-8[/youtube]
Special thanks to Leff Lefferts who introduced me to macros in the first place.

Cool article! I use Autohotkey since I’m on Windows but the concept is the same. It’s nice that KM has a GUI, looks neat to work on macros like that. And you made a very good point in the beginning comparing the time saved by a macro and the time spent creating it. Once I learned about scripting and macros I spent quite some time making some macros, and even though most of them are real life savers, some of them are rarely ever used and probably still didn’t pay off the time I spent creating them. They were still fun to make, like a geeky puzzle, but it’s a good thing to keep in mind.
fantastic piece, and Leff is an audio god…..