 In the last year, we’ve all been happy to see the slow emergence of software tools designed explicitly for sound design. The fine folks over at Tonsturm are the latest to release one such tool under the moniker Melted Sounds. Whoosh is a Reaktor based plug-in for designing, as implied by its name, complex and varied motion elements and pass-bys. The basic idea behind the tool is similar to a post here on Designing Sound by Charles Deenen, which was later built into a Kyma patch by Jean-Edouard Miclot. Whoosh simplifies the process of setting up this kind of processing chain yourself. If you’ve got Reaktor, you simply load the ensemble. The source material included with tool comes from some of the best independent sound effects libraries out there. Seriously, the list is hard to ignore. Sounds have been licensed from: Chuck Russom, Colin Hart, Tim Prebble, Jean-Edouard Miclot, Michael Raphael, Mikkel Nielsen, and Frank Bry…not to mention sounds from Tonsturm itself. It’s safe to assume that it sounds good…even if I weren’t about to tell you exactly that. Ultimately, deciding if it is a worthy addition to your toolbox is something we each have to decide individually. There are a lot of tools out there, and we all have our priorities. So, a review should be about its potential impact on workflow. Does it allow you a depth of control similar to Charles’ process at a comparable (or improved) speed?
Let’s take a look at what Whoosh can do.
The basic signal flow of Whoosh begins with the “Source” and “Impact” samplers. The Source samplers each allow you to choose from one of thirteen banks of sound effects, while the Impact sampler allows you to assign four samples from an additional ten banks of sound effects. The Source samplers provide the doppler engine the elements that will create the whoosh (or pass-by), and the Impact sampler provides stings elements to layer into the whoosh. The Source samplers pass through the doppler engine, which is the heart of Whoosh, then on to the effects section, and finally to the master fader/limiter. The Impact sampler can be set to bypass the Doppler engine, going straight to the effects section.
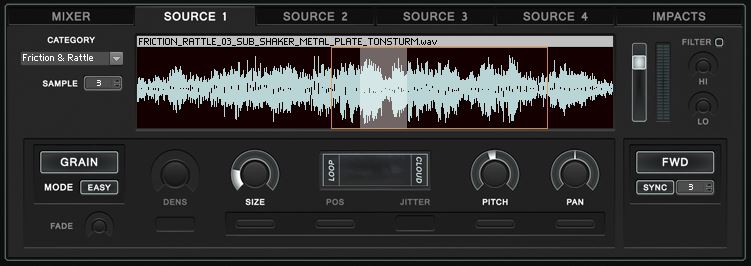 Each Source sampler has its own engine which can be set to either “Loop” or “Grain” mode, and they do exactly what the names imply. “Loop” simply loops the sample, while “Grain” employs a granular process for sample playback. Pitch and Pan (stereo field position) controls are available in either mode, and Grain has a few additional controls available that control the granular process (including a simple and advanced mode). In the waveform section of the Source player, clicking and dragging up and down controls what percentage of the sample is used by the source player. Dragging right and left controls the placement of the playback window. Allowing you to focus on a particular passage of audio if you prefer a more consistent bed for that particular Source. You also have a “Fade” control (assigns head and tail fades for both Loop and Grain modes), a playback direction control (forward, reverse and alternating), high and low pass filters and playback engine volume. This volume control is also available for each Source sampler in “Mixer” view.
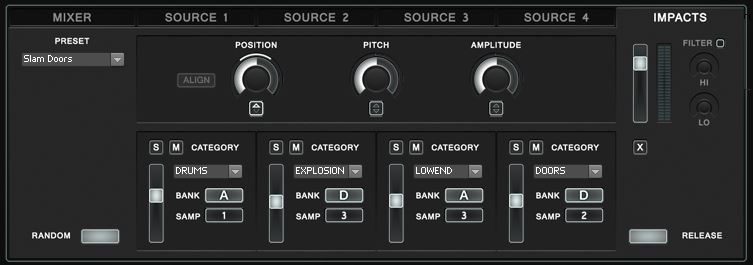 The Impact sampler is a nice addition, and well though out. In some ways, it’s a simplified version of the Source samplers, but it also brings in some additional sub-master controls. There are four samples to be assigned within the Impacts sampler. Every one has it’s own volume fader, and can be soloed or muted. Each category has four “Banks,” and each Bank has three “Samples.” Bank and Sample can be randomized per playback pass by enabling the button labeled “Rand” in the lower left corner of the Impact sampler. There is a preset menu, but this can easily be ignored if you’d rather build your own specific combination. Simply click and change the category in each sampler. If you want to specify what Bank and Sample, turn off the randomizing function (Rand button) and click the Bank and Samp buttons to cycle through the available sounds. Like the Source samplers, Impact also has a volume control and high and low pass filters. Its sub-master section controls all of the four impact samplers as a group. Before I touch on those, I’d like to mention that you can manually control the temporal position of the individual impact samplers in the Doppler engine window above. You’ll notice four gray rectangles.
 The rectangles, from top to bottom, correspond to the individual impact samplers from left to right. Simply click and drag a rectangle to change its trigger point within the whoosh.
Back to the sub-master controls now. Position allows you to move the location of the impact group within the Doppler engine above. Adjusting this pot will move the group while maintaining their relative positions. If you have manually placed the sample triggers, you can reset them by clicking on the “Align” button next to the Position rotary. Pitch is a fairly obvious control, as is Amplitude. Just keep in mind that these affect all of the samplers equally. Each of these rotary controls also has the capability of randomizing values. Click and drag up or down on the square below the control to add randomization. A line will expand around the rotary control. It’s width around the rotary position indicates how wide the randomization values that can be applied may be. It’s a simple visual that let’s you know how far you’re pushing things.
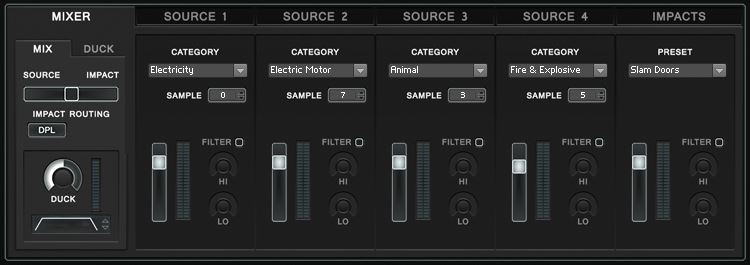
In the mixer view, you have some basic control over the sound categories and samples, mix between the different samplers, high and low pass filters for each sampler, and the ability to solo or mute each sampler (both Source and Impact alike). So, just because the tool uses multiple playback engines, it doesn’t mean you have to make use of them (that statement includes the Impact sampler as well). If you want to build a very simple sound, you can use just one Source sampler. Using all of the samplers allows you to make much more complex sounds. Within the Mixer view, you can also control the balance between the Source Samplers (as a group) and the Impact sampler. Whoosh is setup to apply side-chain compression to the Source samplers whenever the Impact sampler triggers. Worry not, you have complete control over the parameters of the compressor (including the option of look-ahead processing), and how heavily it affects the Source samplers. This is also where you decide if the Impact sampler will bypass the Doppler engine or not. There’s a button labeled “Impact Routing.” If it shows “DPL,” it is passing through the engine. If it shows “DIR,” it bypasses the engine…going straight to the effects section.
 This seems like a good point to step back and mention that we’ve focused pretty heavily on only one of the three main sections of Whoosh so far. By now you should be starting to understand that there’s a lot going on under the hood. What I’ve written so far feels like a pared down user manual, but I felt it was necessary to walk through all of that to adequately express what’s going on in this tool. There’s a level of control and customization that emulates what you would have if you were building all of this by hand, but it’s all laid out in front of you in a very straight forward and consolidated way. Building a base sound in this first section is fast and gives you a chance to quickly audition changes. Swapping out sounds in the sources sampler is a breeze. Your playback settings are retained (unless you load one of Whoosh’s presets, of course) whether you change sound sample or even category. The fact that you don’t have to redo work is key here. It’s this attention to detail and workflow that makes me appreciate this tool so much. That’s right, I haven’t finished the review yet, and I’m already telling you that I like it. Let’s take a look at some how this type of flexibility and efficiency makes its way into the other sections of Whoosh.
Technically, the Doppler window is a bridge between the Mixer and the Doppler engine, but I’m treating it as it’s own section for the purposes of this review. Here is where you can manually adjust the timing of the Impact sampler triggers, and you can also keep track of the playback of the individual Source samplers. The four meters under the waveform window represents the individual Source samplers. Clicking the wide button beneath a meter assigns that Source as the starting sound for your whoosh. The “Mix Shape” control affects the amplitude curve in and out of the “center” point. At maximum, it keeps the volume low unless playback is near that “center” point. At minimum, there is a more gradual build up and fade. The “Latitude” control is, at first, a bit mystifying. It’s hard to relate that term to anything in audio, and the built in description…”inertia of the wave mixer”…does little more to illuminate the actual function of this control. It controls the the cross over of the Source samplers. The engine plays the Sources back in sequence (unless you’ve set the this section to Random). When Latitude is at minimum, the next Source begins as soon as the current Source sampler reaches maximum amplitude. When at maximum, the next Source begins almost immediately after the current source sampler…ultimately giving you a sound with all Sources playing throughout the majority of the whoosh.
All Sources, and maybe the Impact sampler, pass through the Doppler engine, which likely needs little explanation; the controls here are self-explanatory. Likewise with the effects section. Modulated delays and tremolos are fun and simple to add to your sounds, complete with two LFOs that can generate the four basic wave types. Equalization, Drive and Compression round out the effects chain, and a master limiter with three behaviors completes the signal path.
I mentioned in the first paragraph that I would be telling you the tool sounds great. No point in beating around the bush at this point.
Here are some sounds generated by through the presets during playback.
[soundcloud url=”https://api.soundcloud.com/tracks/136623354″ params=”color=ff5500&auto_play=false&hide_related=false&show_artwork=true” width=”100%” height=”166″ iframe=”true” /]
Here’s a set I crafted during some of my initial experiments with the tool.
[soundcloud url=”https://api.soundcloud.com/tracks/136622671″ params=”color=ff5500&auto_play=false&hide_related=false&show_artwork=true” width=”100%” height=”166″ iframe=”true” /]
Same set…adding in the rotation feature (where it starts on a different Source sampler after each individual playback).
[soundcloud url=”https://api.soundcloud.com/tracks/136622672″ params=”color=ff5500&auto_play=false&hide_related=false&show_artwork=true” width=”100%” height=”166″ iframe=”true” /]
Again…this time with a bit of Mod Delay and Tremolo added in. I also messed with the Wave Shape and Duration a bit.
[soundcloud url=”https://api.soundcloud.com/tracks/136622701″ params=”color=ff5500&auto_play=false&hide_related=false&show_artwork=true” width=”100%” height=”166″ iframe=”true” /]
I had to stop myself from playing with it for too long…plenty of other work to get done besides this review. So, sounds great…covered. So how does the tool behave?
It’s stellar.
As either stand-alone in Reaktor, or loaded as a Reaktor plug-in using Pro Tools, there wasn’t a single hiccup. I even loaded this into a 24 bit/192k session in Pro Tools to see if the higher res. calculations would cause any problems. Not a single bug or glitch, and the output still sounded great. By default, Whoosh runs whenever the master clock of its host does. It’s simple to turn off in the “B view” though (simply right-click in Whoosh’s header to change views). It’s also fun to “perform” Whoosh by controlling parameters as it’s playing back…change the Duration, Speed or Distance to get some really interesting sounds. Map those controls (or others) to your MIDI controller by right-clicking and assigning MIDI learn, and you now have some tactile control over it. This tool is definitely well thought out and fun to use.
That doesn’t mean I don’t think there’s room for improvement. [I know, I’m a hard bastard to please. ;) ] For instance, the method for importing your own sounds is a little clunky. Part of that is simply due to the nature of Reaktor, but there’s currently no way to rename the sound categories within Whoosh if you do. Have a look at the video tutorial Melted Sounds has released to walk you through the process, and you’ll see what I mean.
Part 2 walks you through the process for replacing the impact samples
If you’re going to do this yourself, I’d suggest first exporting the factory sample map somewhere to your hard drive to save yourself the time of having to replace the whole ensemble. I’m dropping in an image below to show you how to do it.
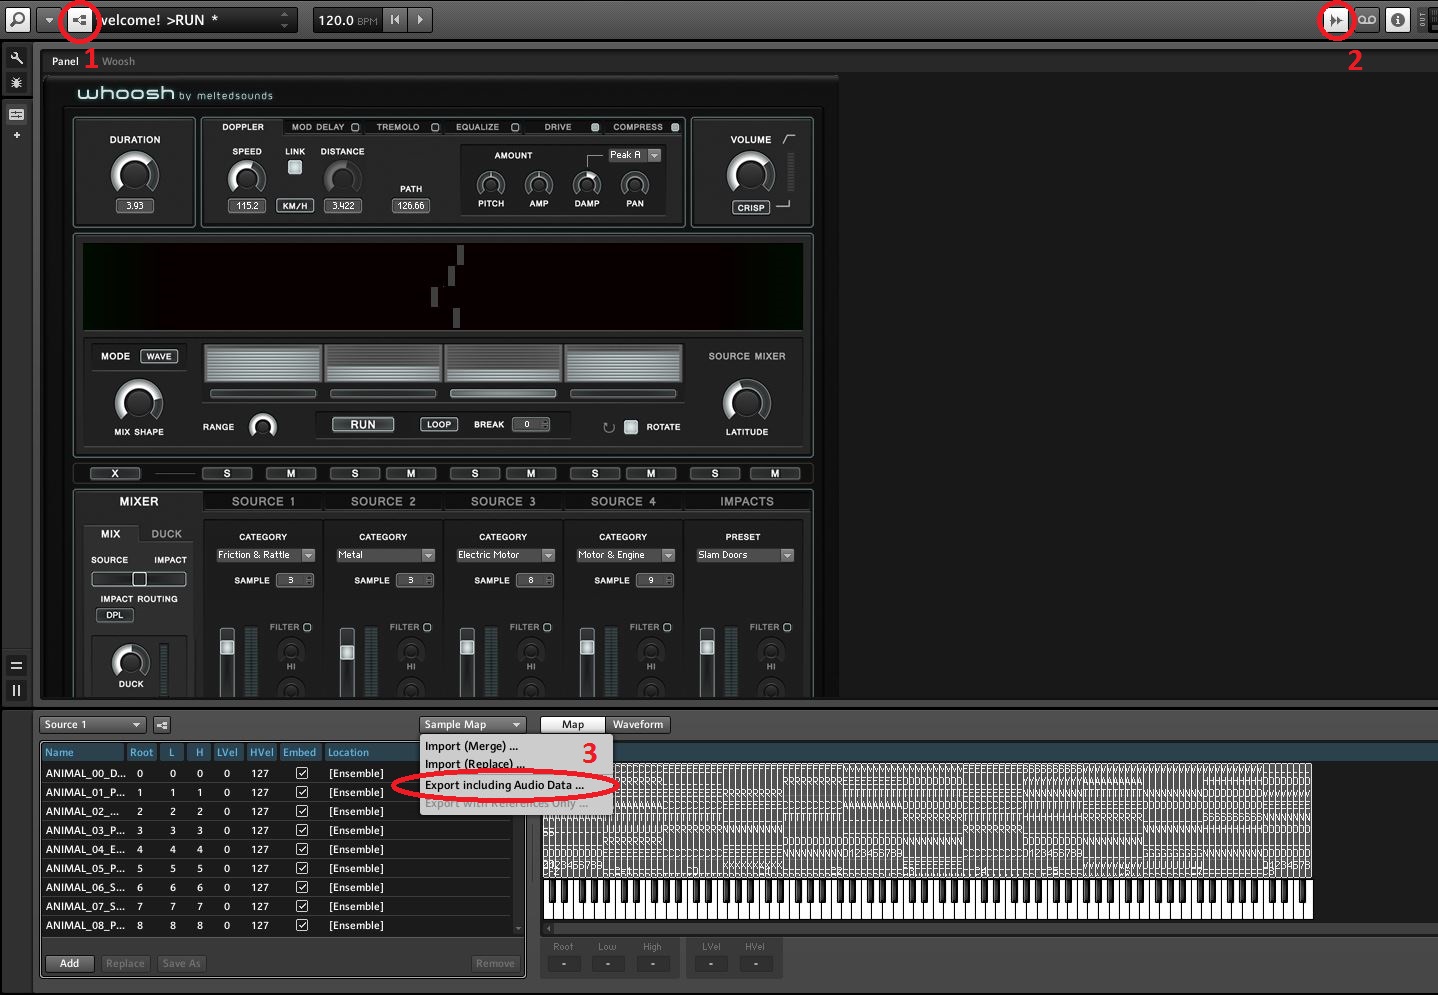 Enable Edit Mode, open up the Sample Map, and use the pull-down menu to export.
I’ve asked Tilman about their plans to make this more transparent for the end user, and he’s assured me that they’re working on it for a future (note – it will also be free) update to the tool. Also in the works are additional randomization functions for sample selection, new MIDI functionality, and the ability to adjust the “center” position during playback (giving you the option of having a short head and long tail, or vice versa). Something else I’d like to see incorporated in the future would be a way to bypass the effects section for one or more of the Source samplers. I’d like to be able to construct a complex whoosh that has a stable bed with a modulated layer over top, without having to go through two passes of record with the tool.
This all feels a bit like nitpicking though. Melted Sounds really has released a terrific tool, and I’m happy to see that they’re paying attention to its users…incorporating additional functionality as needs and wants are identified. I really have enjoyed getting to know this tool, and it will be a part of my workflow in the future. The next time I need a good whoosh or pass-by, I’ll probably be pulling this up and constructing it. It all likelihood, it may be faster than hunting through my library to find the one that has just the right texture. And that right there is probably the best endorsement of the tool I can give…it allows you the time to BUILD a sound, even in a rush project. Anything that permits me to apply some actual creativity, not just be creative in sound selections, is a worthy addition to the toolbox!
Whoosh is available from Melted Sounds for $79 and requires the full version of Reaktor. As such, it is available on any platform that will run Reaktor. A copy of Whoosh was provided by Melted Sounds for review purposes. It was tested on a Windows 7 PC in both Reaktor stand alone and as a Reaktor based plug-in in Pro Tools (in both 24/96 and 24/192 sessions).
Don’t get me wrong, this looks like a pretty awesome tool but am I the only one that’s thinking a bit ‘meh’, kinda taking the creativity out of sound designing things a bit? I don’t mean to sound like an old fart but I would probably take more satisfaction out of crafting something from within a DAW with a few choice plug ins then just hit ‘random’ and hope for the best. I know there are pressures of time and all but something inside me doesn’t quite sit right. Maybe I’m over reacting on this a bit too much lol I don’t want to come across like things were better ‘in the good old days’ but anyone else thinking along the similar lines or do I just need a better nights sleep? ;)
If you’ve got the time on a project, J R, absolutely. Crafting completely from scratch can be far more satisfying. This tool isn’t necessarily about being random though. Think of it more as those choice plug-ins you mentioned are all integrated from the outset, and they’re a little simplified to give you the ability to actually CRAFT something quickly. Sure, if you want to hit random you can. I don’t think that’s this tool’s strength though. There’s a good selection of starting points (and by that I mean source sounds, not presets), and you can also replace them. I see this more as having a tool that lets you bypass the act of setting up a session for creativity, and just getting straight to the creative part.
“Sound design” should have little to do with what tools were used and how, that’s not the point. The point is that the outcome is fitting.
I think tools that lesser the pain of the process and save time for other elements are useful, rather than spending manual labour time on things that a listener will not care for (that it was manual laboured).
The source material is even more important than “knob turning”. The knob turning, as can be seen, can be automated, but the creatable sounds are still highly dependent on the source sounds and their quality, which is much wiser thing to spend time on, finding good source sounds.
Hey there,
I fully understand your concerns. We thought about this during the creation process as well. As I work as a sound designer / sound editor myself it was very important to me that “Whoosh” offers features that add something to the process of designing pass by sound effects.
This instrument offers certain functions you simply can not realize inside your daw. Everything in this instrument is synchronized to the “Duration” parameter. Grain Position, Cross Fade Mixer, Doppler, Effects Modulation, Impact Position. It allows you to edit your events very precisely and results in very consistent and tight pass by effects.
You can implement your own sounds and safe your creations as presets. This will be more convenient with the next free update. You can also open multiple instances and create swarms of whooshes. :-)
Like every new tool – it is an addition to the current existing methods.
Cheers,
Tilman
Been playing around with this now for a few hours, absolutely awesome tool! There´s so many ways to use this one creatively, and at the same time it eases your workflow. Great job!
One question Tilman: Is there any way to line up the impacts so that they become synced with certain beats in your DAW, other than adjusting the duration knob manually? For example, I might want to build up a whoosh that peaks exactly at beat 1 of a bar … I know it´s primarily a sound design tool, but that way you could incorporate it easily in musical scores as well (e.g. buildups in action tracks). You could also sync it easier to film clips … maybe I am just missing something?
Hey Jurek,
thanks a lot! Well for now it is not inclouded into the workflow. But we have it on our list. Maybe this will be part of the next update or maybe at sometime in the future…
Thank you,
Tilman
Hey Tilman,
I have ordered it, but I thougt that it will also be available as a stand alone.
Do I realy have to use it with Reaktor?
My bad, I should have read, before buying :(
Best,
Alex
Thanks lot for the Kind words!!
Jurek: with our new version this is possible now.
Alex please contact us via the contact form on our website. But I guess this post is old and you allredy did…
This is a new whoosh tool I cannot wait to play with. After re-creating Charles Deenen’s PT template, and owning Wavewarper for the past year, I welcome the addition of Whoosh to my arsenal. In regards to the comments above regarding this kind of tool being a little “lazy”, I disagree. We all set out to create cool, unique sounds and this simply speeds up the process. Even using the same source, we all would create new, unique sounds using tools like these every time we use them. :-)