As and editor, I’m constantly sending files over to RX for general or specific improvements. One of the biggest challenges I was facing until recently was that of figuring out a way to clean up an ambisonics recording. If you try to send a 3-channel or more audio file to it, RX will prompt you with the following warning: “RX does not support that many channels“. So how can that be achieved?
A few months ago my teammates, Oliver Schulz and Calum Wakeling, and I were having an issue where no matter what we tried, we couldn’t make the ambisonics recordings sound better and fit well with the picture. Together, we’ve figured out a way to split an ambisonics file into 4 mono channels and route them through a bus that would then maintain each channel’s spatialisation. In order to accomplish that, Reaper must recognise RX first — the DAW doesn’t have support for RX Connect yet, so the alternative we have at our disposal is to open files in external editors. Without any further ado, let’s dive into it.
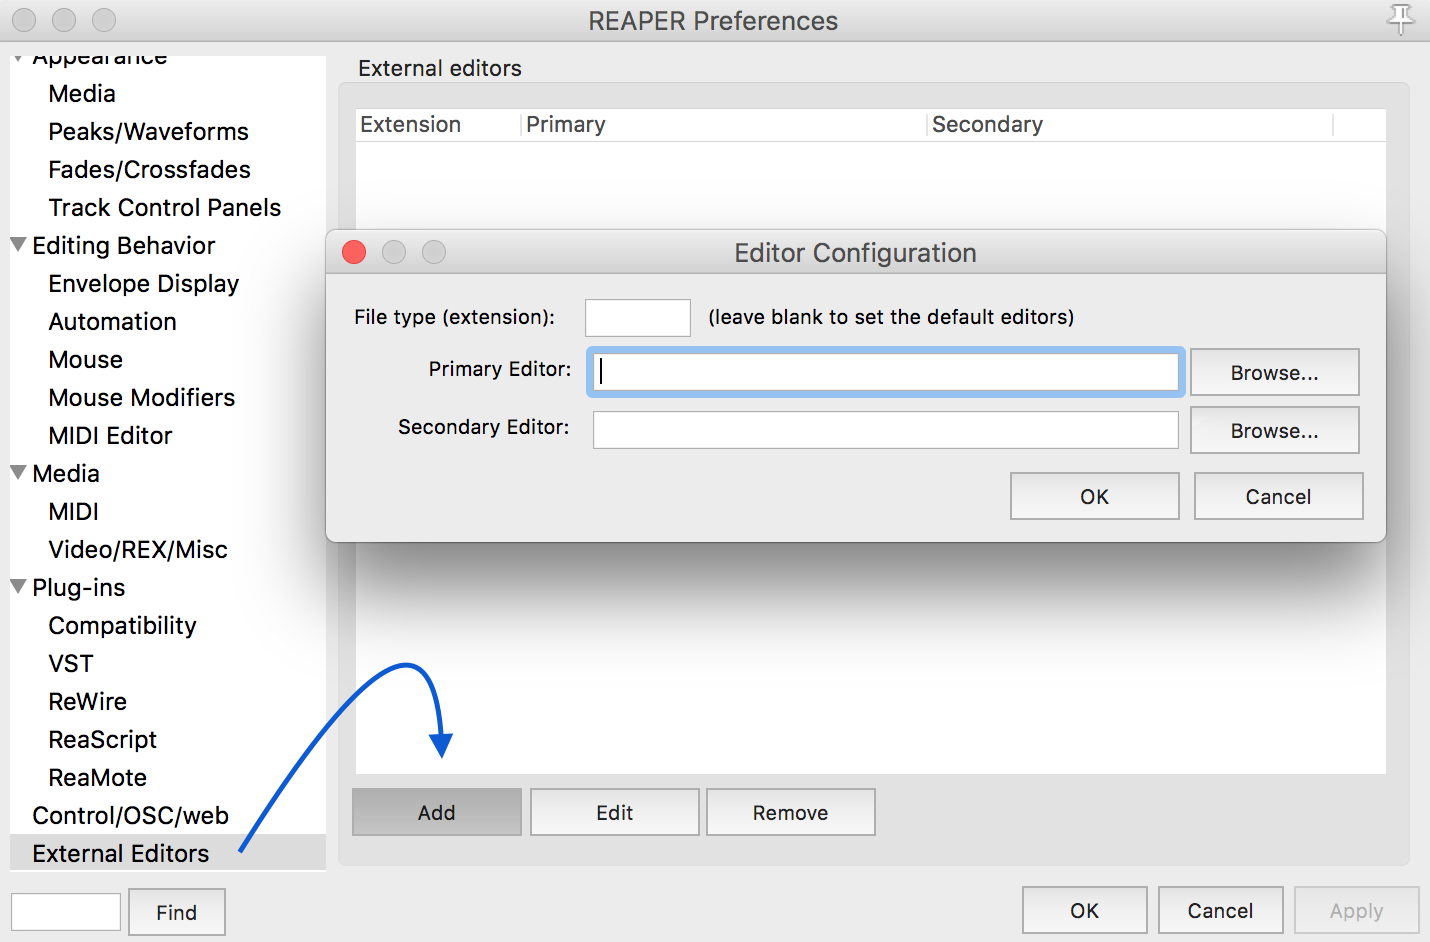
In the Reaper preferences menu, scroll all the way down to External Editor. There, select ‘Add‘ and choose your primary external editor, as illustrated on the picture below.
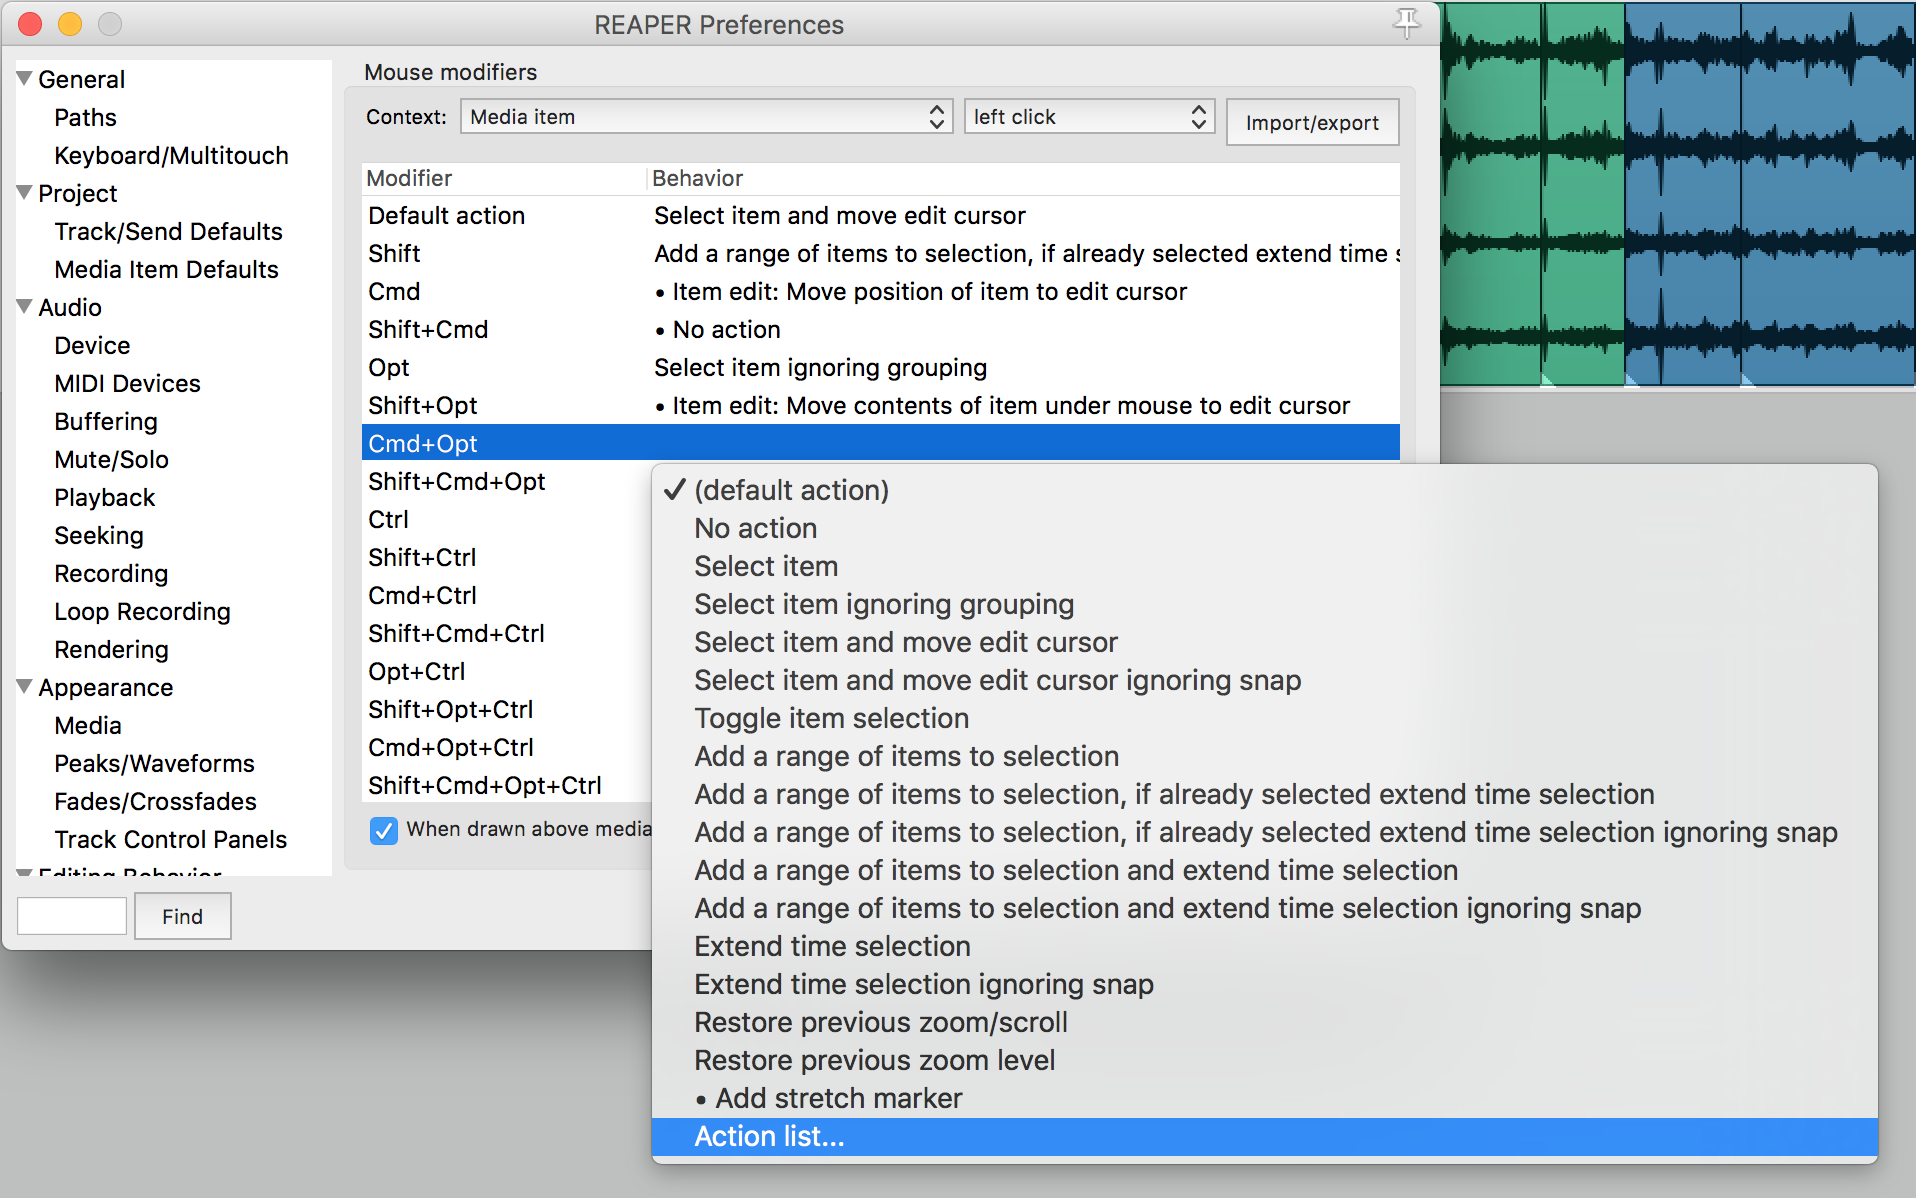
Once you’re all set, keep preferences open and scroll up to Editing Behaviour – Mouse Modifiers, to create your custom mouse modifier to open items in RX. On the top menu where it says ‘Context’, select ‘Media Item’ and ‘Left Click’. Then, select the modifier of your preference, double click on it and go to ‘Action list…‘ in the drop-down menu and search for: Item: Open items in primary external editor; click on ‘Select‘ on the bottom-right corner of the action list and now you’re good to go. You can also set a key command instead of a mouse modifier, or both.
Track Layout & Channel Selection
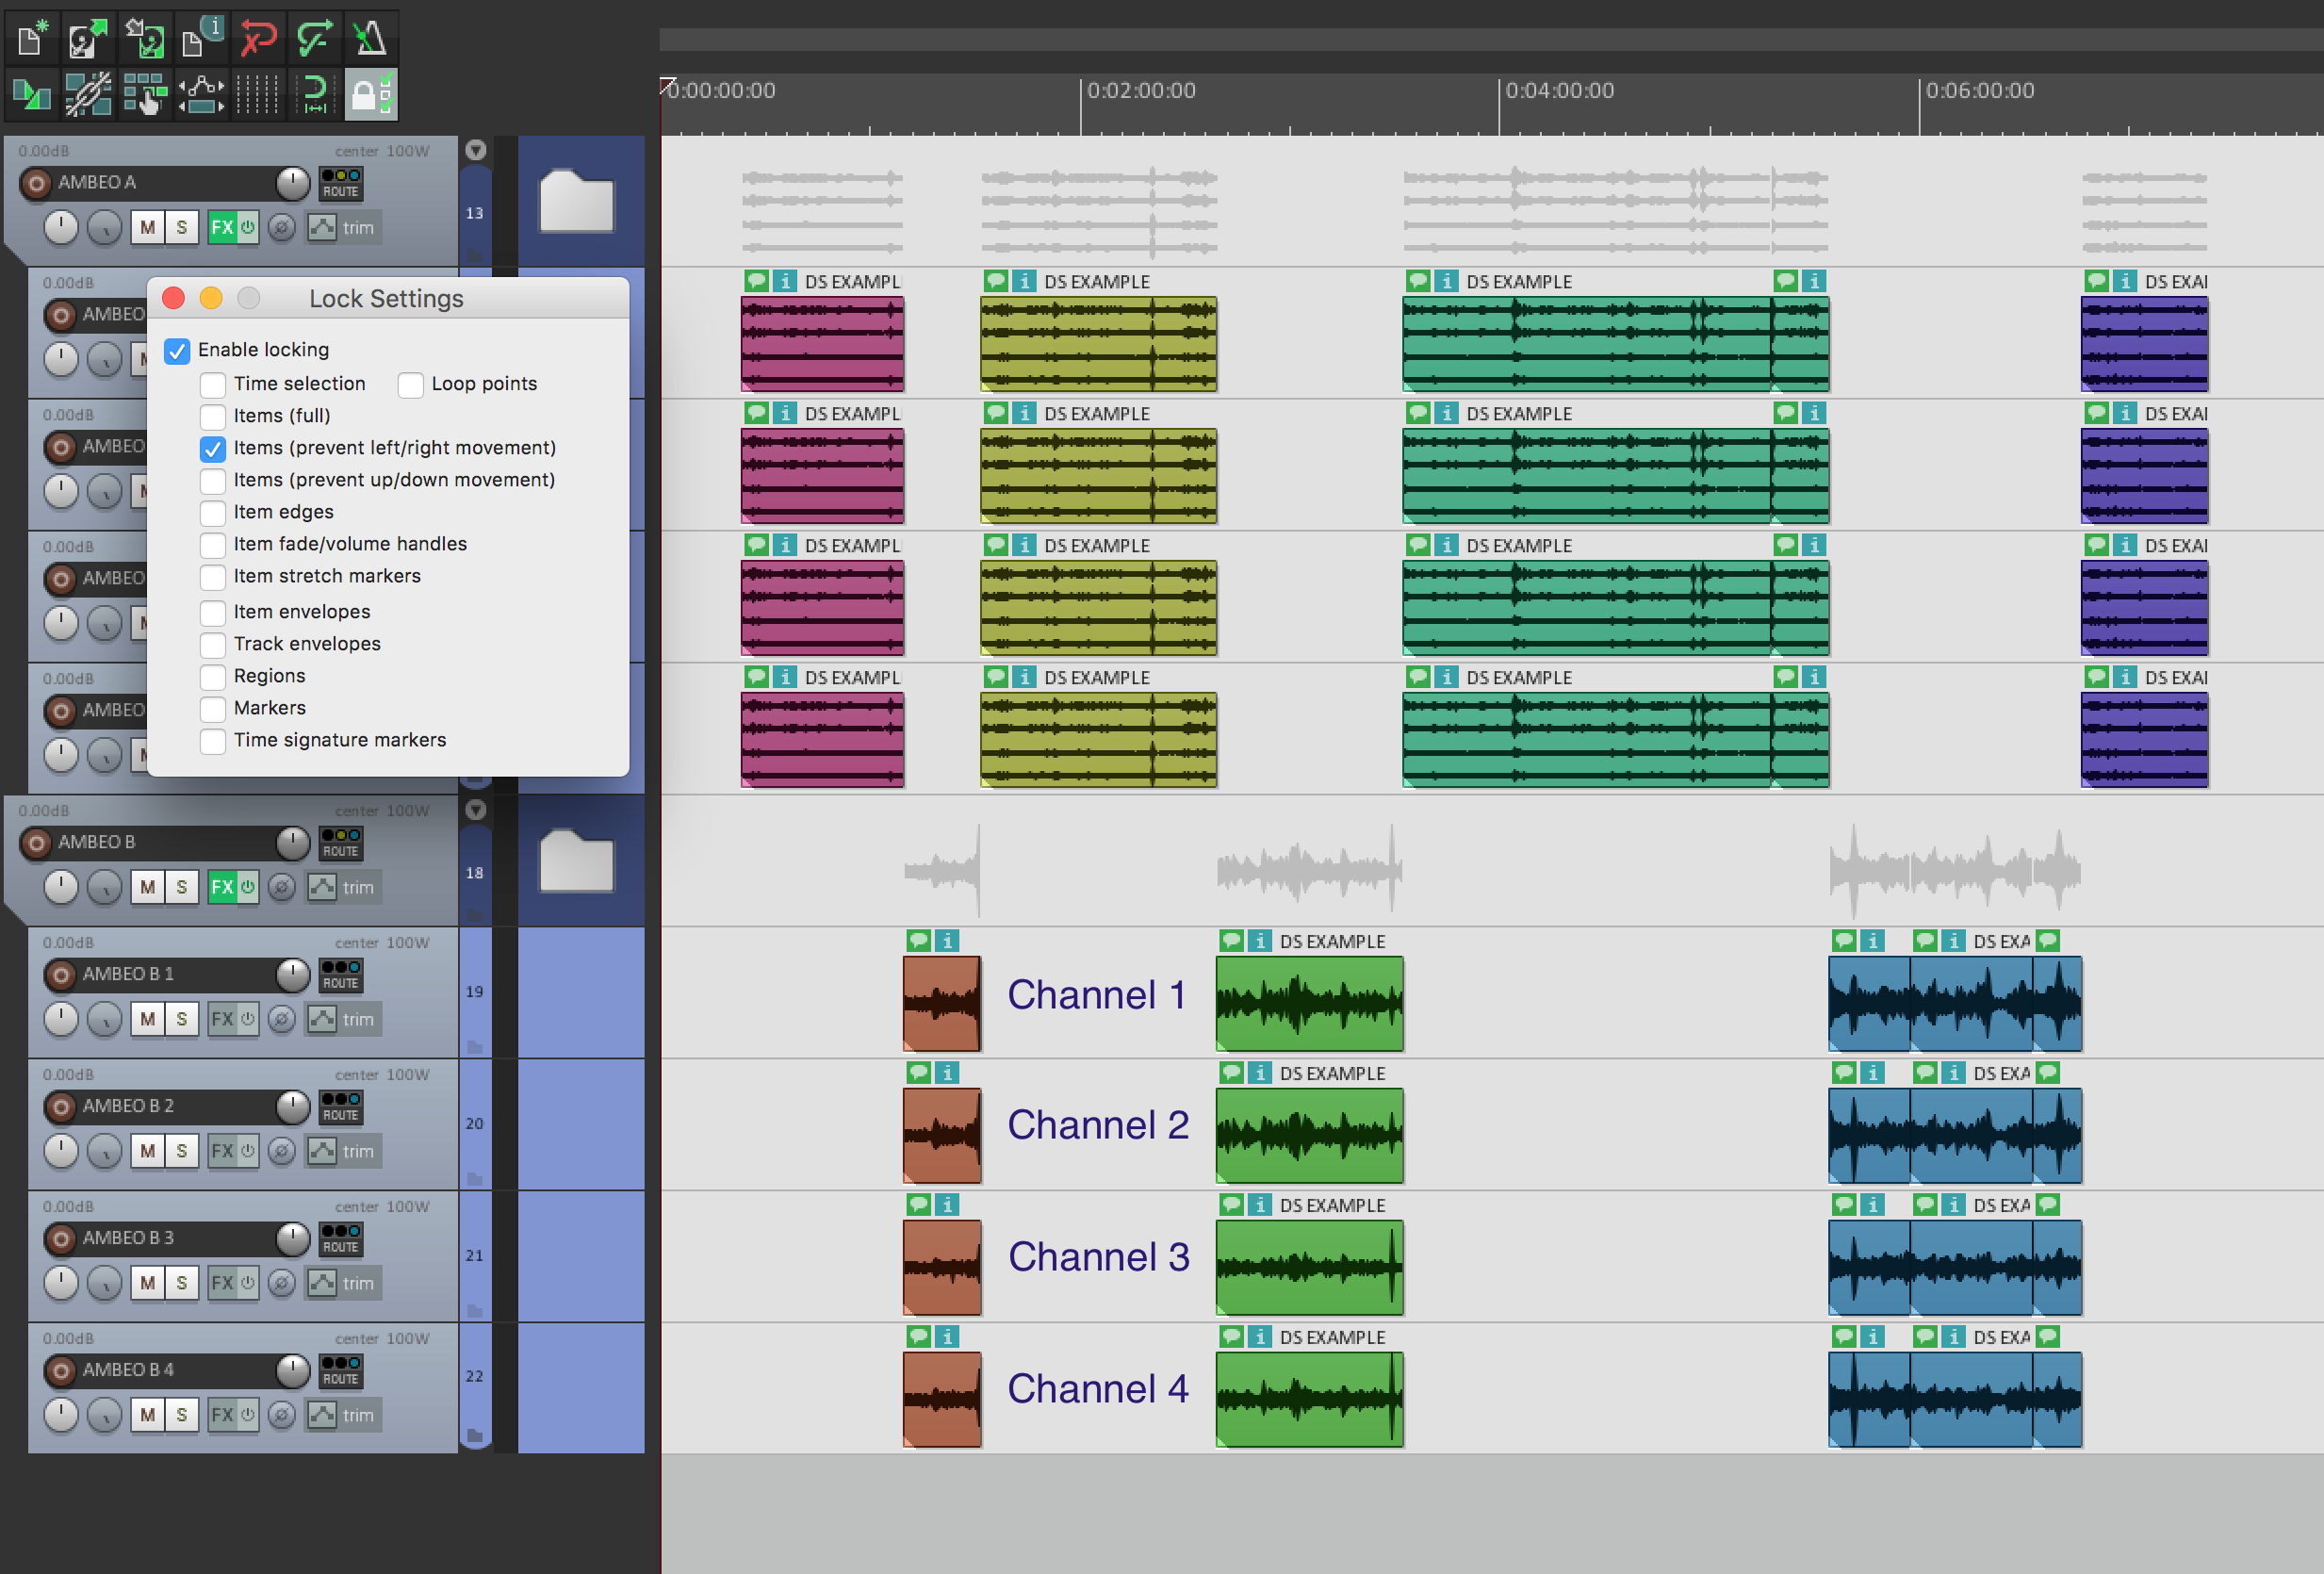
Similar to traditional ambience editing, the ambisonics files below are color-coded and banked according to scene changes. Instead of having two banks of 8 tracks, we’ll create two banks of 4 tracks each, and each bank should then be routed to an aux track (also known as folder tracks). In addition, all tracks should have 8 channels. In Bank A the original files are duplicated and in Bank B each channel is already assigned to its respective track (ie. Track 1, channel 1) for demonstrations purposes; ideally all tracks should be assigned to their respective channels in both banks.
In the image below, notice that only the aux tracks contain an effect (FX icon is labelled in green); as mentioned in the brief introduction to this tutorial, the files will be split into 4 mono channels and then be routed to aux tracks, which therefore contain the spatialisation plugin.
- Quick tip on duplicating files to new tracks: right click on the padlock icon in the tools menu and click on ‘Items (prevent left/right movement)‘, as demonstrated below–you can click on the image to zoom in.
To select a take’s channel, open the action list and search for ‘Set take channel‘, then assign your key commands of choice to the actions ‘Set take channel mode to mono (left)‘ and so on, for example. For this tutorial, let’s assign the following:
- ‘Option + 1‘ (Alt + 1 on Windows) to the left channel;
- ‘Option + 2‘ to the right channel;
- ‘Option + 3‘ to the third channel;
- ‘Option + 4‘ to the fourth channel.
When done, select the respective items and set each row to its channel. Setting the channel mode of an item DOES NOT make it mono. What we need to do now is render each item as a new take and then we’ll be one step closer from being able to send them to RX. You can either do this by right clicking on an item and navigating to ‘Render items as new take‘ (yes, you can do it to multiple items at once), or by creating a custom action as well. In the action list, search for ‘Item: Render items to new take‘ and assign your key command of choice.
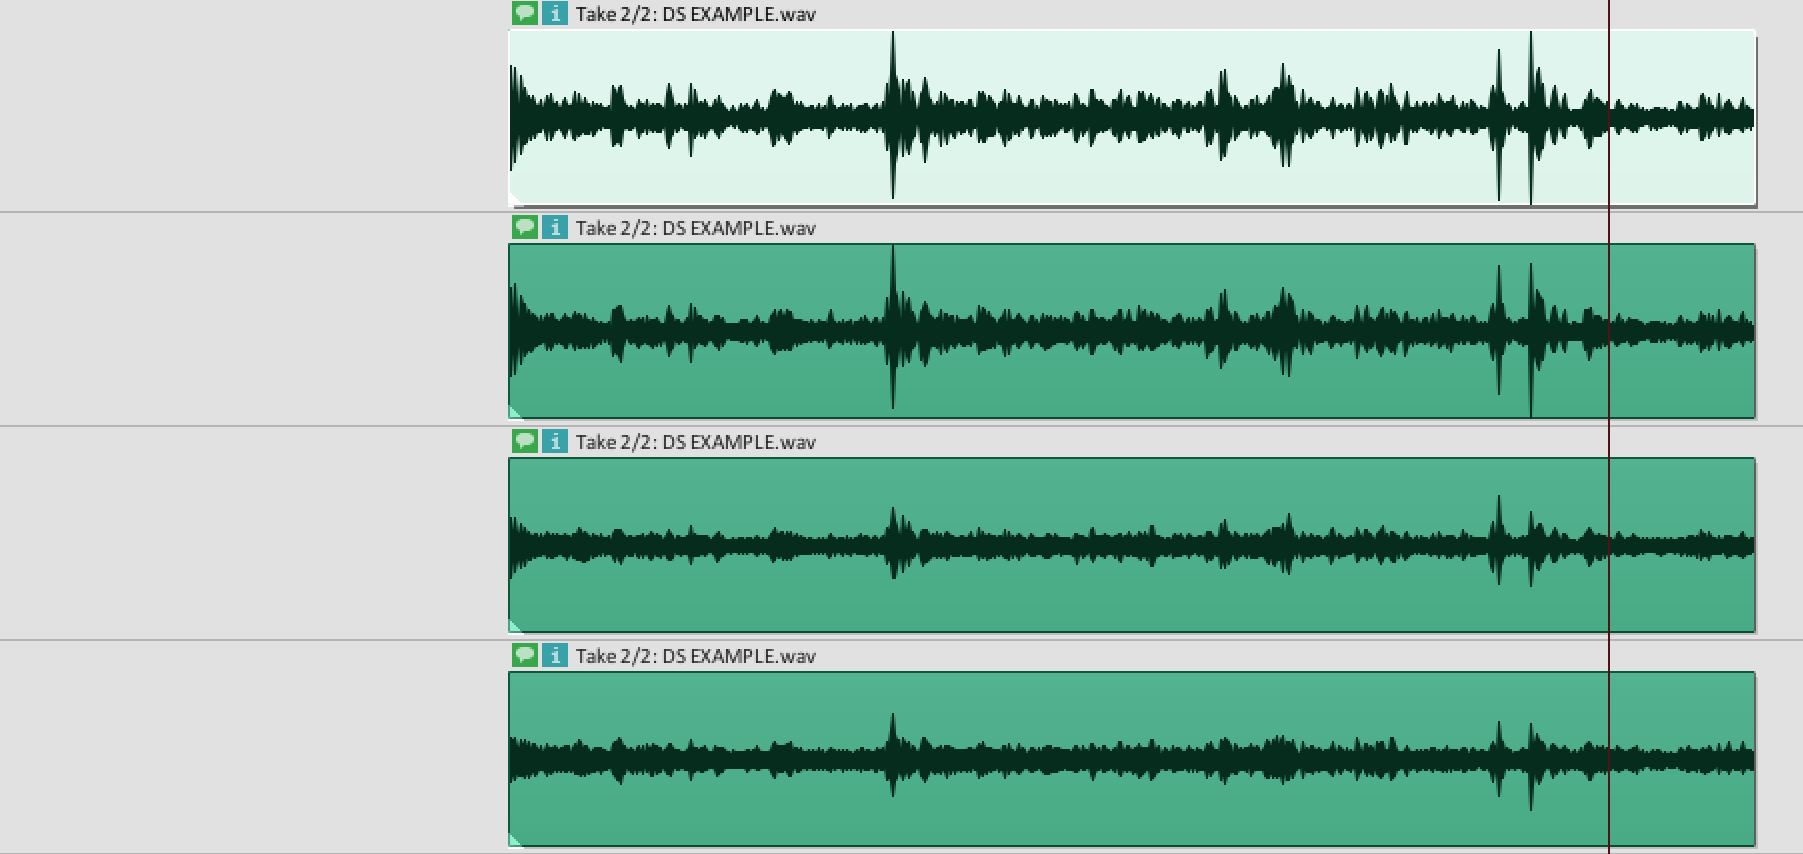
Once the items are rendered to a new take, Reaper displays which take is active in a rather confusing way. Instead of placing the previous take(s) in a playlist, it keeps it above the newest take by default. Furthermore, it illustrates which take is selected with a tiny indication on the top-left hand side of the item, as well as by colour-coding the previous take dark-grey. Fortunately, however, there is a way to simplify this. In the ‘Options’ drop-down menu, select ‘Show all takes in lanes (when room), or apply the key command ‘Command + L‘ (Control + L on windows) and that should do the trick. Now instead of displaying both takes in same space, it will only show the selected take. To switch between takes, the default action is assigned to ‘Shift + T‘.
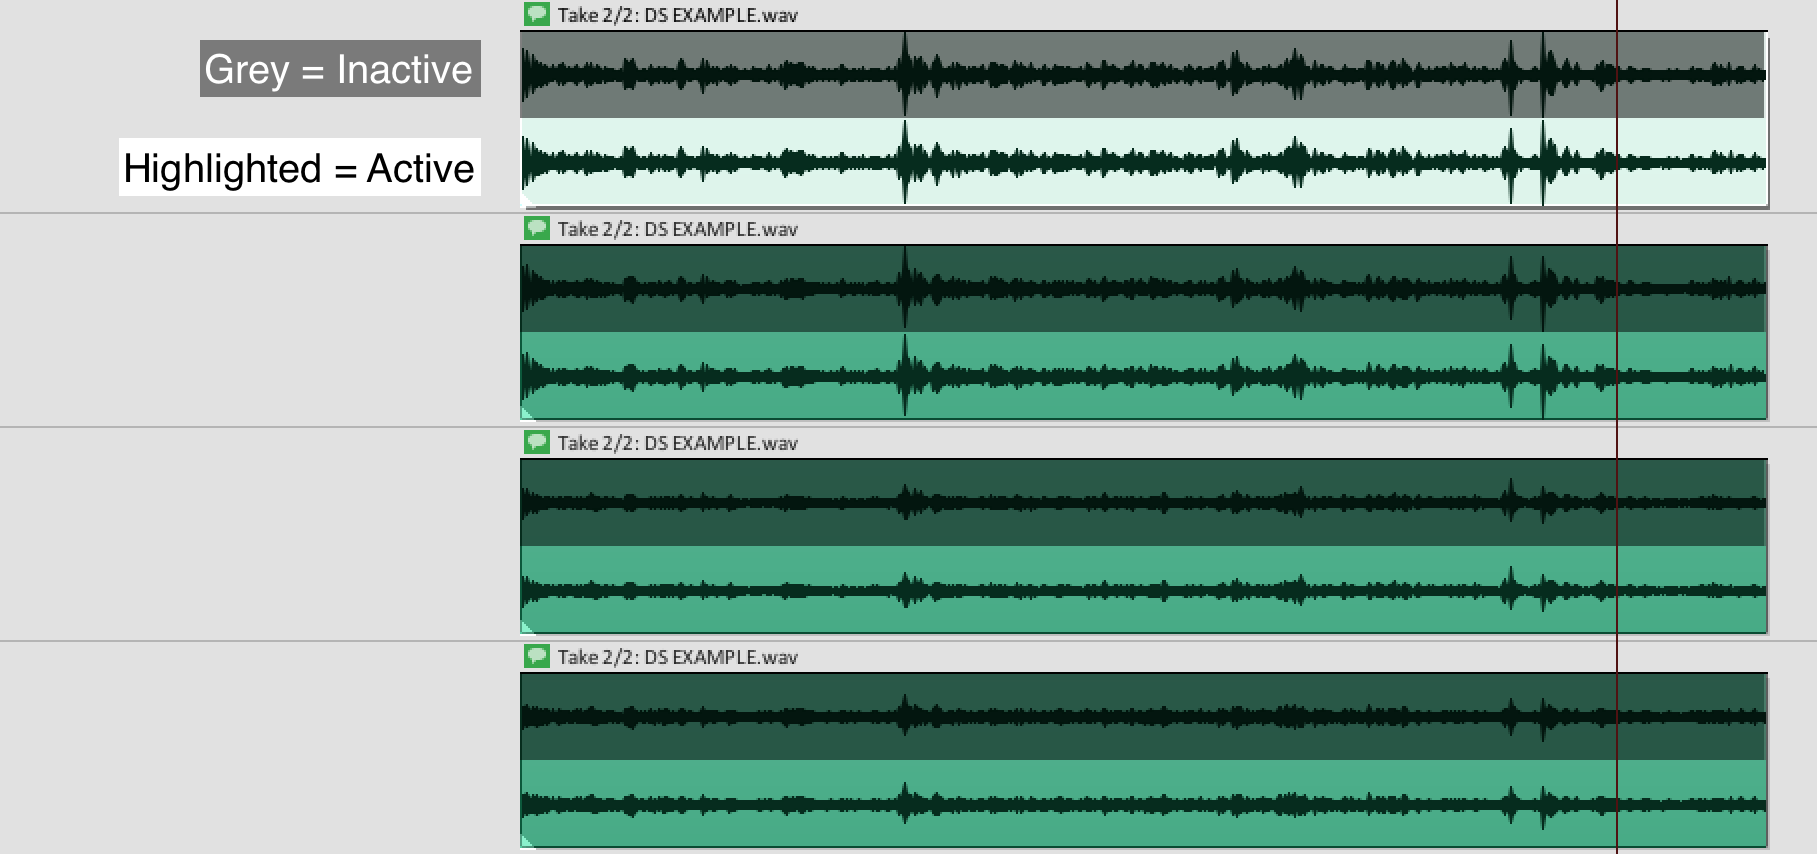
It looks quite cumbersome and confusing, doesn’t it? When you deactivate the option to show all takes in lanes, Reaper hides the inactive file and displays only the active take, like this:
Track Routings & Making it Work
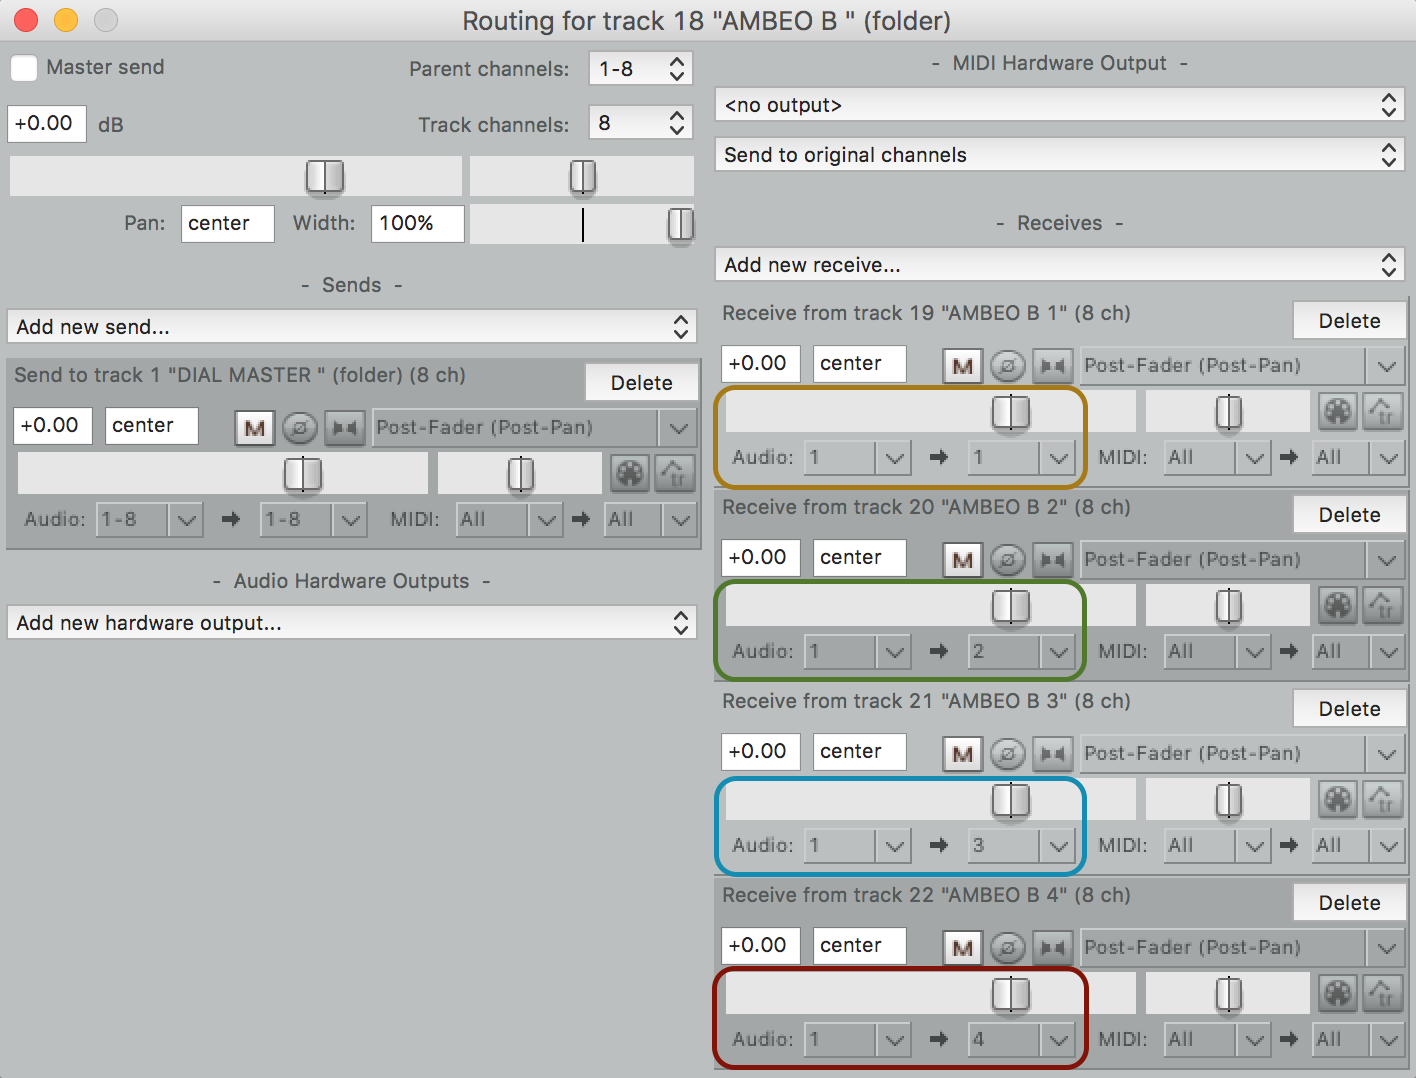
In order to split the channels appropriately, you have to route each track to its corresponding input in the aux track. For example:
- AMBEO B 1 – Route from source 1 to destination 1 (Circled in yellow)
- AMBEO B 2 – Route from source 1 to destination 2 (Circled in green)
- AMBEO B 3 – Route from source 1 to destination 3 (Circled in blue)
- AMBEO B 4 – Route from source 1 to destination 4 (Circled in red)
Reaper’s interpretation of routing is quite different than that of Pro Tools. In Pro Tools, you’re able to route a track’s output to another track and send it to an FX return. In Reaper, when you ‘send’ one track to another you’re literally assigning it to another track.
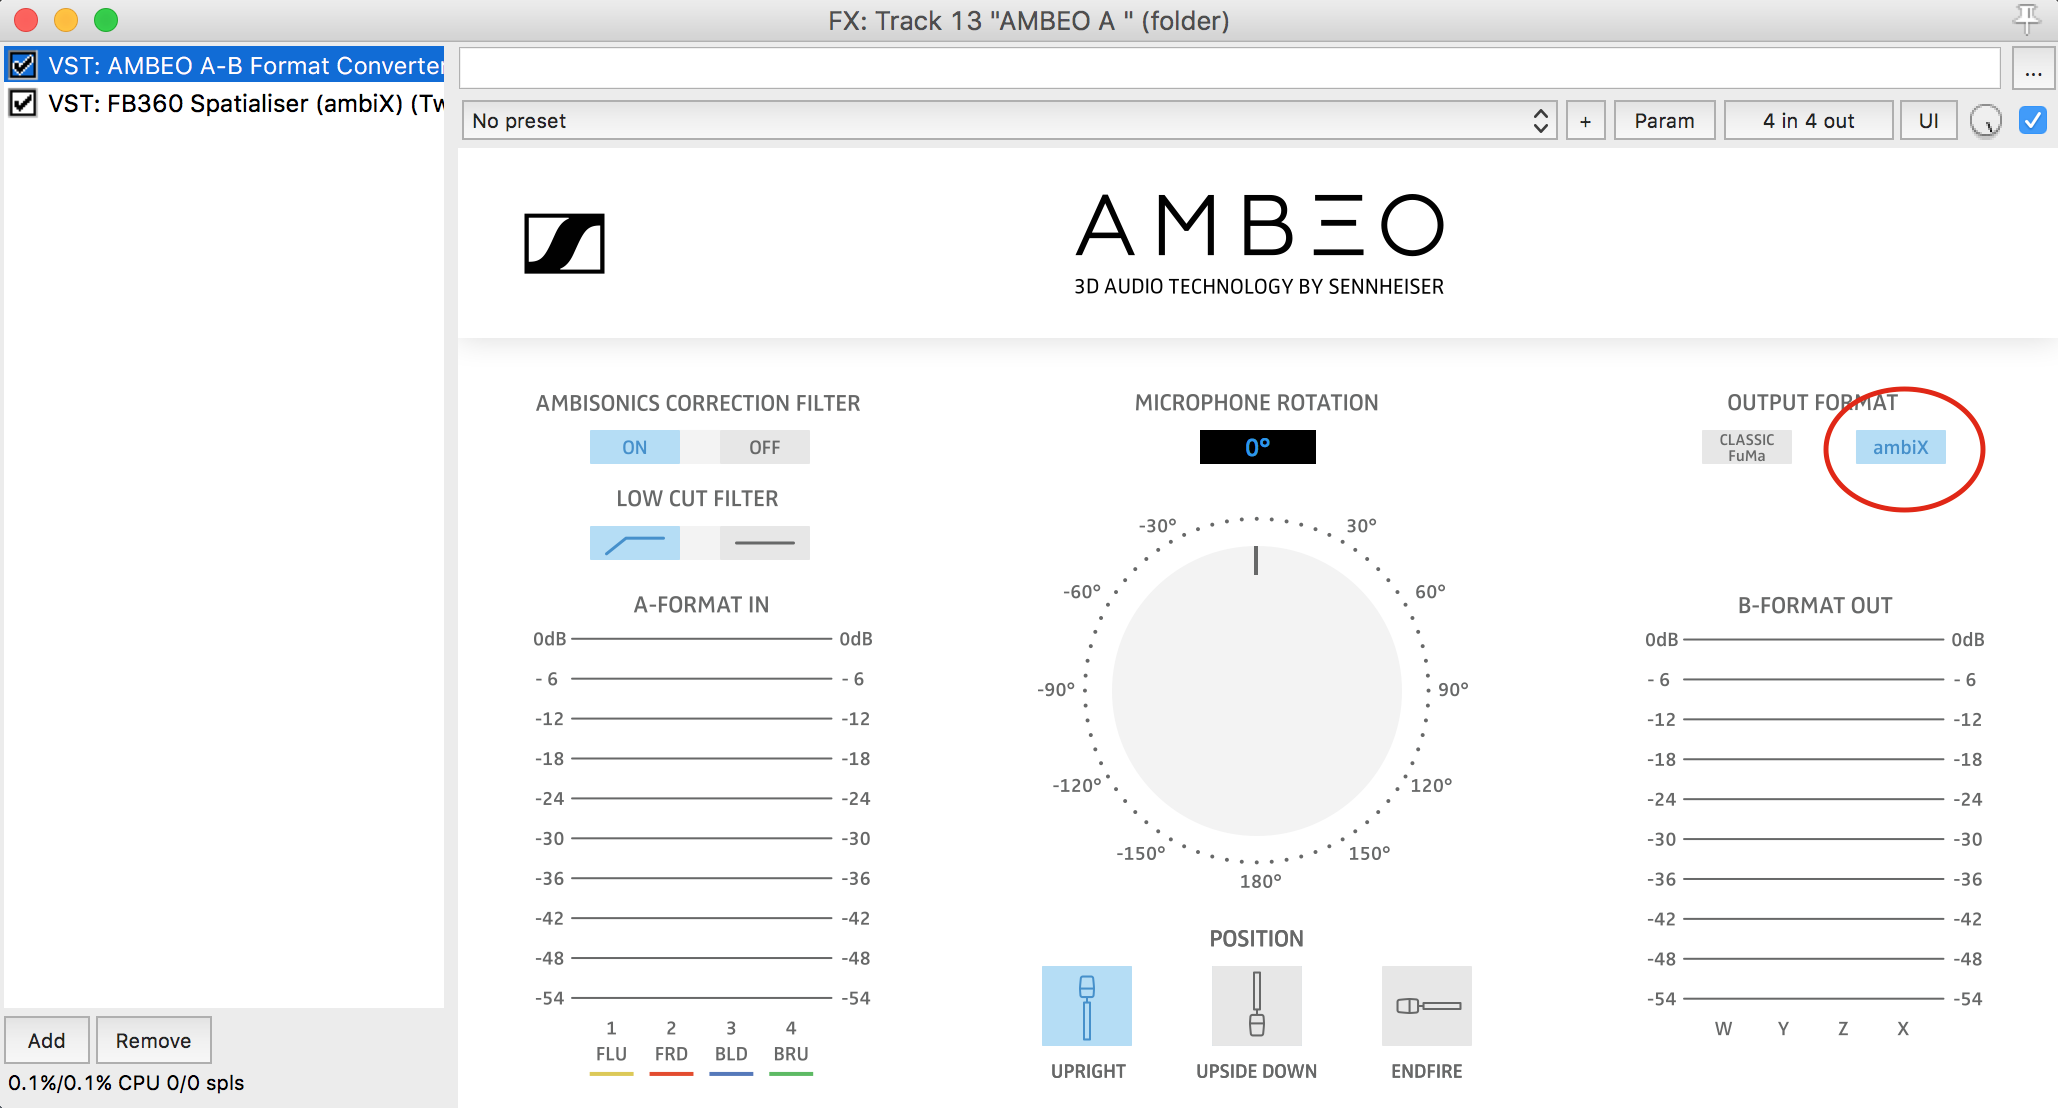
When you’re done, you’ve got to set the spatialisation plugins in the aux (folder) tracks. Those recordings were made with the Sennheiser AMBEO microphone, and therefore the AMBEO Converter plugin was loaded to the top of the chain and set to ambiX; the FB360 spatialiser must then be put below the converter and its input should be set to ‘B-format (ambiX)’. What the Sennheiser plugin is doing is converting the A-format file to B-format before hitting the spatialiser. If the recordings were made by the Soundfield SPS200, you’ll need the SurroundZone 2 plugin, set the output to B-format and place it before the spatialiser plugin.
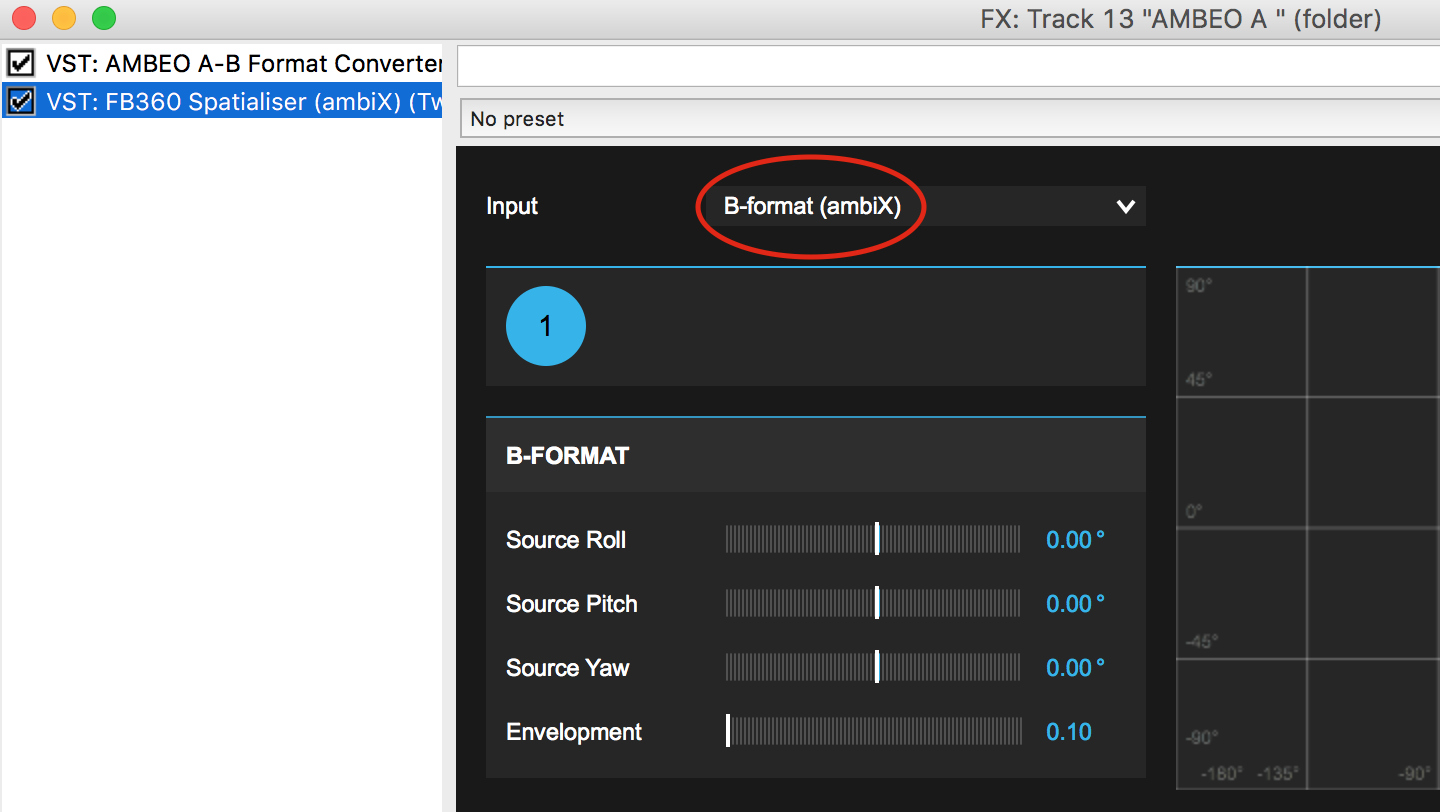
- Note: none of the audio tracks should contain the FB360 Spatialiser plugin, only the aux tracks.
RX Workflow
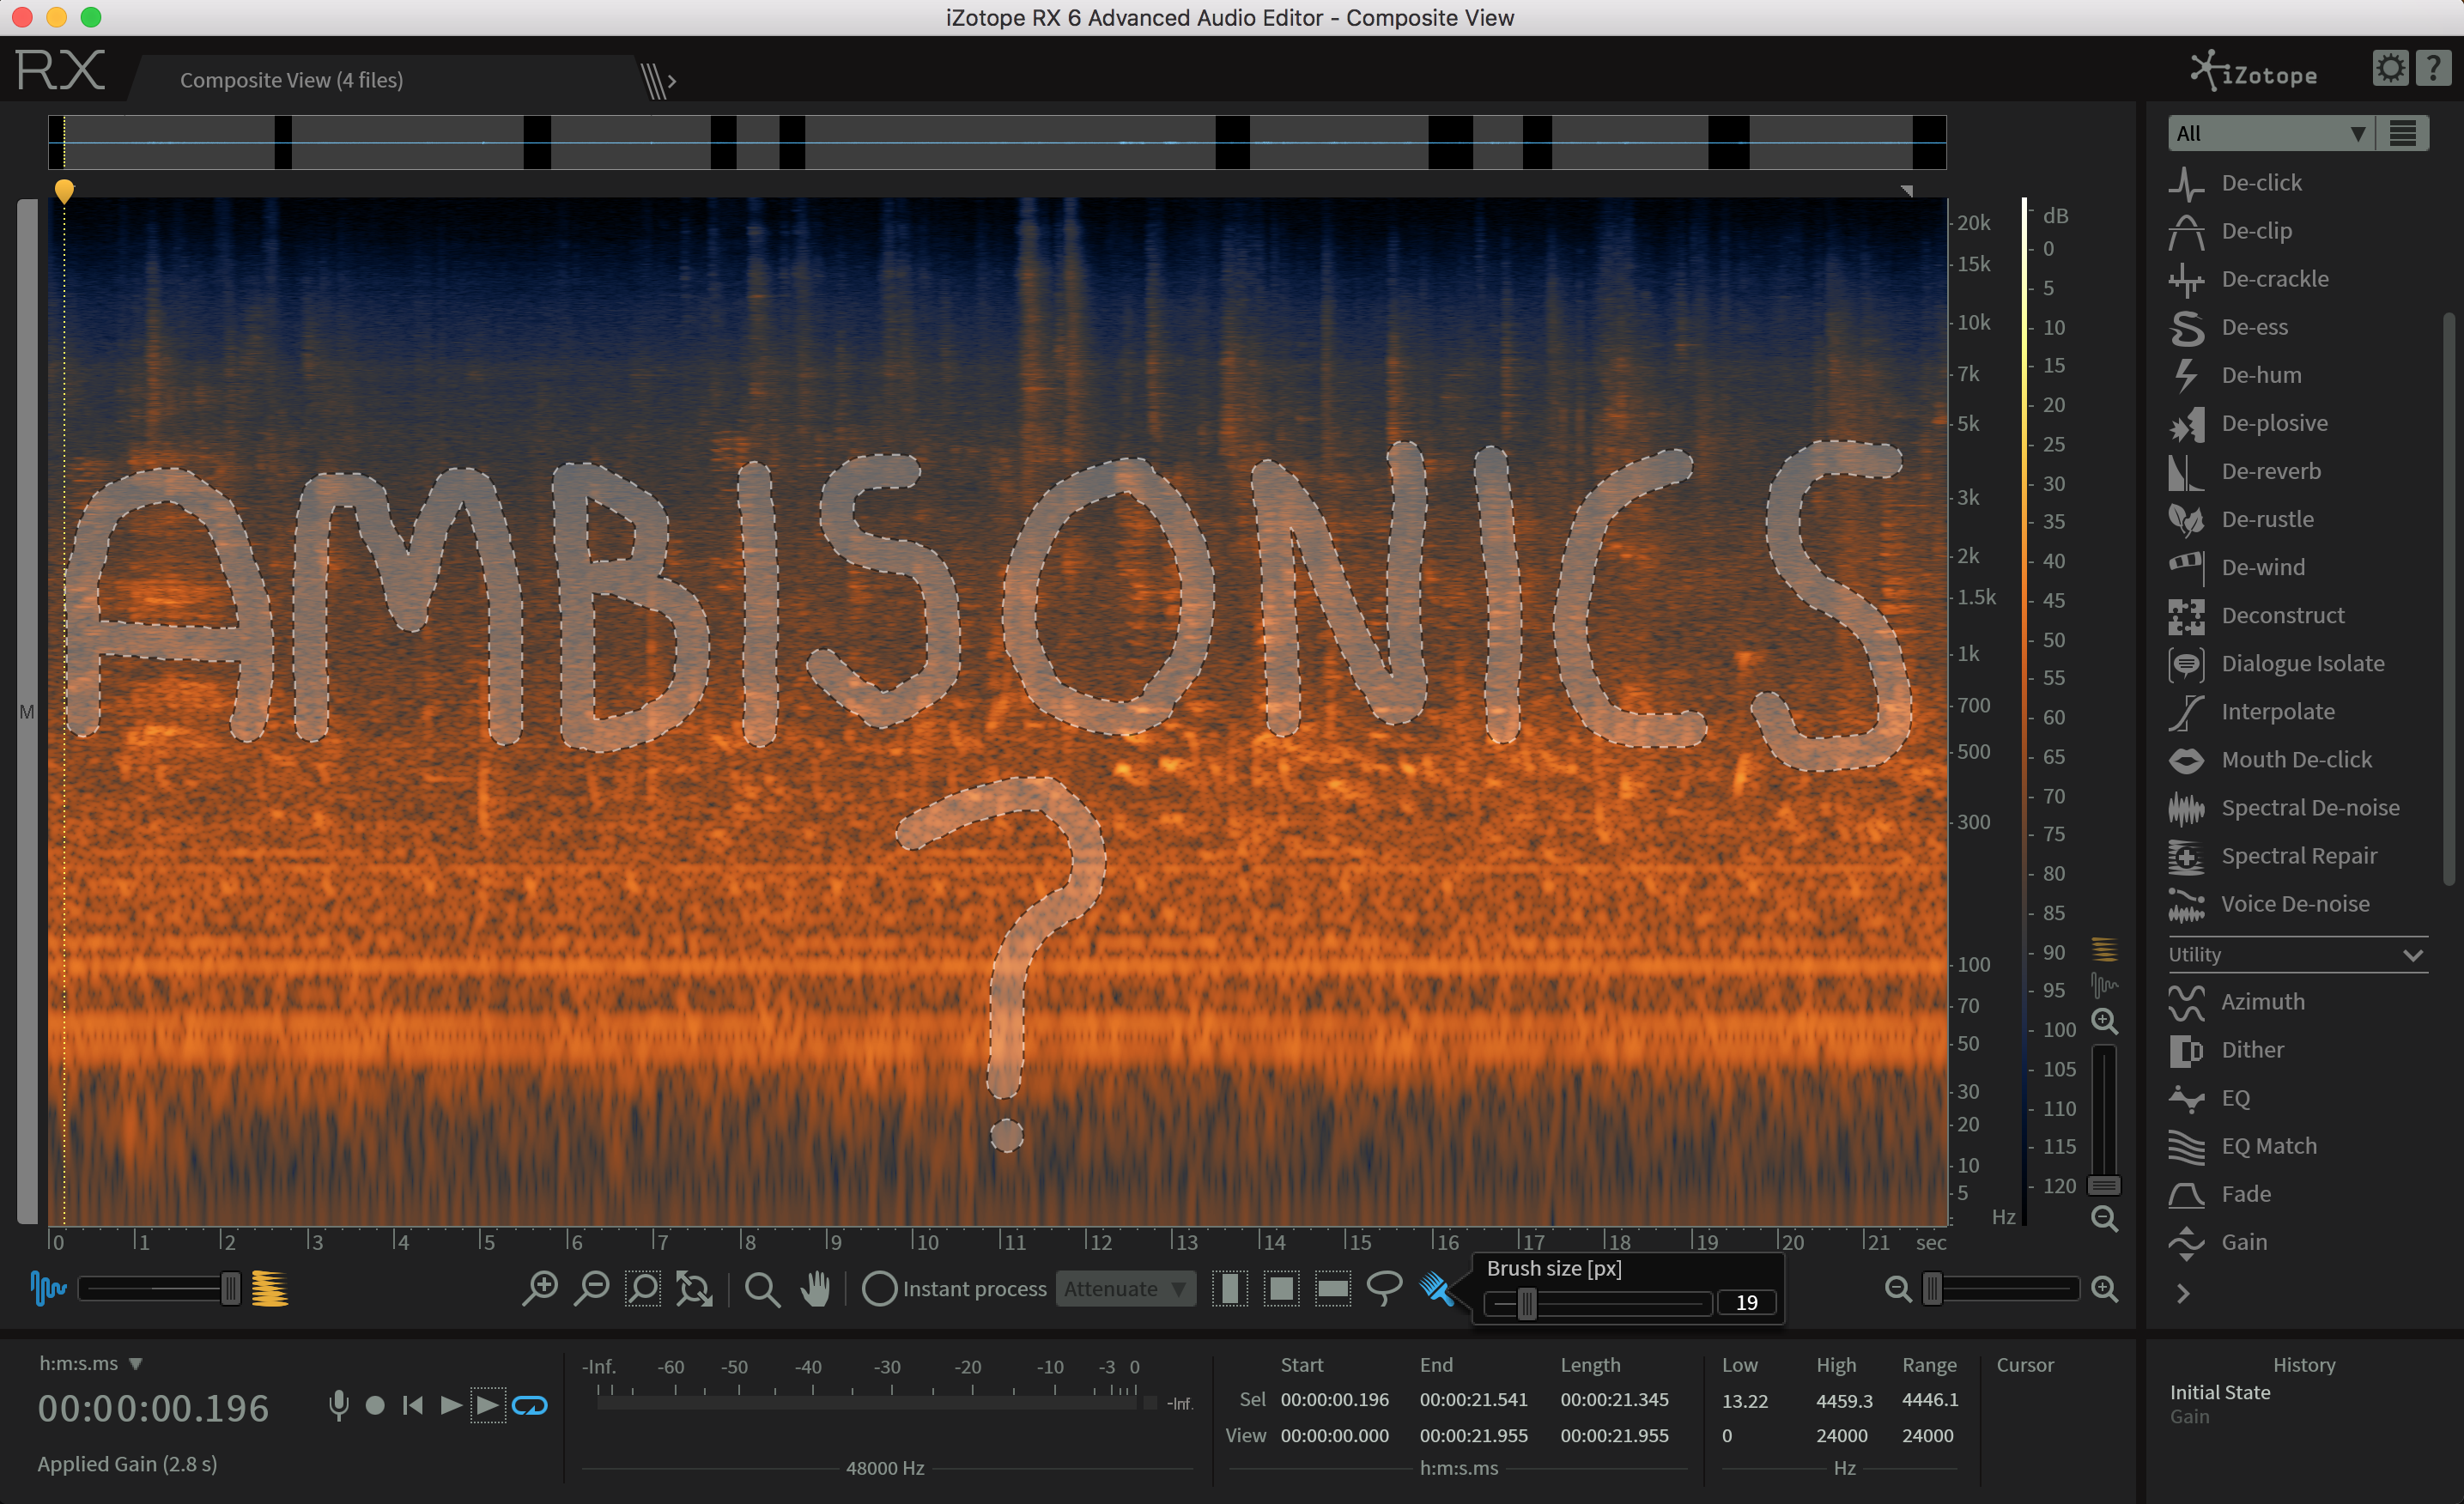
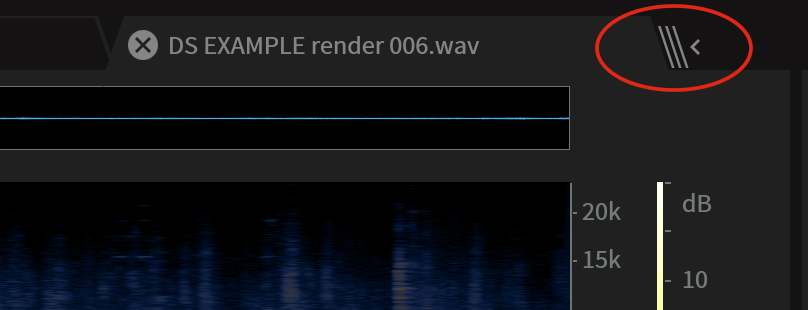
Now that we’re finally good to go, let’s send the files to RX. You can select all of them and use your key command or mouse modifier of choice, and all of the files will open together. In version 6, iZotope introduced a very convenient feature called Composite View. What that allows you to do is group all audio files into only one spectrogram view, and any modification you apply to it will therefore affect all the files. You can composite up to 16 audio files. To set composite view, click on the little arrow located on the right edge of last audio file tab, as illustrated in the following image:
When you playback in composite view, you’ll listen to all files being played together. Depending on quality and overall level of the recordings it can get tricky to accurately fix issues, however since all channels correspond to the same recording then it’s more of a convenience to edit them all at once. Taking on a rather radical approach, the gain was reduced all the way down, as displayed on the left hand side of the picture below.
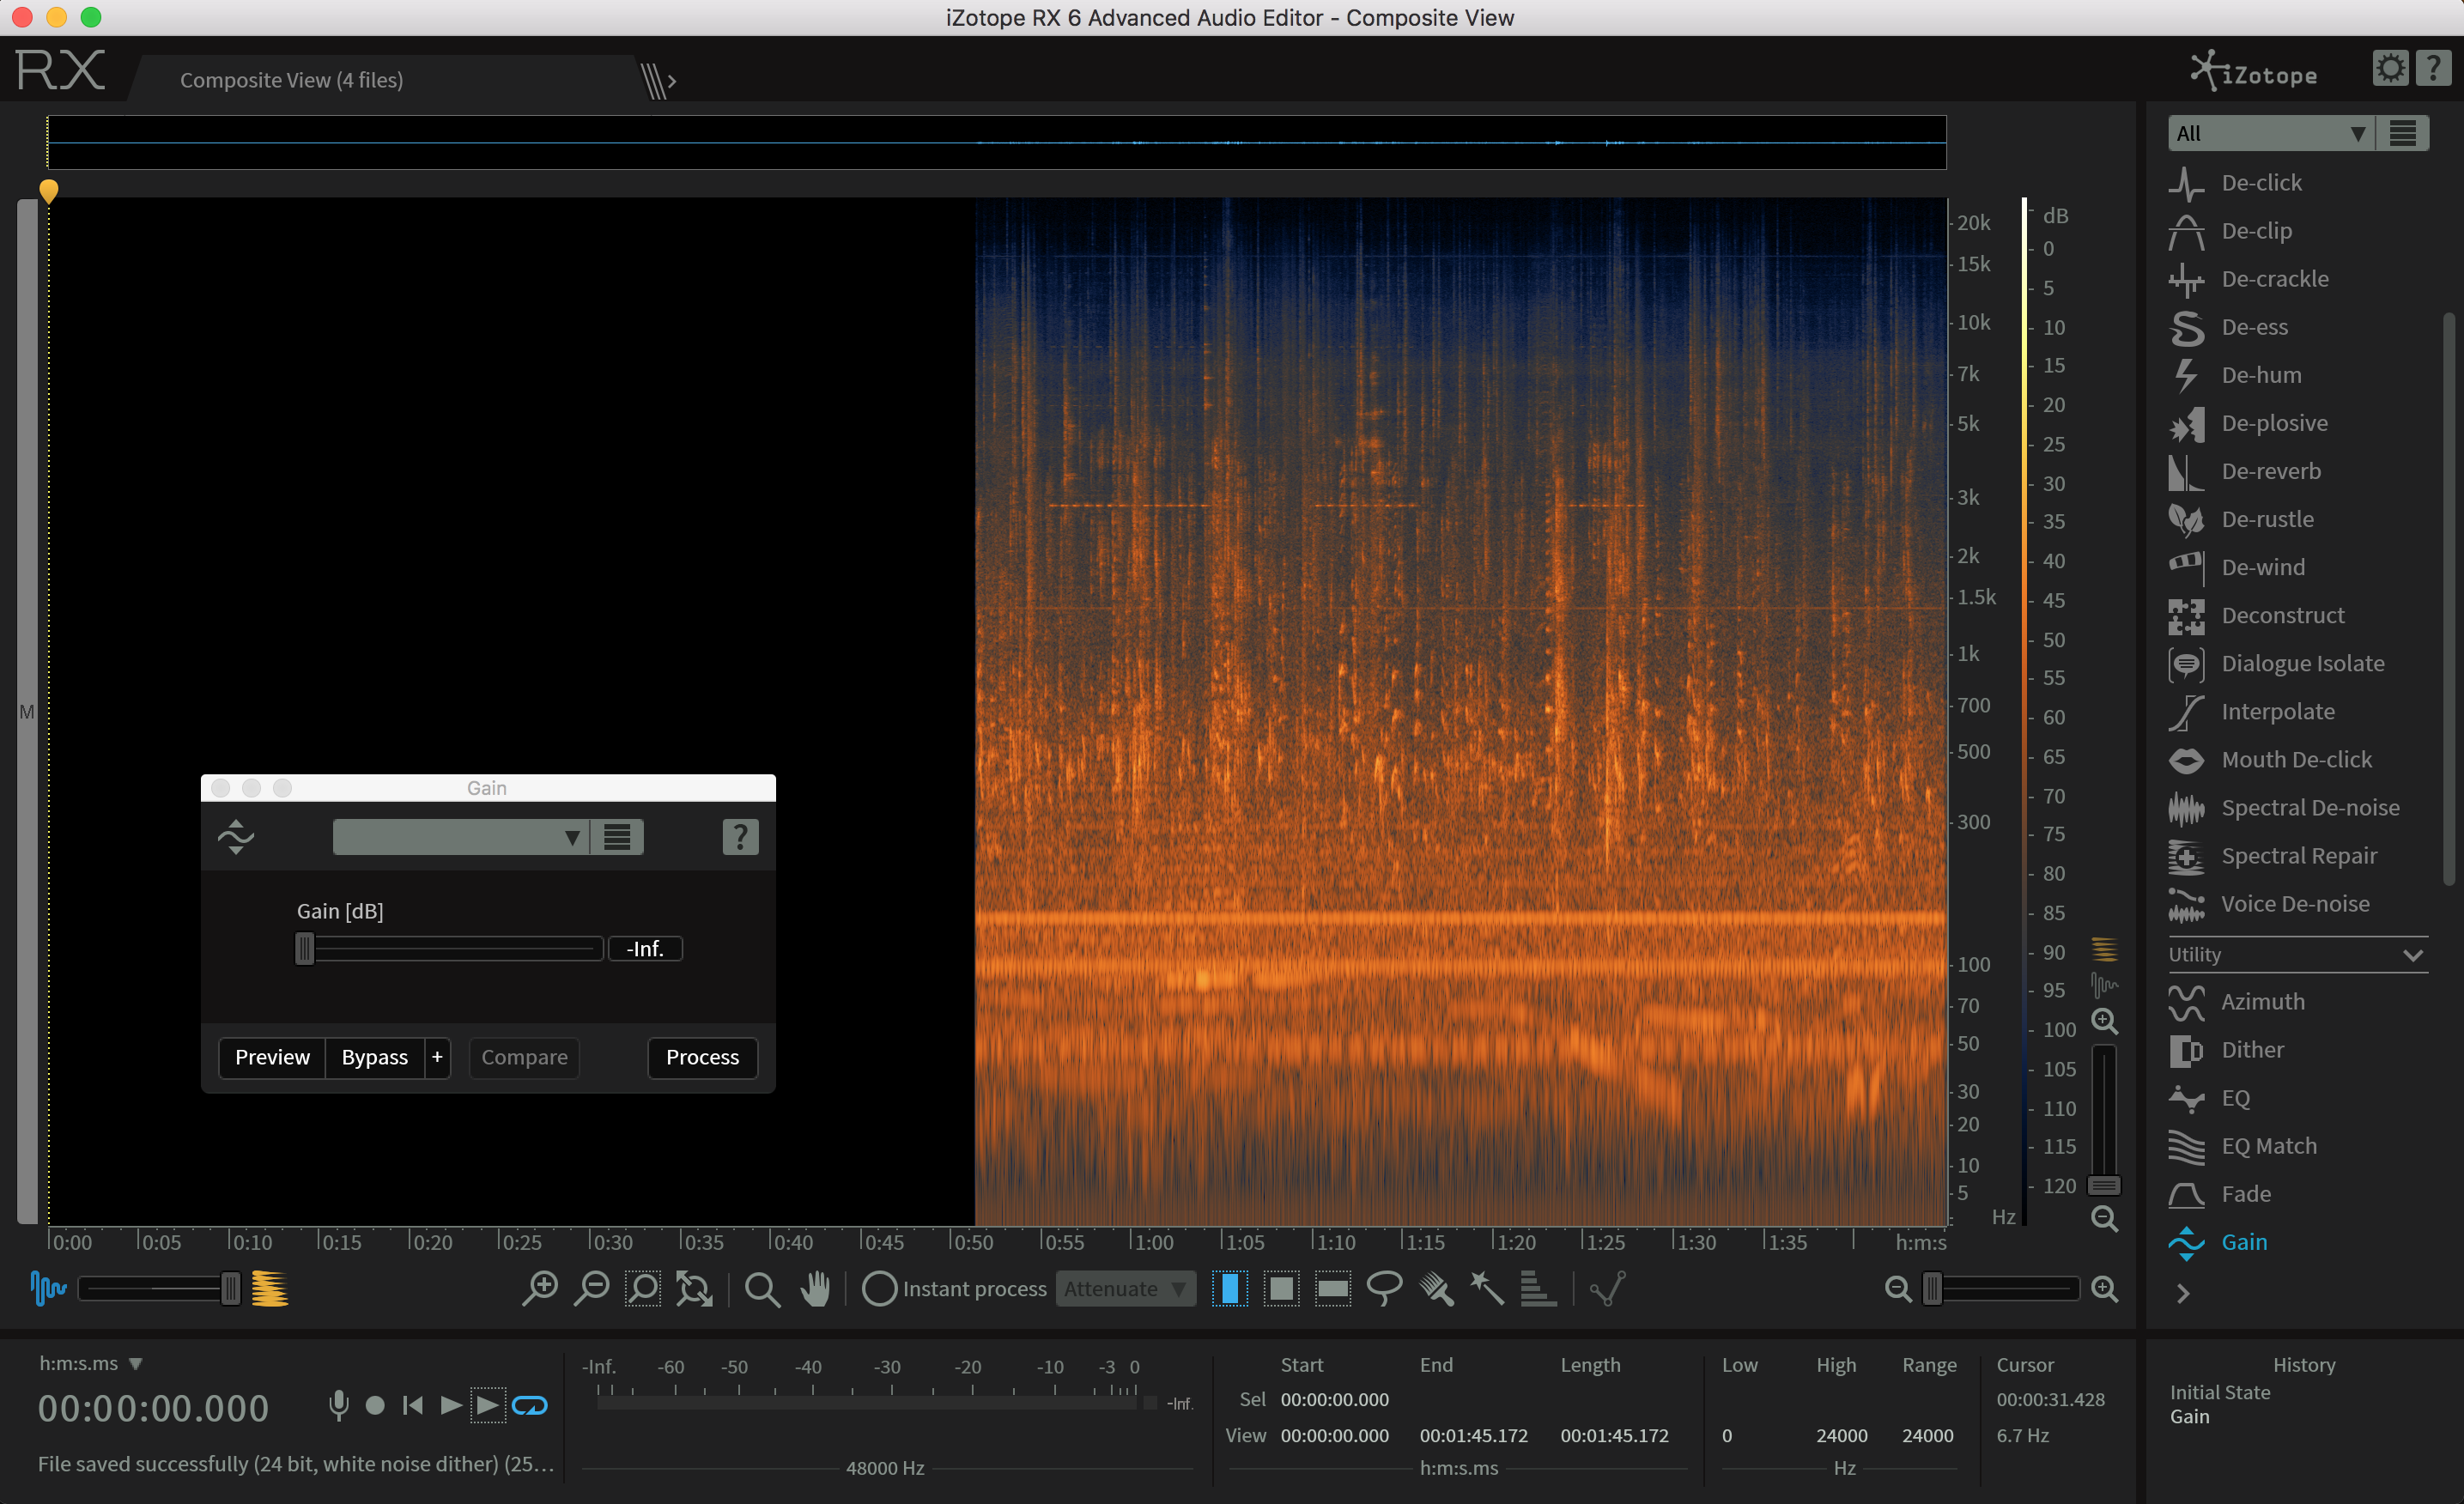
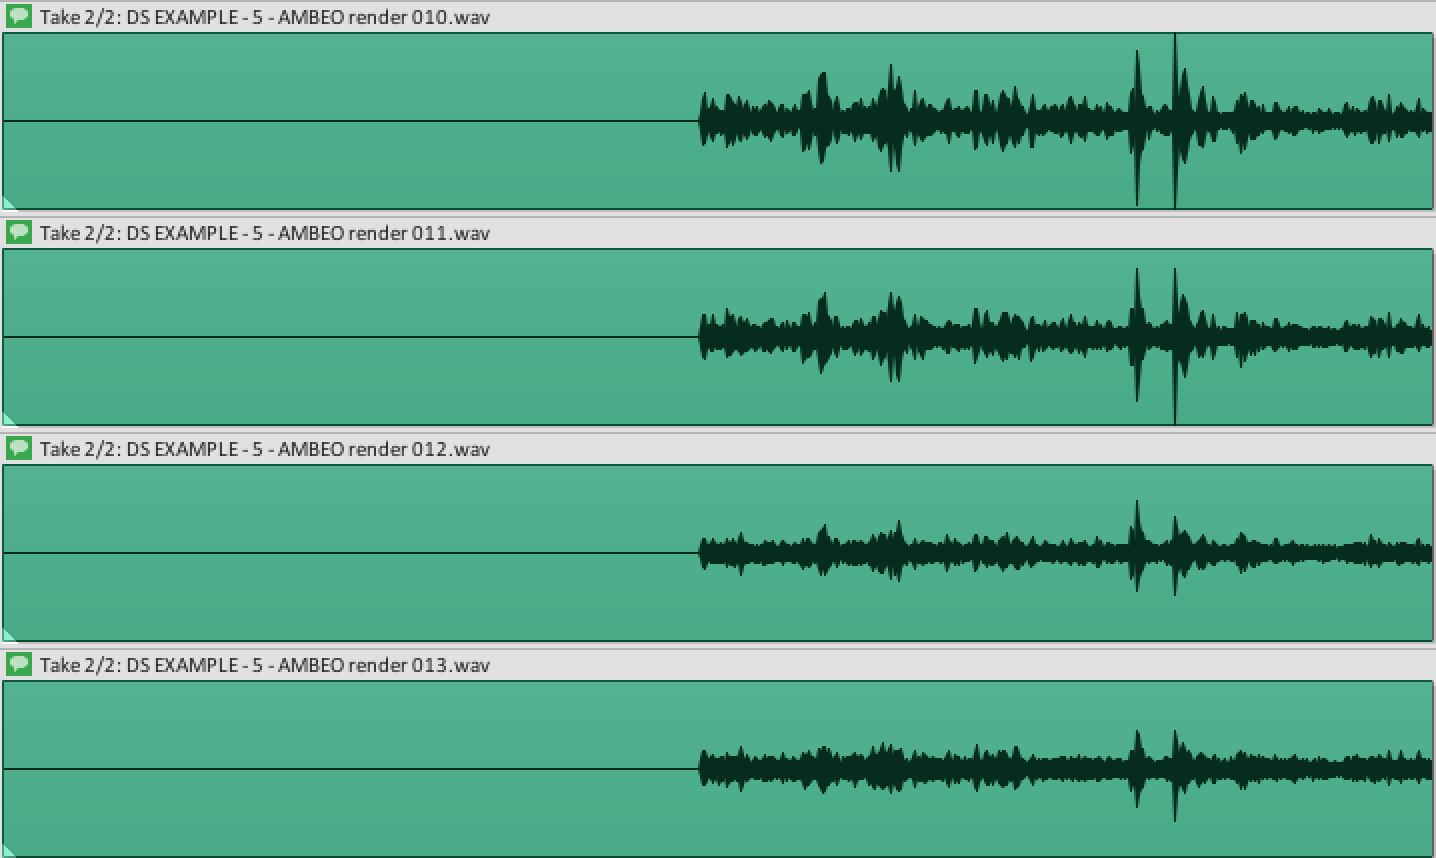
Once your edit is done, all you need to do to send them back to Reaper is by going to ‘File – Overwrite Original File‘. Now, what’s unfortunate is that Reaper won’t let you know that the overwritten file came from RX, so it’s always worth verifying and renaming it properly. In this case, due to the harsh gain reduction, the modification is evident when we have a look at the audio files.
- It’s crucial to emphasise that the files to be overwritten are the rendered takes instead of the original recording.
Wrap Up
And there we have it: an easy way to edit ambisonics in iZotope RX 6. By no means this is the definitive or even the best way to do it, of course; after all, 360 sound editing still has a long way to go. If you have any ideas you’d like to add, please do not hesitate to share them in the comments below.
Happy editing.
Hey Victor, thanks for the write-up.
I’m curious what sort of cleanup you are able to get away with. Since the sound field decodes based on frequency amplitude of the channels relative to each other I figured almost any cleanup pre-decoding would therefore impact the final image. What has been your experience with that?
Hi Jesse, great question! I’ve found that if I de-noise too much the final image does get quite messed up. Depending on how much noise there is, I’d get something similar to comb filtering and it’d sound fake. However, I’ve been using RX to fix only smaller issues such as unwanted clicks, buzzes and pops and it works perfectly. There’s a plugin I’ve been experimenting with to control the loudness of specific points in the 360 image, and it works pretty well. Have a look at: http://www.matthiaskronlachner.com/?p=2015