Whenever I meet someone who’s keen in getting into post audio the most common thing they mention is that if they had the right tools, only then they would be able to break into the industry. While we tend to associate higher quality with higher price, this relationship is not always accurate and for sound that is no exception. It’s true that expensive recorders are expected to have better preamps and therefore perform better, but what about the portable ones?
Besides the one in the introduction, the inspiration for this review also came from two other observations:
1. The Zoom H2n is regarded as a highly versatile device. Indeed, for such a small size, the H2n delivers exceptional audio quality. The vast majority of consumers, however, generally review its performance when exposed to vocals and guitars. What about in foley and field recording applications? Is it capable of doing the job of a proper field recorder?
2. Not so long ago, I started bringing my field recording kit everywhere I went — who knows what might come up along the way? However, it soon became inconvenient in a few public spaces as people would often find it unpleasant and quite invasive. I realised that I need a smaller device to capture the sounds I wanted while remaining inconspicuous. My main field recorder is a Zoom H6; I needed something portable that could serve as a decent replacement for it, especially one that contained the flexible attributes of the H6, such as MS (Mid-Side), and XY setups.
And this is where the Zoom H2n comes into play.
Let’s Begin with the Hardware
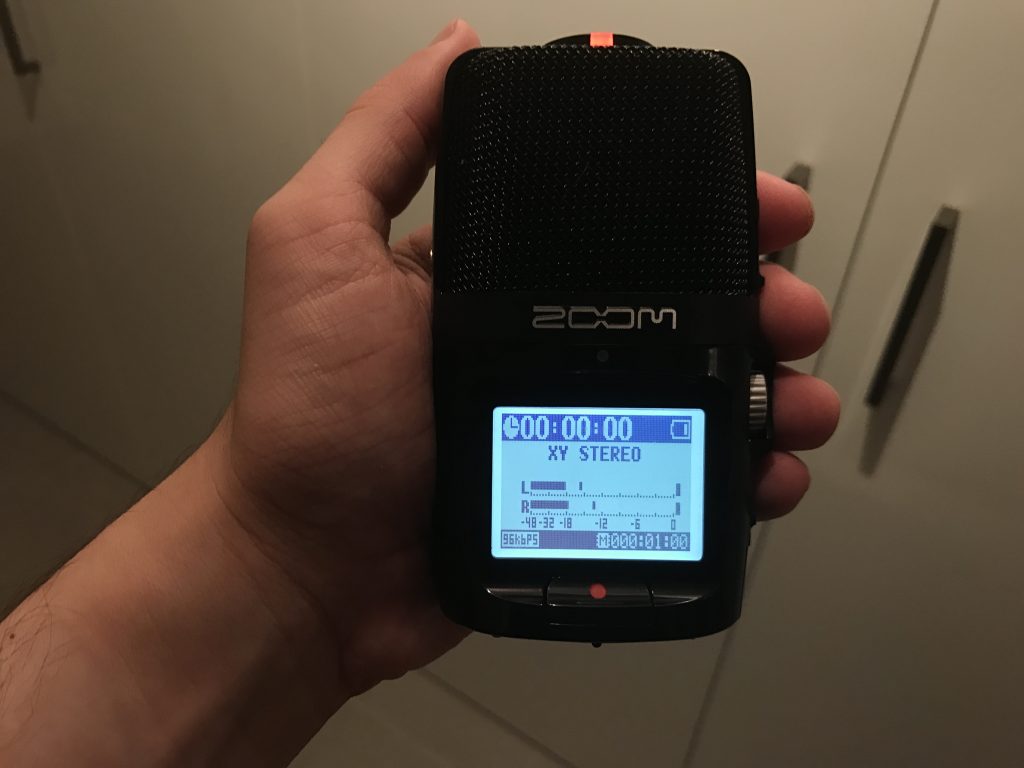
Hidden beneath a well-crafted piece of plastic, there are five small diaphragm condenser microphones, whose built-in configurations account for XY, MS, 2 and 4 channels (Surround) and, most recently, Spatial Audio through software update. On the outside of the enclosure you will find a small screen and a record button on the front. The recording techniques are located on the top and to switch between them all you have to do is turn the dial. On the bottom there’s a SDHC card slot and a tripod mount. While the interface controllers are located on the right-hand side, the left-hand side is comprised of a line input, volume monitoring, a headphone jack and a USB port. The Zoom H2n runs under two AA batteries and it lasts plenty of hours, depending on how much you use it. I’ve managed to record 4-5 hours within 3 days of casual use. As for heavy usage, the batteries got drained under a day.
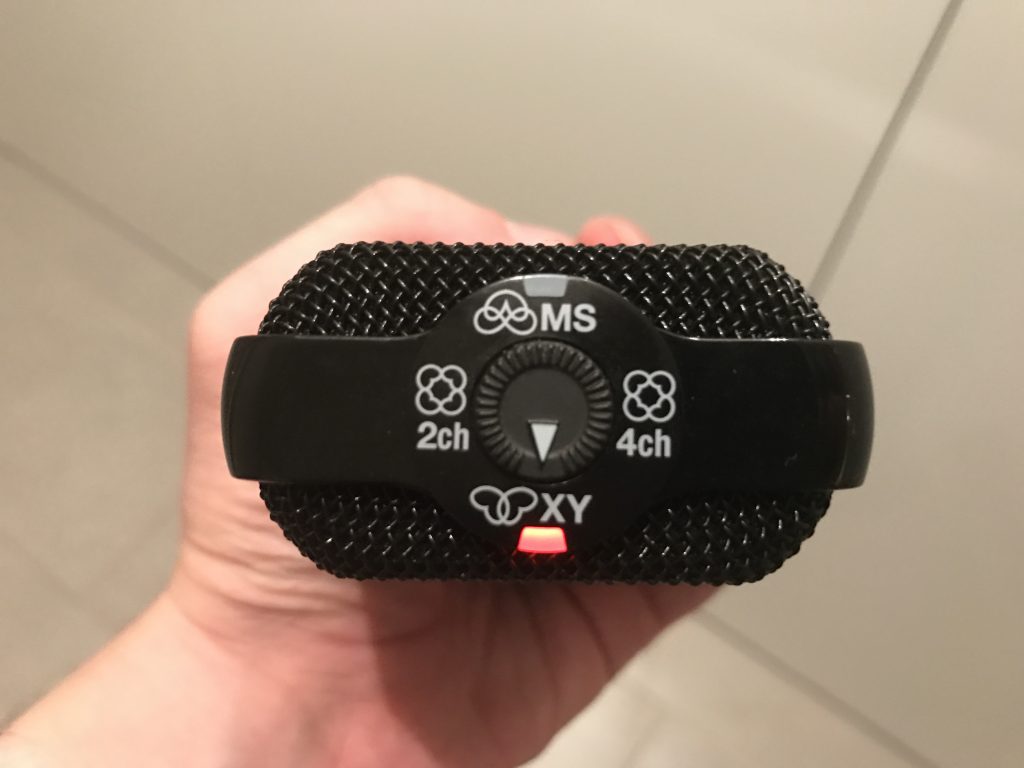
The compact design is ergonomic and it doesn’t provide the user with handling fatigue over time. Due to handling noise issues, It’d be nice if Zoom had chosen a different type of material, such as rubber to facilitate the overall operation. Aside from that, the buttons are well positioned, making it easy to control the device both right or left-handed. The recording setup dial located on the top feels sturdy, which is great as it prevents the user from accidentally switching between modes.
To get a feeling of what are the capabilities of its microphones, I compared the Zoom H2n with the H6 in XY and MS in a controlled environment. You will need good speakers or headphones for this!
- XY
On this experiment my goal was to analyse the accuracy and overall quality of the sound reproduction of both recorders under the same situation and with the same settings. Both the H2n and H6 were set to 90 degrees XY mode — on the H6 you can switch the XY mics from 90º to 120º — and their gain was set to maximum.
[soundcloud url=”https://api.soundcloud.com/playlists/315977312″ params=”auto_play=false&hide_related=false&show_comments=true&show_user=true&show_reposts=false&visual=true” width=”100%” height=”300″ iframe=”true” /]I know you noticed that the ‘H2n_XY_Degrees’ recording sounds inverted. I didn’t pan it at all. That’s a big issue with the design and I’ll discuss it in detail at the end of the review, under the ‘ISSUES’ area.
It’s interesting and rather curious that the Zoom H2n doesn’t quite “spatialise” that well. In other words, while the rear rejection is clear in the H6, the H2n lacks fidelity in that regard. The discrepancy in quality is also noticeable: the H6 sounds warmer and brighter than his younger cousin. That’s not to say, however, that the Zoom H2n sounds bad. Regardless of the fact that its preamp is weaker due to the price range and body size, the portable recorder by no means dissatisfies. In fact, when it comes to the noise floor, the H6 has more low-end presence than the H2n. To better illustrate this, below is a spectrogram comparison between both.
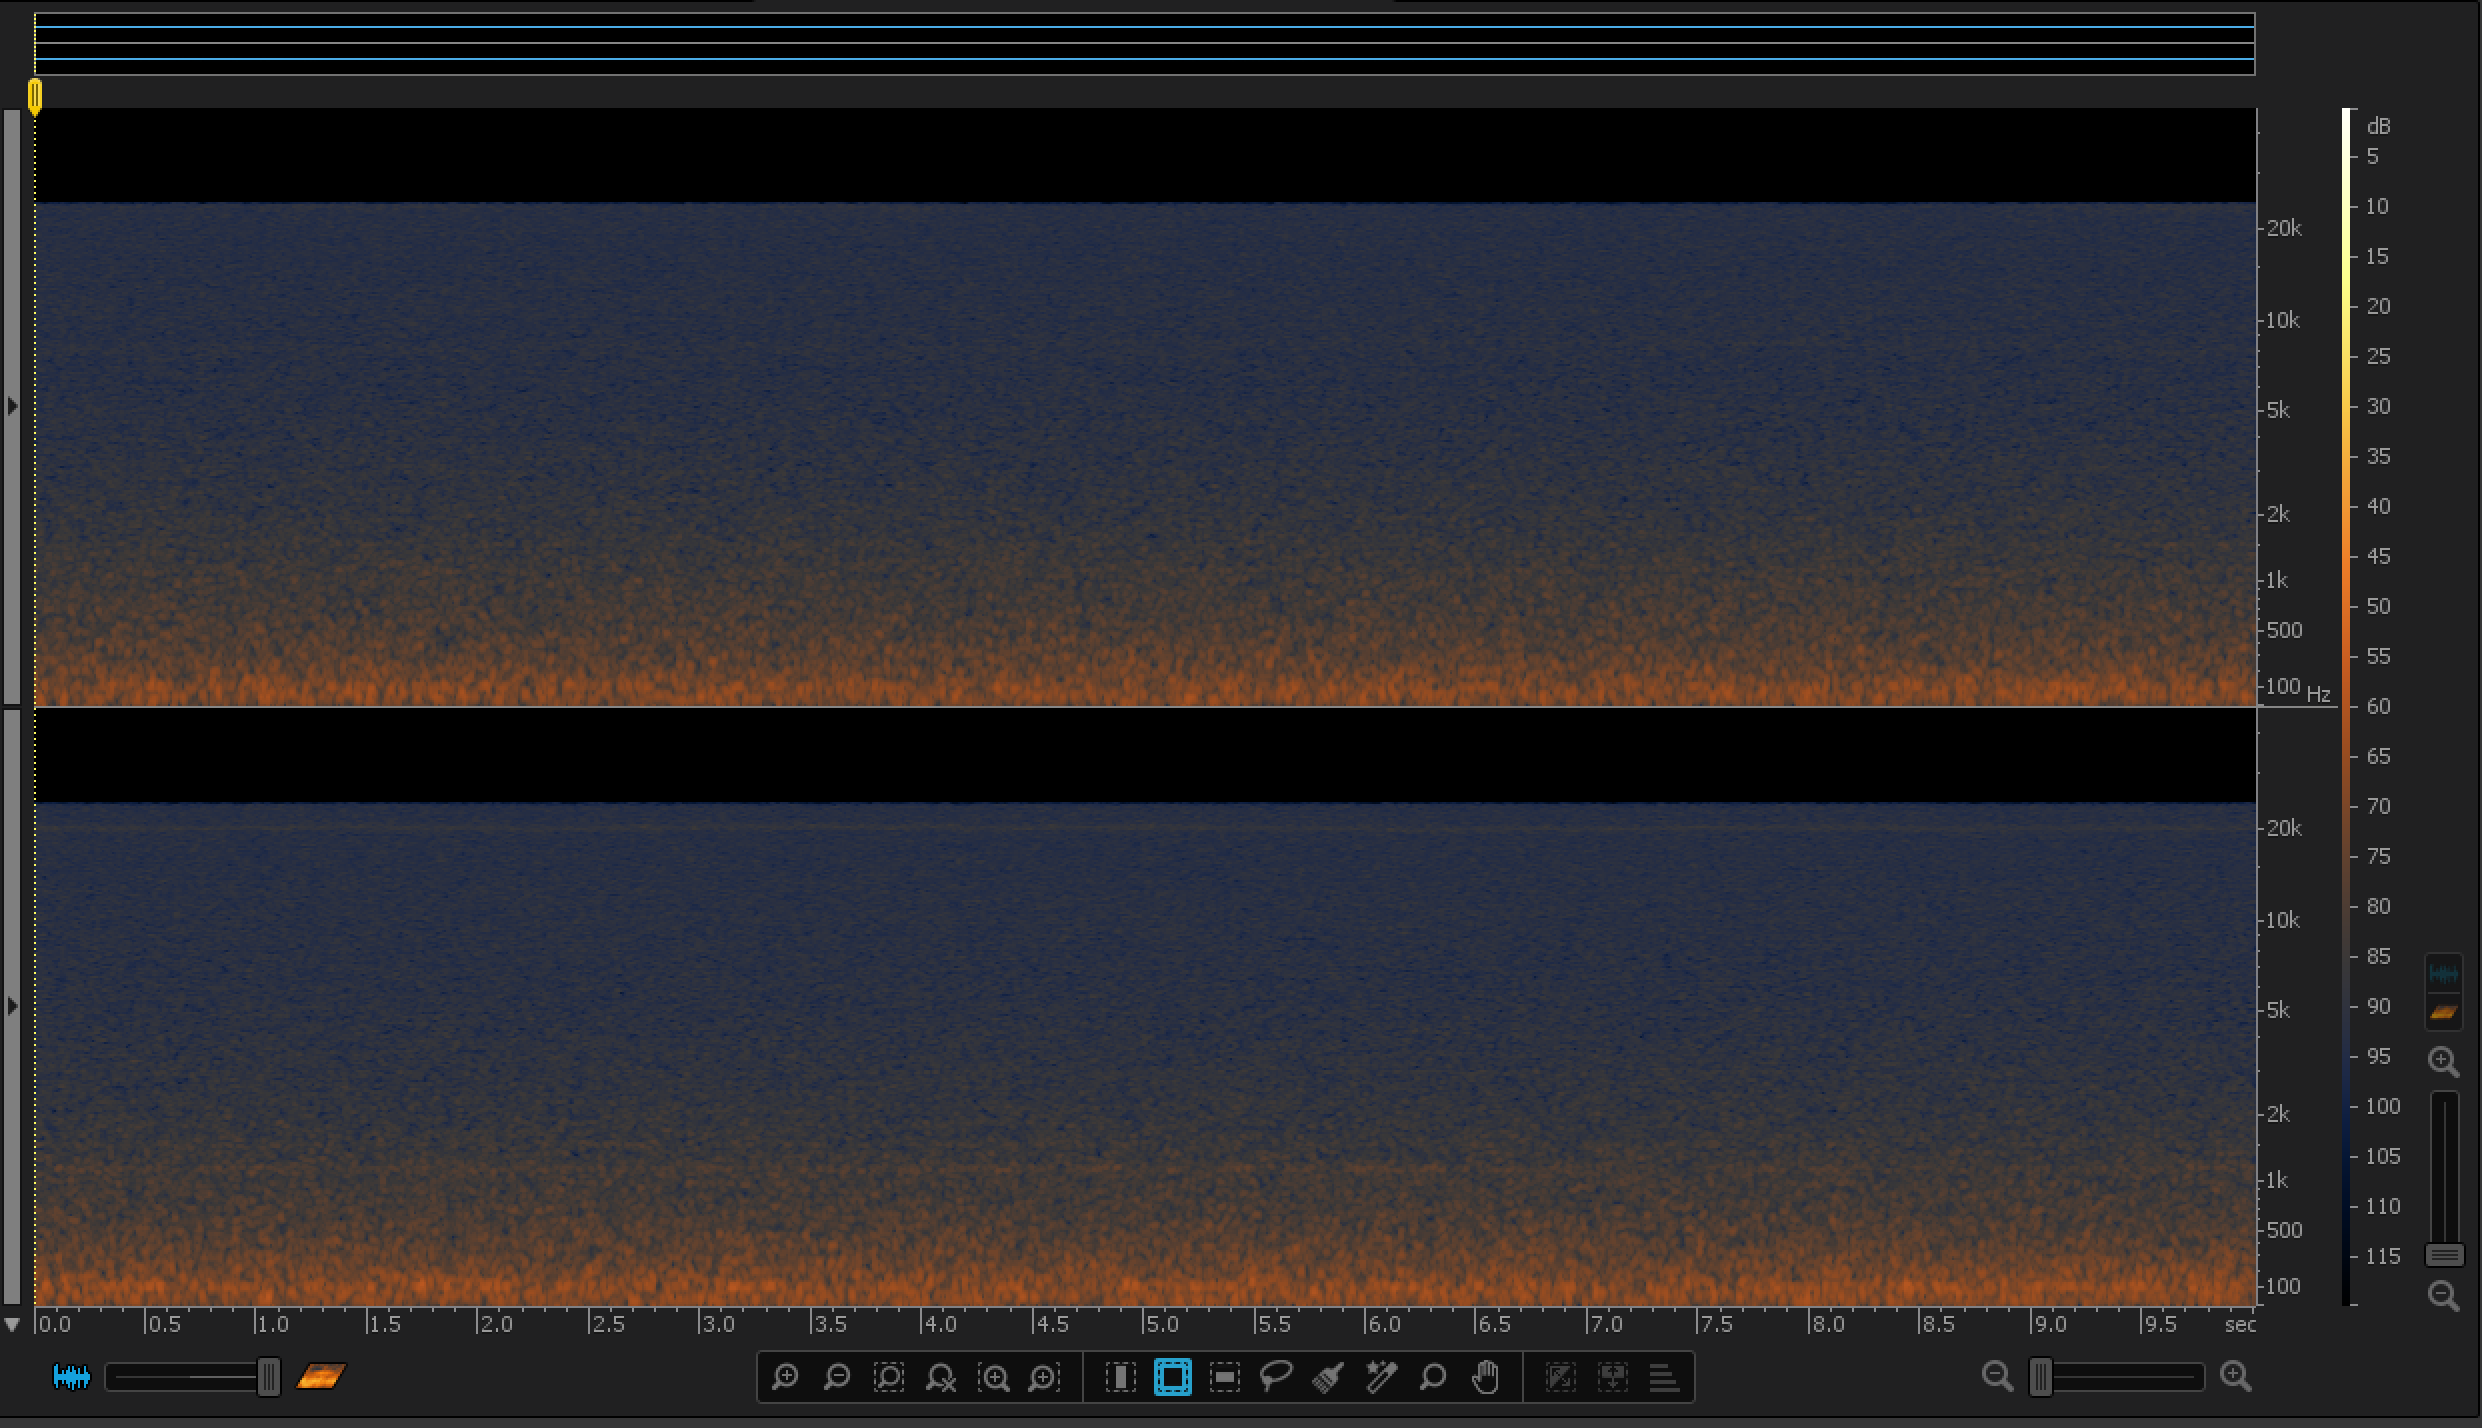
H2n Noise Spectrogram (Source: iZotope RX 4) The brighter the orange colour, the louder (dBFS) it is. The noise floor of the H2n is more spread out frequency-wise than the H6.
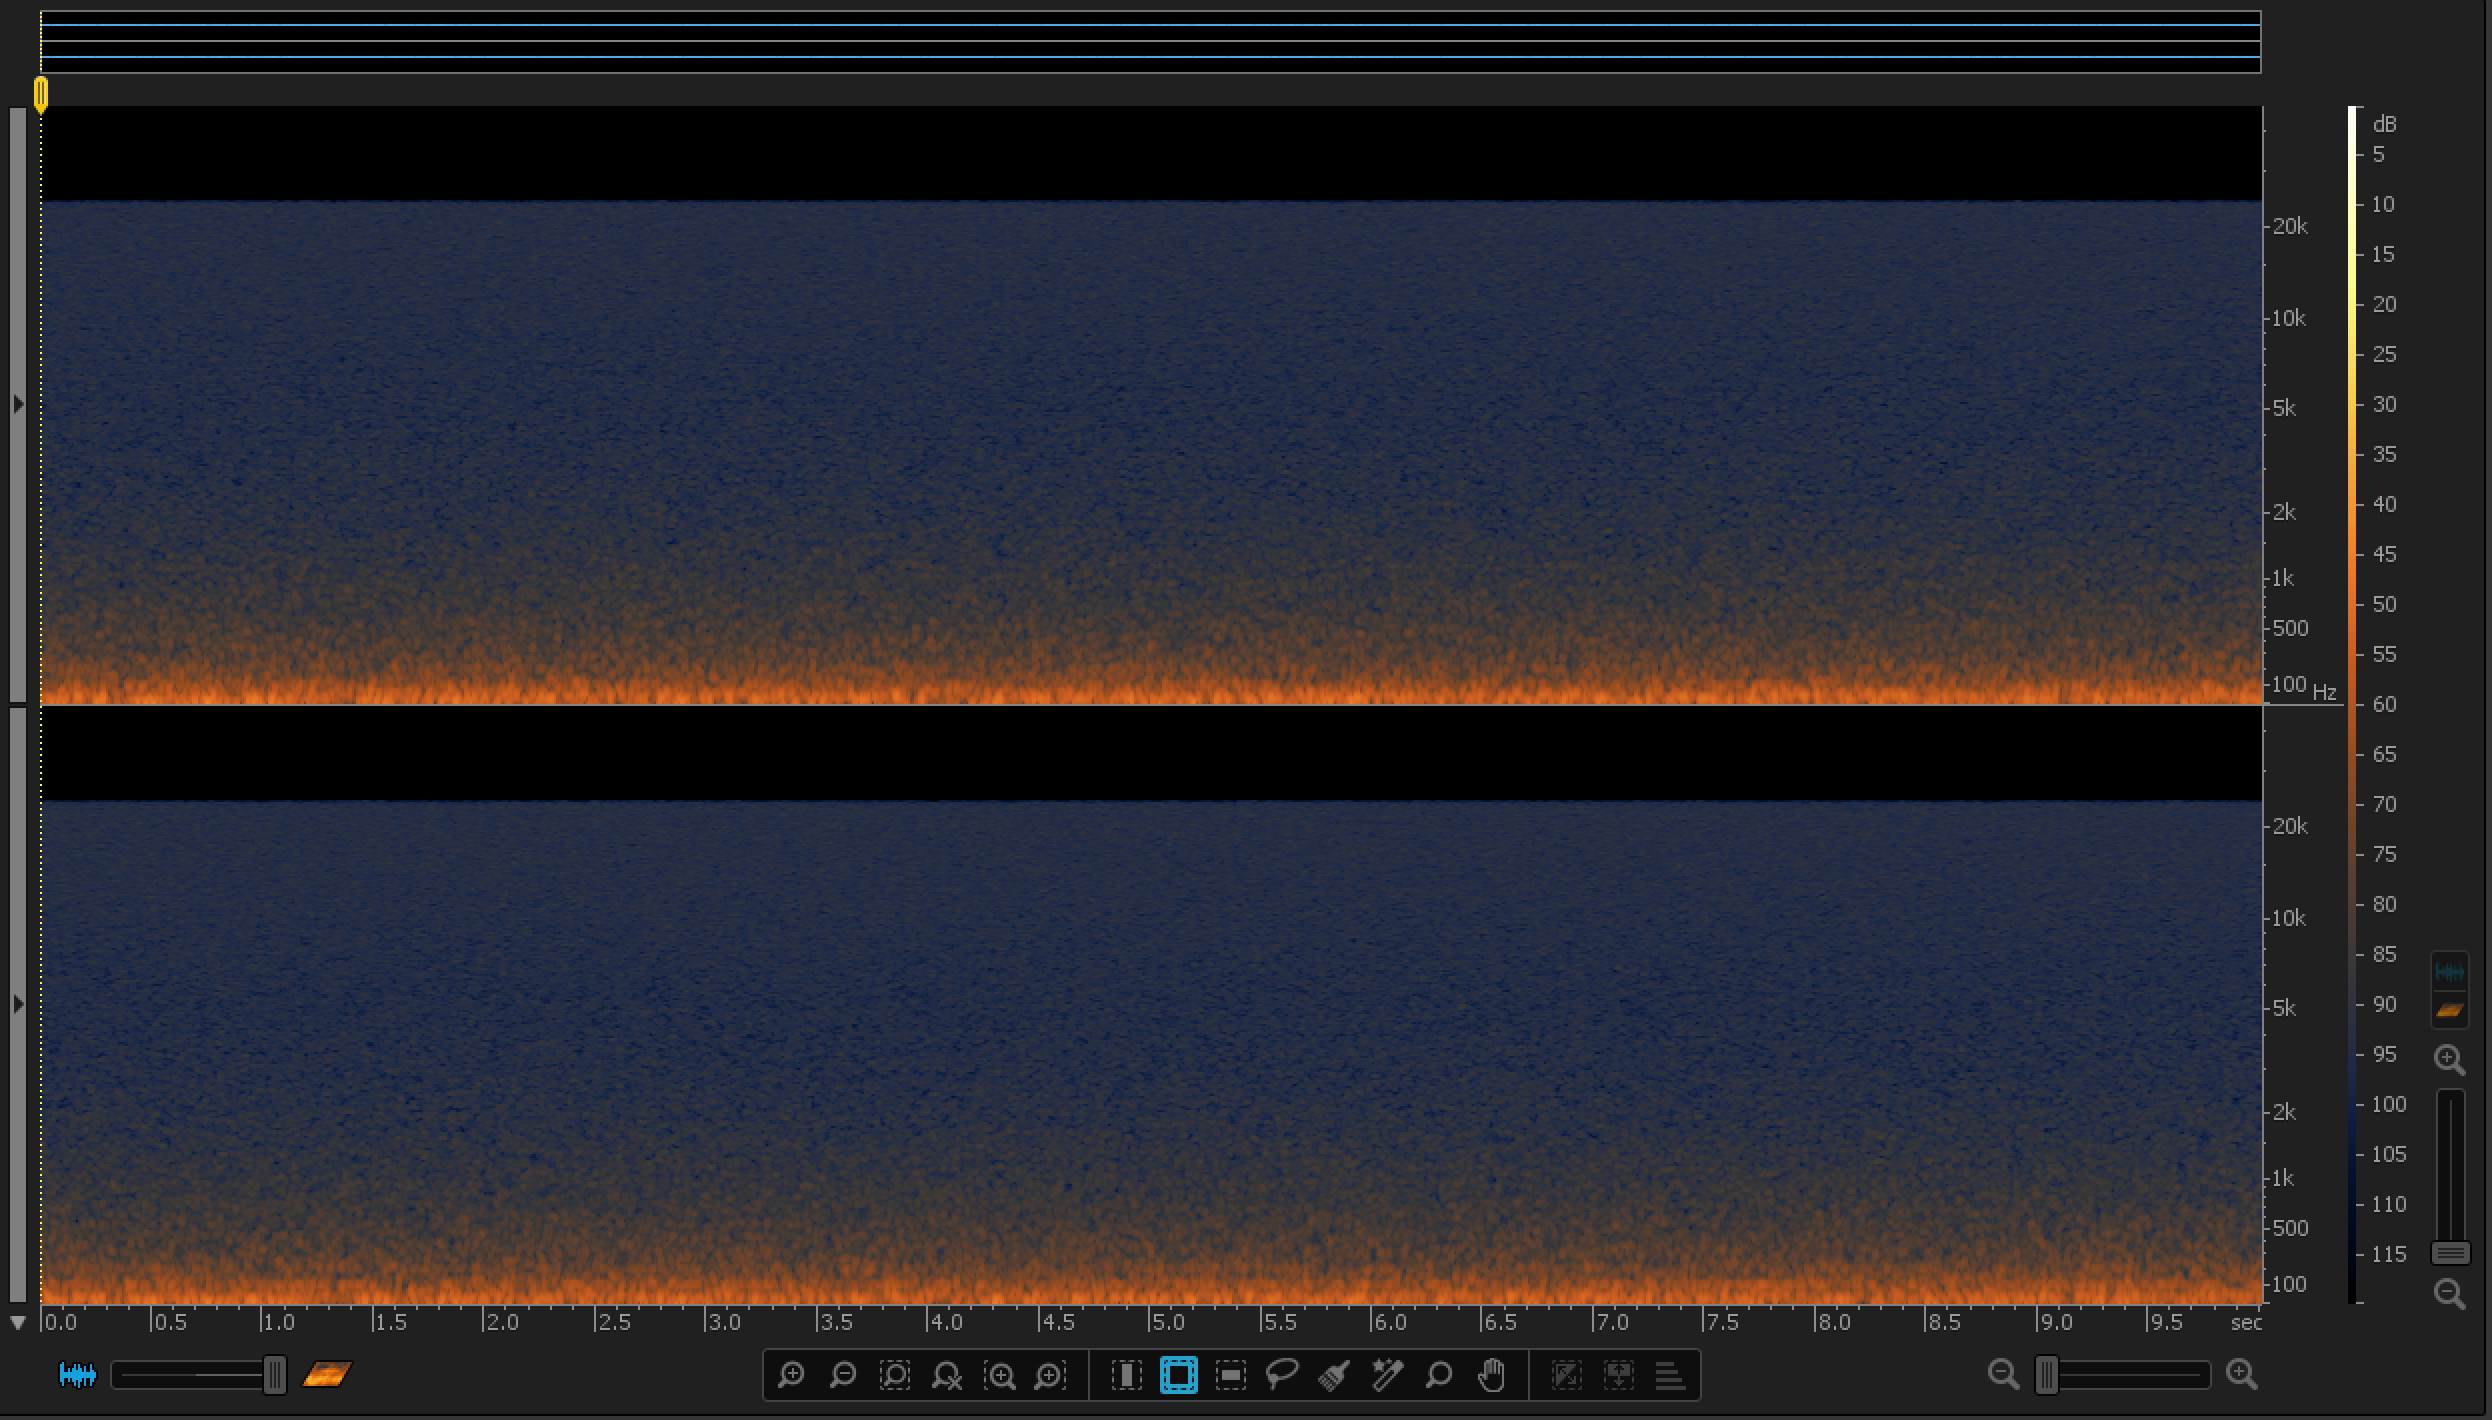
H6 Noise Spectrogram (Source: iZotope RX 4) - MS
Given that all the microphones are attached to the enclosure, it would be reasonable to be skeptical about quality of the MS recordings, whereas with the H6 the user needs to attach an external MS microphone. Taking the quality vs price relationship into account, the MS recordings of the H2n sound good, although not as ‘spatialised’ as the H6’s. Ambience recordings will be analysed further down this review.
[soundcloud url=”https://api.soundcloud.com/playlists/315954276″ params=”auto_play=false&hide_related=false&show_comments=true&show_user=true&show_reposts=false&visual=true” width=”100%” height=”300″ iframe=”true” /]
What makes the MS feature unique in the H2n is that you are allowed to control how much of the sides that he or she wants, thus enabling the recorder to work in mono using nothing but the mid in cardioid polar pattern. If you forget to set the parameters prior to recording, you can download the Zoom MS Decoder VST Plug-in and make the adjustments afterwards.
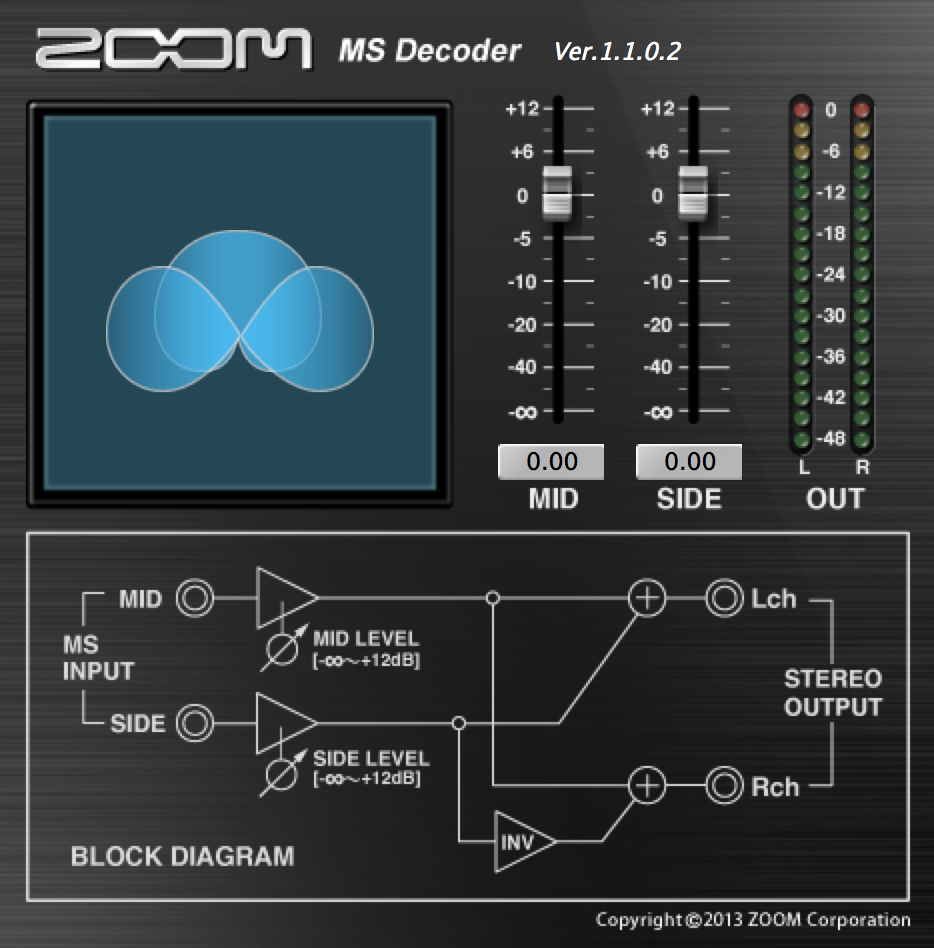
Zoom MS Decoder VST Plug-in In addition to setting the parameters, the user is also allowed to automate them individually.
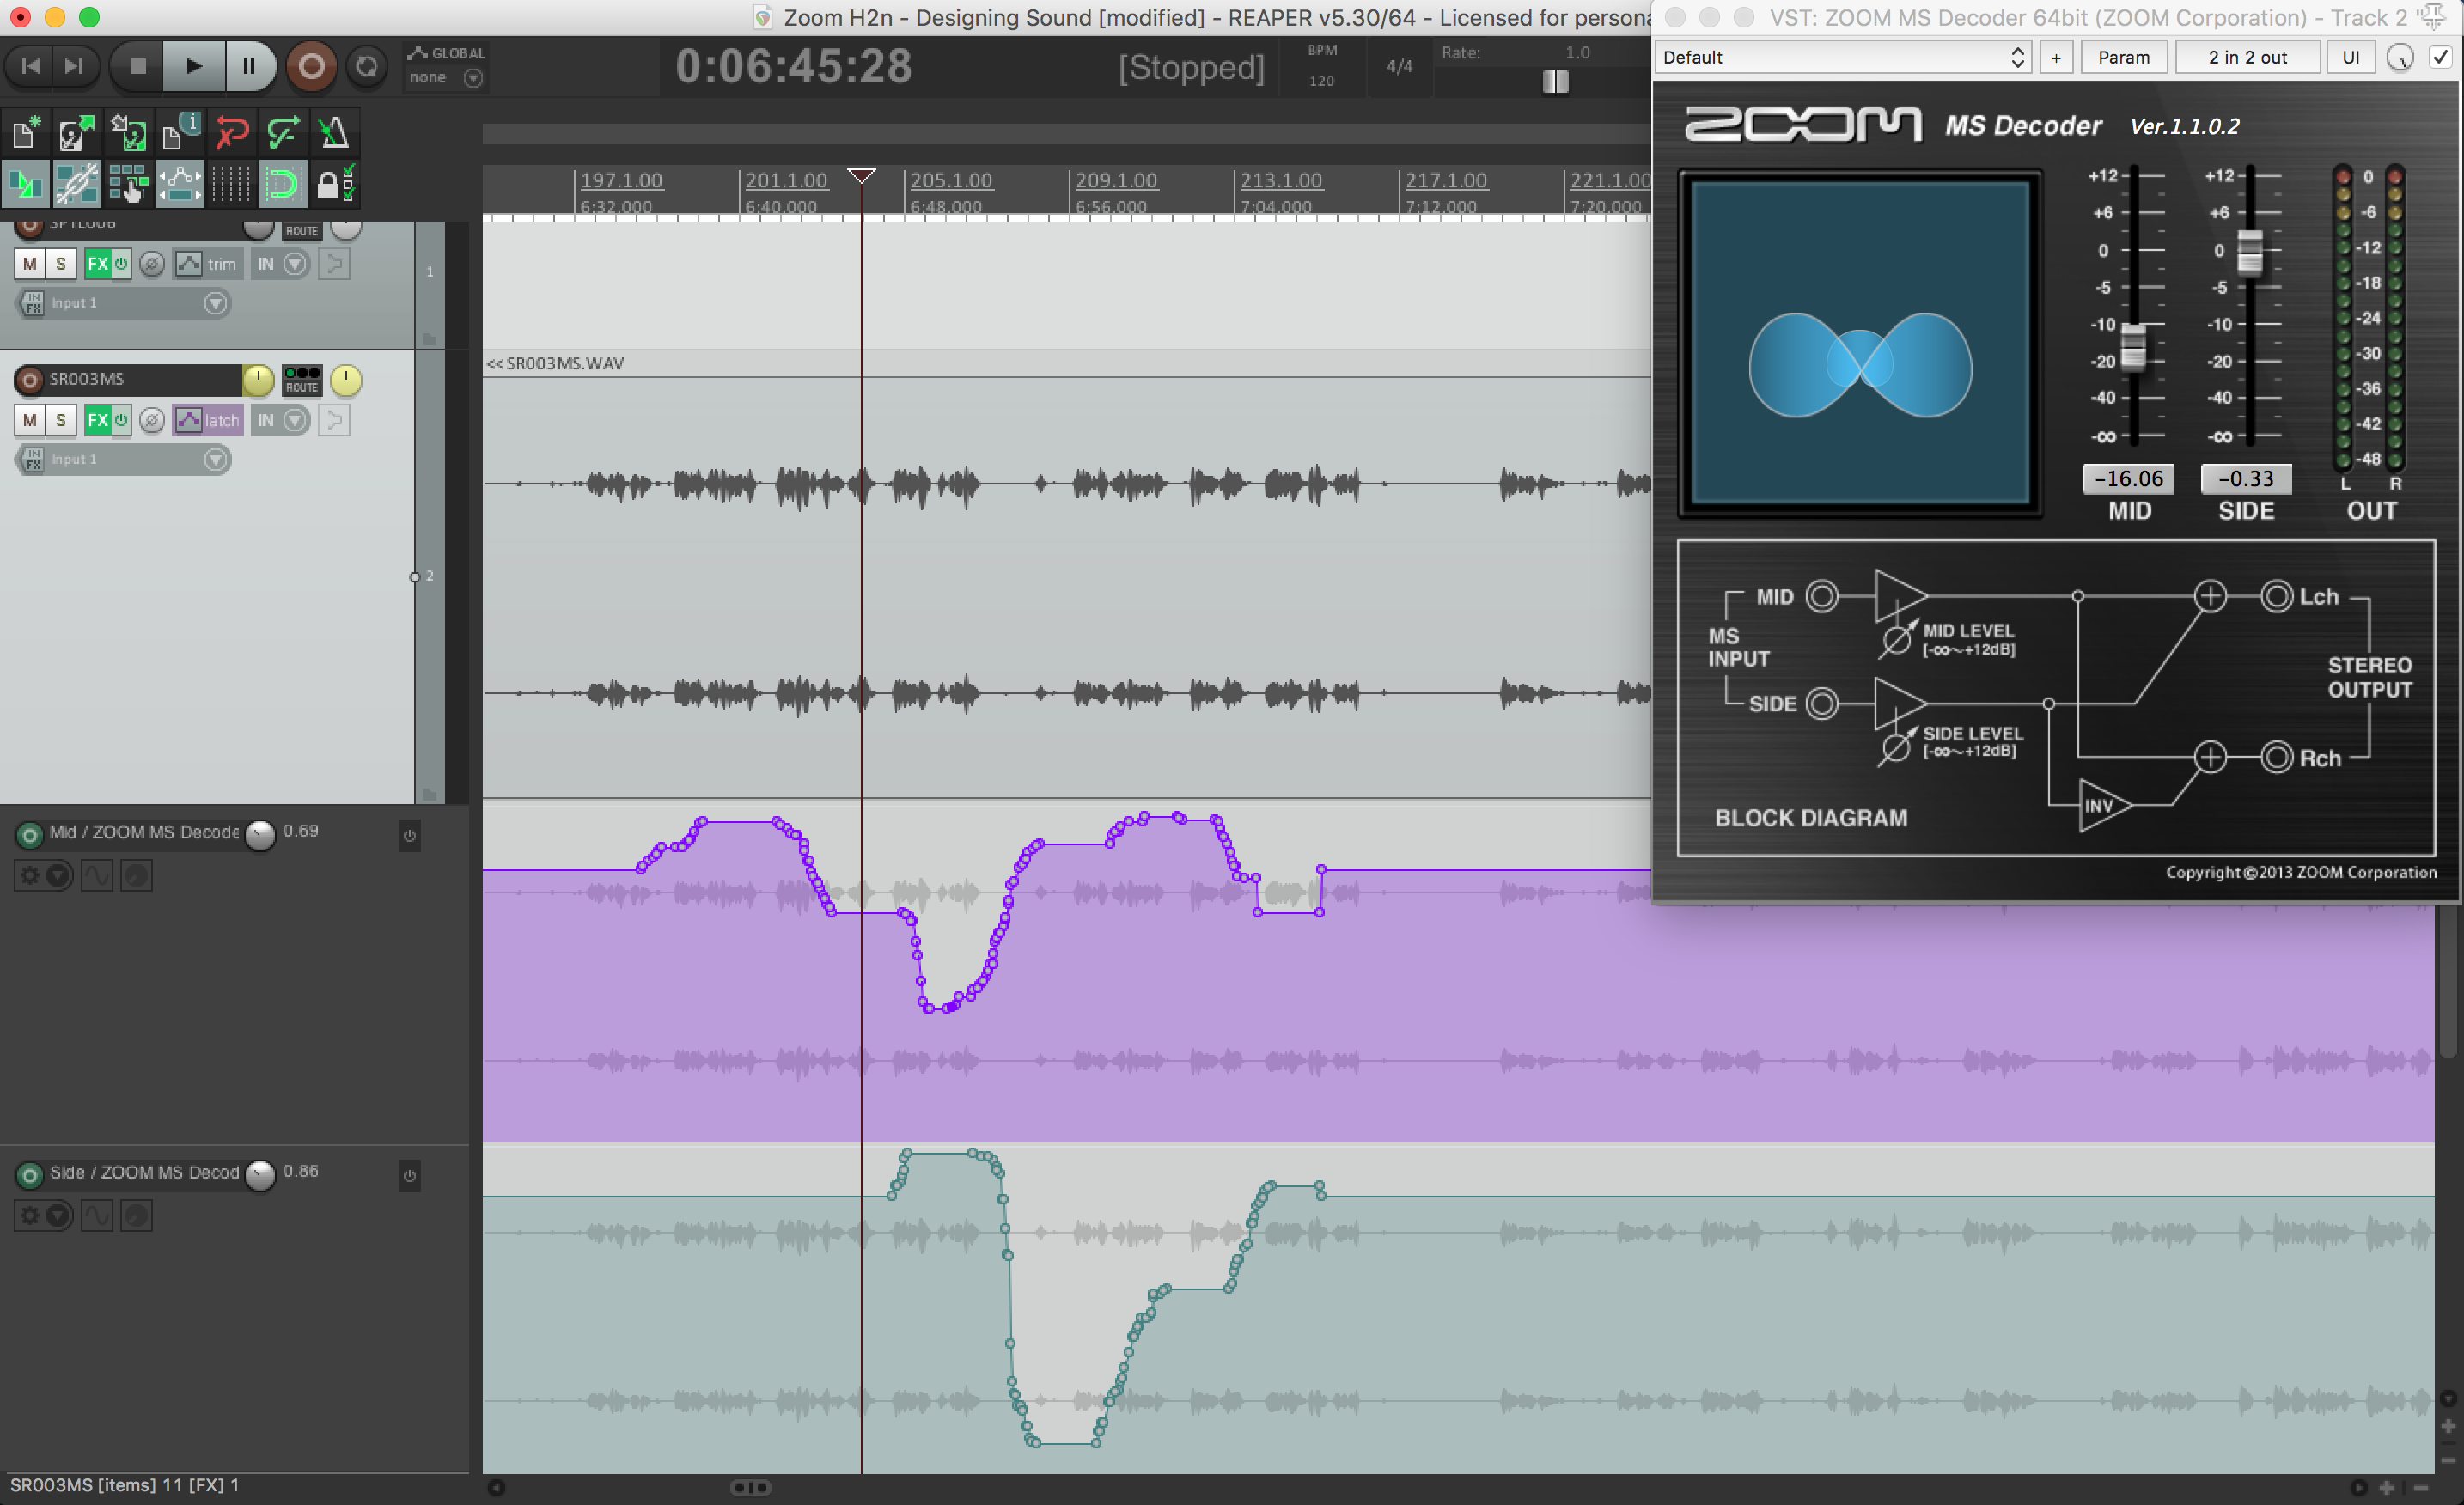
Zoom MS Decoder – Automation - 2ch, 4ch and Spatial Audio
These recording modes are similar in the way that the H2n programs itself for the procedure. Both 2ch and 4ch modes record in surround. The main difference between both is that when the recorder is set to 2 channels the recording is converted to LR (Left and Right) only. While in 4 channels it’s possible to modify the amount of side pickup, the user is limited in 2ch mode. Another limitation worth mentioning is that in 4ch the user is only allowed to record up to 48 kHz / 24 bit. Recently, through a software update to version 2.0, the Zoom H2n was enabled to record in spatial audio. In Spatial Audio mode, the user is limited from .WAV at 44.1kHz / 16 bit up to .WAV 48 kHz / 24 bit.
You might be wondering what’s the difference between 4ch and Spatial Audio modes since both are recording in surround. When recording in 4ch, the recorder enables both MS and XY and records them together. When the files are transferred to a DAW, the user ends up with two distinct recordings: MS and XY. When it comes to Spatial Audio, however, the process is done differently. Have a look at this screenshot:
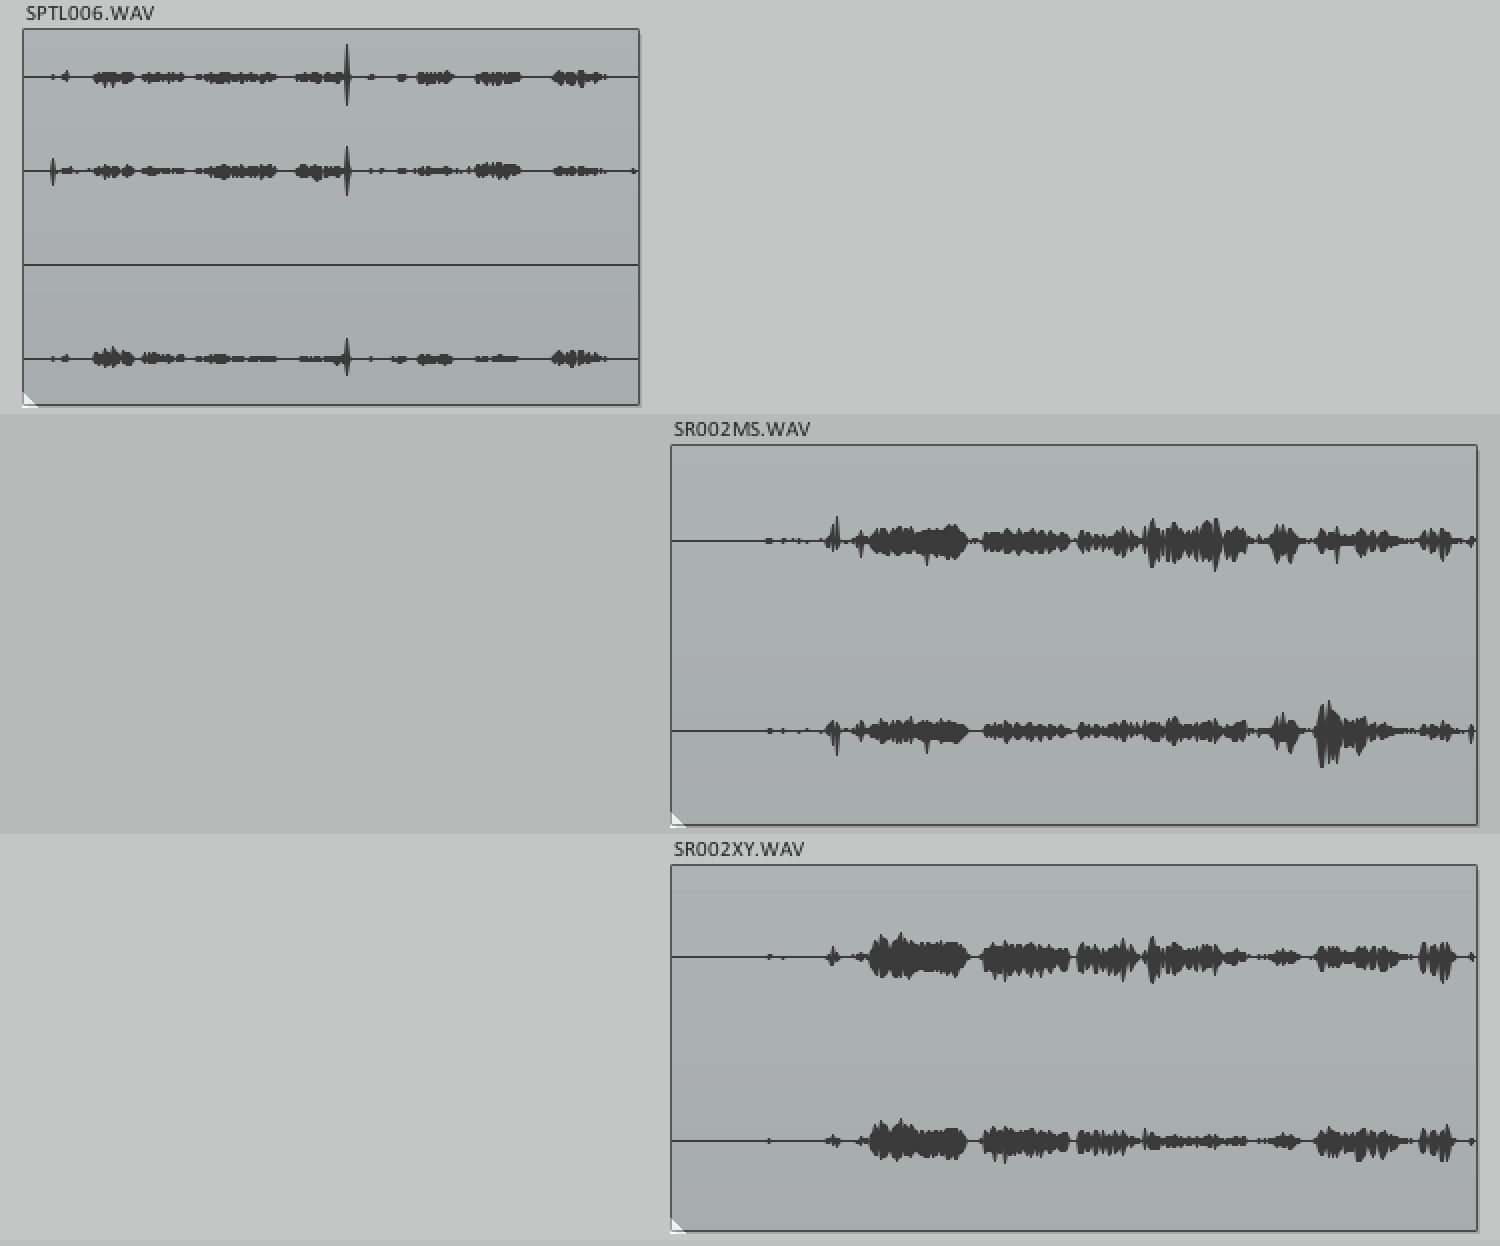
Spatial Audio on the Left / 4Ch (MS & XY) on the Right As you can see, when recorded in Spatial Audio the H2n combines all channels into one file, as is with a proper ambisonics microphones. In 4ch mode the portable recorder renders two files: one in MS and the other in XY. One advantage of recording in 4ch is that the user is provided with the possibility of controlling how much of the sides they want, exactly as in MS mode.
Accessories
As Rene Coronado mentioned in his recent contribution to Designing Sound, accessories play a huge part in our recording adventures. “A secure and reliable tripod mic mounting situation will allow you to approach ambiences and animals and other situations where you have to walk away in a completely different light than if you didn’t have it.“– he says. Unfortunately, this review doesn’t involve recording animals, but it does involve tripods. Right out of the box, the Zoom H2n doesn’t come with accessories. There is, however an accessory kit (US$ 39.99) available that comes with a windscreen, a remote controller, an AC adapter, a mini tripod and a case. If you’re looking for a more robust windscreen, Zoom offers the WSU-1 Universal Microphone Windscreen (US$ 31.00), and it fits in all Zoom recorders.
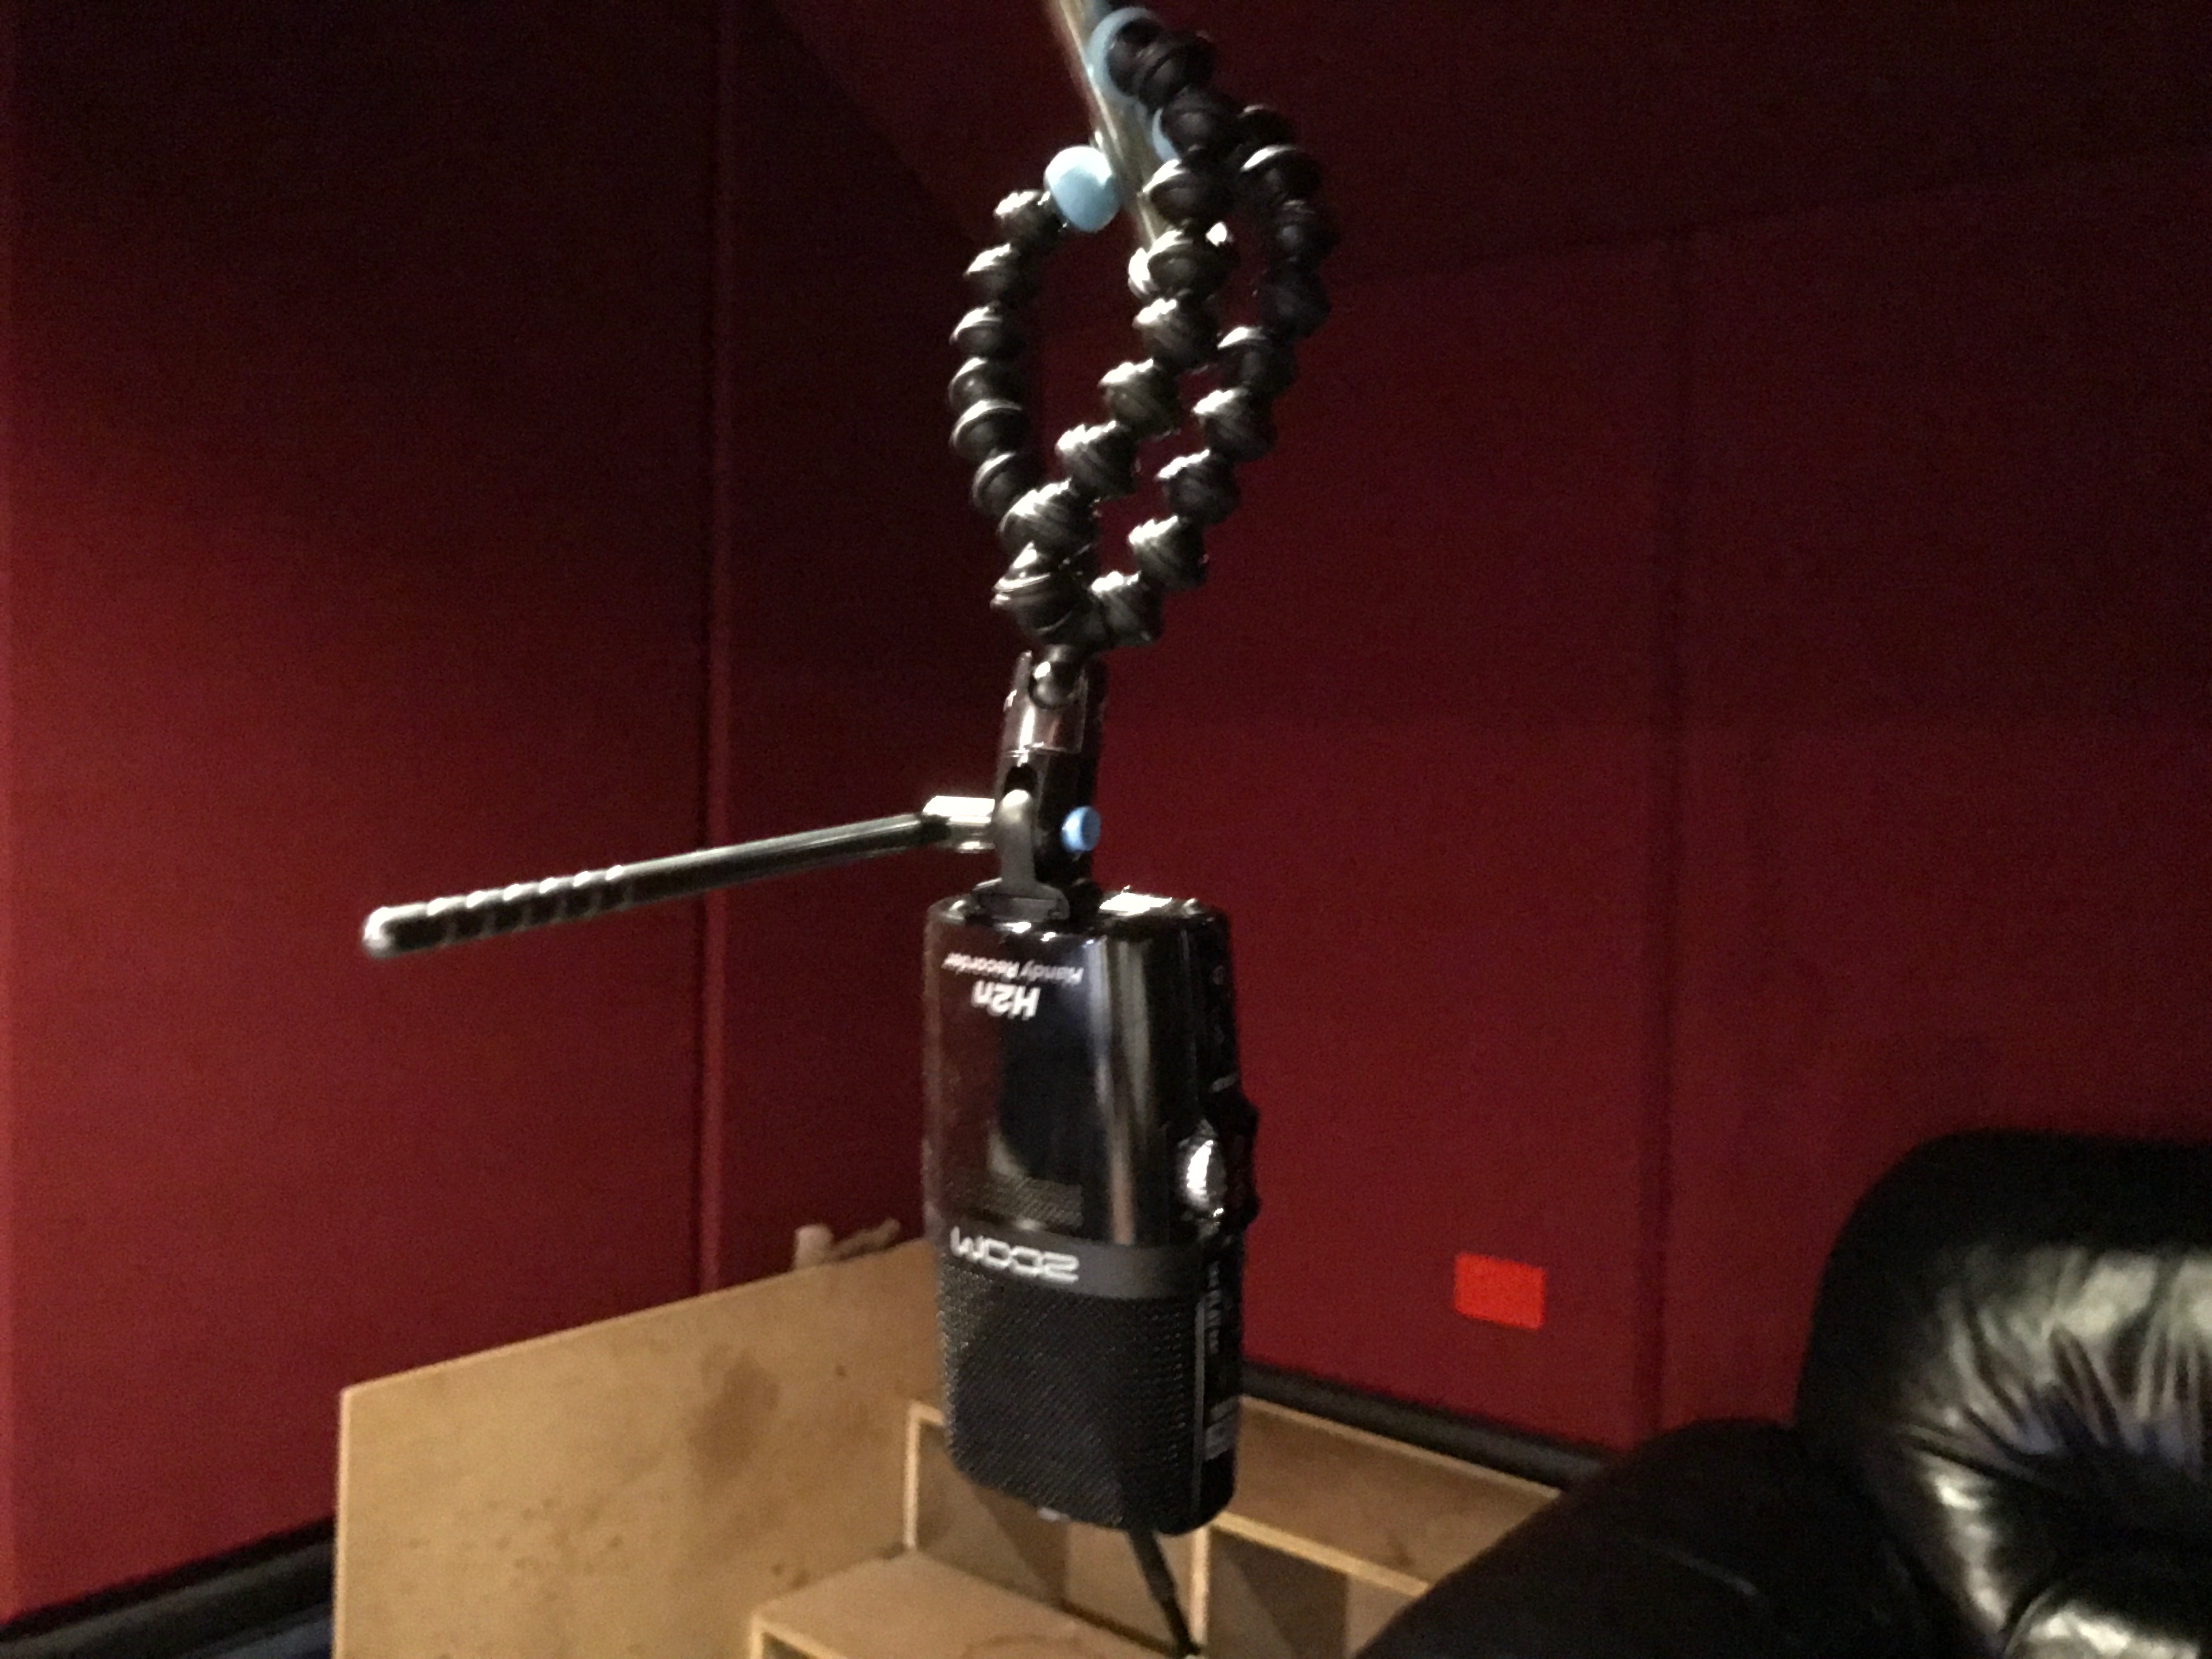
The biggest challenge in writing this review was to come up with a way to compare the H2n with a shotgun microphone while having both standing around a meter from the ground. Since the mini tripod that comes with the kit has a rigid, solid structure, it would be impractical to mount it upside down on a mic stand. The best solution I found was by getting a Joby Gorillapod Video (US$ 29.95), as it is extremely flexible and magnetic. And this was the result:
It’s important to advise, however, that the Gorillapod Video can be quite flimsy in some complicated applications where you’d need to tilt the recorder sideways. I’m not sure if it’s a build quality fault or if the one I got came this way, but it’s something worth checking if you ever plan to get one. For these experiments it worked perfectly. If the magnetic feature doesn’t suit you, a reliable alternative would be the Gorillapod Original. I use it with the H6 and never had any issues.
Software
As soon as you turn it on you will notice a minimalist interface design pop up on the screen. On the top left hand side is the timecode and opposite to it is the battery indicator. On the bottom left and right hand sides you will find the sample rate and bit depth indicator and the remaining time available in your SD card, respectively. Once the recording technique is modified, the display adapts itself to the parameters of the chosen technique.
Within the menu there are up to 8 settings, such as FOLDER, FILE, INPUT, REC, TOOL, SYSTEM, SD CARD and USB. Let’s examine them closely.
Folder: The user is provided with a total of 10 folders. Their role is very straightforward: to manage your files in a unique place. Mind you that this is extremely important when you have done a lot of recordings as the default naming convention for a file is, for example, ‘ZOOM0001.wav’. Now, you must be cautious when recording in multiple folders as the default naming convention restarts to ‘ZOOM0001.wav’ whenever a new empty folder is selected, and this is valid for all recording modes, except 4ch where the file name becomes SR001MS/XY. In other words, the SD card will contain multiple files with the same name, so in order to avoid any problems remember to slate every recording.
File: While with folders you are given the ability to manage their files within the assigned folder, the ‘File’ settings allows only to scroll through all the files and select to playback.
Input: The input settings consist of a Low Cut (High-Pass Filter), a Compressor/Limiter, Monitor, Auto Gain and Plug-In Power. Beginning with the low cut filer, there is only an ON/OFF option and a similar approach is applied to the compressor/limiter where instead of only containing and on/off switch, the user is given the possibility of choosing 3 options: ‘General’, ‘Vocal’ and ‘Drum’ for the compressor and ‘General’, ‘Concert’ and ‘Studio’ for the limiter. The ‘Input Monitor’ setting provides the user an ‘Always on/off’ and a ‘Home and Rec’ options.
Rec: The recordings settings menu is where you will find the format options. Amongst the file formats, the Zoom H2n allows only WAV and MP3, ranging from 44.1 KHz/16 bit to 96 KHz/24 bit and from 48 Kbps to 320 Kbps, respectively. Following the recording formats, the recorder delivers an interesting ‘Auto Rec’ and ‘Pre Rec’ configuration.
Tool: The tool settings offers both a tuner and a metronome. Within the tuner parameters, the user is able to set the calibration (in hertz), choose between guitar and bass, open A, D, E and G, as well as DADGAD.
System: The system settings relates to data and time, back light, display contrast, battery type (Alkaline, Ni-MH), software version and factory reset
SD Card: Displays the remaining amount of storage and formating.
USB: The USB acts not only as an SD card reader, but also as an audio interface. This is no surprise since the hardware features an 1/8 inch mic/line slot.
Performance on the Field
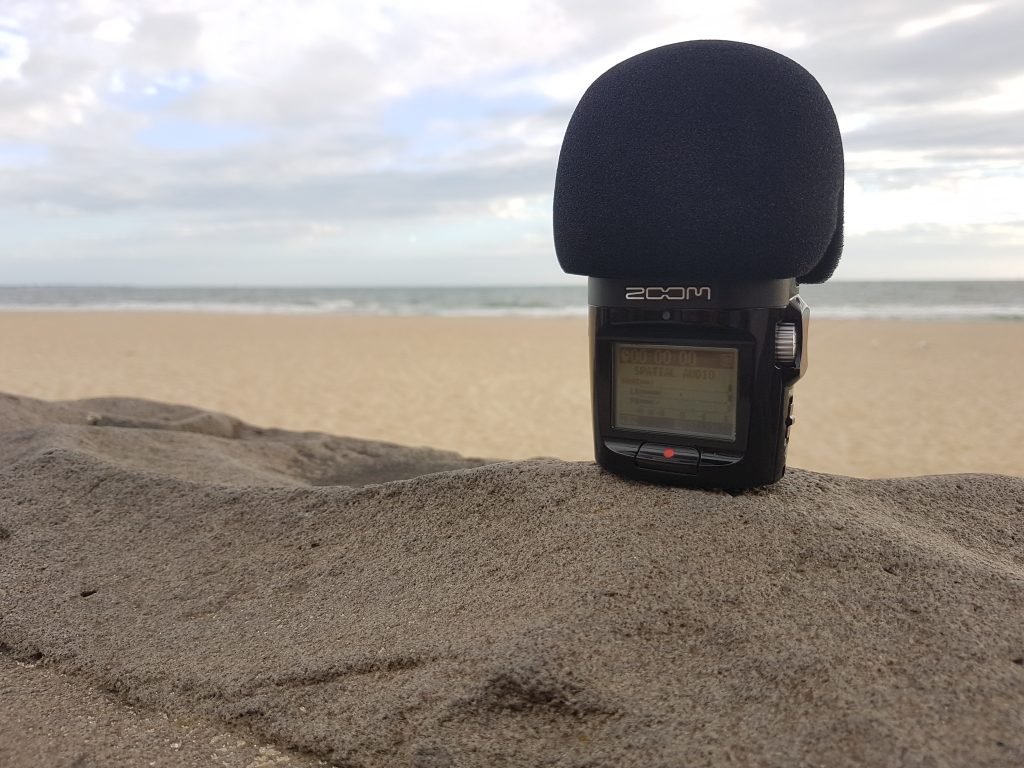
As mentioned in the introduction, the purpose of this review was to analyse the performance of the Zoom H2n as a field recorder. I set out to the park in attempt to get the most out of it, from ambiences to foley and sound effects. As I arrived, I came across a beautiful and calm place surrounded by a metallic pathway.
For one who was looking to go on stealth field recording, I managed to do the exact opposite. Think about it, there’s a metal pathway in the middle of the park and no one’s around… why not make some noise, right? Since I had nothing with me but the recorder, I started stepping as strong as I could to try to capture transients. You can have listen at the recordings below.
[soundcloud url=”https://api.soundcloud.com/playlists/314144819″ params=”color=ff5500&auto_play=false&hide_related=false&show_comments=true&show_user=true&show_reposts=false” width=”50%” height=”300″ iframe=”true” /]
 Next, I moved on to an area filled with bamboo to record sticks and ambiences. For both the transients recordings, I switched the recording technique to MS and removed the sides; for the ambiences I recorded in MS.
Even though there were kids playing and yelling in the background, the Zoom H2n performed well in recording the impacts.
The following experiment was in MS and it took place at the same place. Using the MS Decoder plug-in, I exported the raw recording using only the ‘Mid’ and then the ‘Side’. When listening through good speakers or headphones, you will immediately notice the boost in the low frequencies in the ‘Side’ recording. On this scenario, the ‘Mid’ recording delivered a better result.
Since the reason why I needed a smaller device was to record what I wanted while keeping all the features of the Zoom H6 and remaining stealth, I decided to analyse their performance side by side.
I began experimenting in the public library. I set the recorders to XY mode in 96 KHz / 24 bit, and increased the gain up to 10 (maximum). When listening closely, the Zoom H2n and the H6 sound very similar. Again, due to the preamp advantage, the H6 presents a slight boost in the lower end and better overall clarity over the H2n. Other than that, I’m happy with the performance of the younger cousin.
[soundcloud url=”https://api.soundcloud.com/playlists/310252607″ params=”color=ff5500&auto_play=false&hide_related=false&show_comments=true&show_user=true&show_reposts=false” width=”100%” height=”300″ iframe=”true” /]
Moving to MS mode, I compared them in the city and looked for interior and exterior places. As it happened during my recordings in the park, I attracted more attention than I wanted to as people would often ask what was I using. The best interior I found in the end was in the train — I could just sit in the back, set up the recorders and get to work. To analyse the recordings more precisely, I exported each one not only as an unique MS file, but also as ‘Mid’ and ‘Side Only’ distinct files, exactly as with the recordings made at the park. The external recordings of the cars passing by were made near a relatively busy street, and the one with the woodpecker-y soundalike was made in a busy sidewalk.
My impressions of the H2n is that if the sound source is far away from the grill, it doesn’t do a good job. Rather, when increasing the level of the mid or the side, a big chunk of noise comes forward. The performance of the H6 was practically the same, although with less noise due to its preamps and warmer and brighter as well.
[soundcloud url=”https://api.soundcloud.com/playlists/316226562″ params=”auto_play=false&hide_related=false&show_comments=true&show_user=true&show_reposts=false&visual=true” width=”100%” height=”300″ iframe=”true” /]
In the case of indoor foley performance such as footsteps and cloth, both recorders performed quite well, despite the amount of background noise. The gain was set to maximum on purpose so you can get a better feel of the overall quality of the recordings. I find the H6 to be more pleasing in this regard than the H2n; it sounds fuller. Once more, taking the comparison in the library into account, the above-mentioned characteristics can be considered for this analysis.
Note: beware of your monitoring level!
[soundcloud url=”https://api.soundcloud.com/playlists/315926969″ params=”color=ff5500&auto_play=false&hide_related=false&show_comments=true&show_user=true&show_reposts=false” width=”100%” height=”350″ iframe=”true” /]
Performance in the Studio
Taking on a slightly radical approach, I wanted to go the extra mile and compare it to a shotgun microphone (Rode NTG-3) connected to an AVID D-Command. While there’s an obvious discrepancy in this comparison, I was curious to hear how the H2n would perform. As a staring point, I turned the gain on the D-Command to 5, as well as on the H2n and began throwing bricks on gravel around 50cm from the ground. Now this is where things get interesting.

My first impressions between them is that the NTG-3 seems quite shy in the sense that is not as bright an clear as the H2n. The NTG-3 demonstrates a big boost at the lower frequencies.
My next experiment was by scraping the metal sheet located beneath the bucket with a sharp object. Again, the H2n sounds brighter than the NTG-3. I do prefer the flatter response of the NTG-3; that’s not to say, of course, that the Zoom H2n sounds terrible.
The following tryout was with recording footsteps on gravel. For this one I cranked the gain of the H2n to maximum and left the D-Command as it was. The results sound quite similar in the sense of expressiveness. Once more, the NTG-3 remained flatter than the H2n. It’s important to notice that the H2n captured a bit of my breath, whereas the NTG-3 didn’t, and that’s due to differences in polar pattern.
[soundcloud url=”https://api.soundcloud.com/playlists/315933965″ params=”color=ff5500&auto_play=false&hide_related=false&show_comments=true&show_user=true&show_reposts=false” width=”100%” height=”300″ iframe=”true” /]
Issues
Back to that inverted XY recording, my main issue is with the position of the screen. At first I thought that there was a manufacturing problem with my unit, but then I looked up for the manual on Zoom’s website and found an image on page 20 that demonstrates the directionality of the microphones. Where things get interesting is that when recording in 2ch and in 4ch — remember that the H2n is using both the MS and XY modes and combining them into one file in 2ch, and recording two separate files in 4ch –, the left is not inverted even though the manual illustrates otherwise. In other words, when recording in surround or in MS, the XY recording is translated as it should instead of being inverted as the ‘2ch and 4ch surround modes’ image demonstrates.
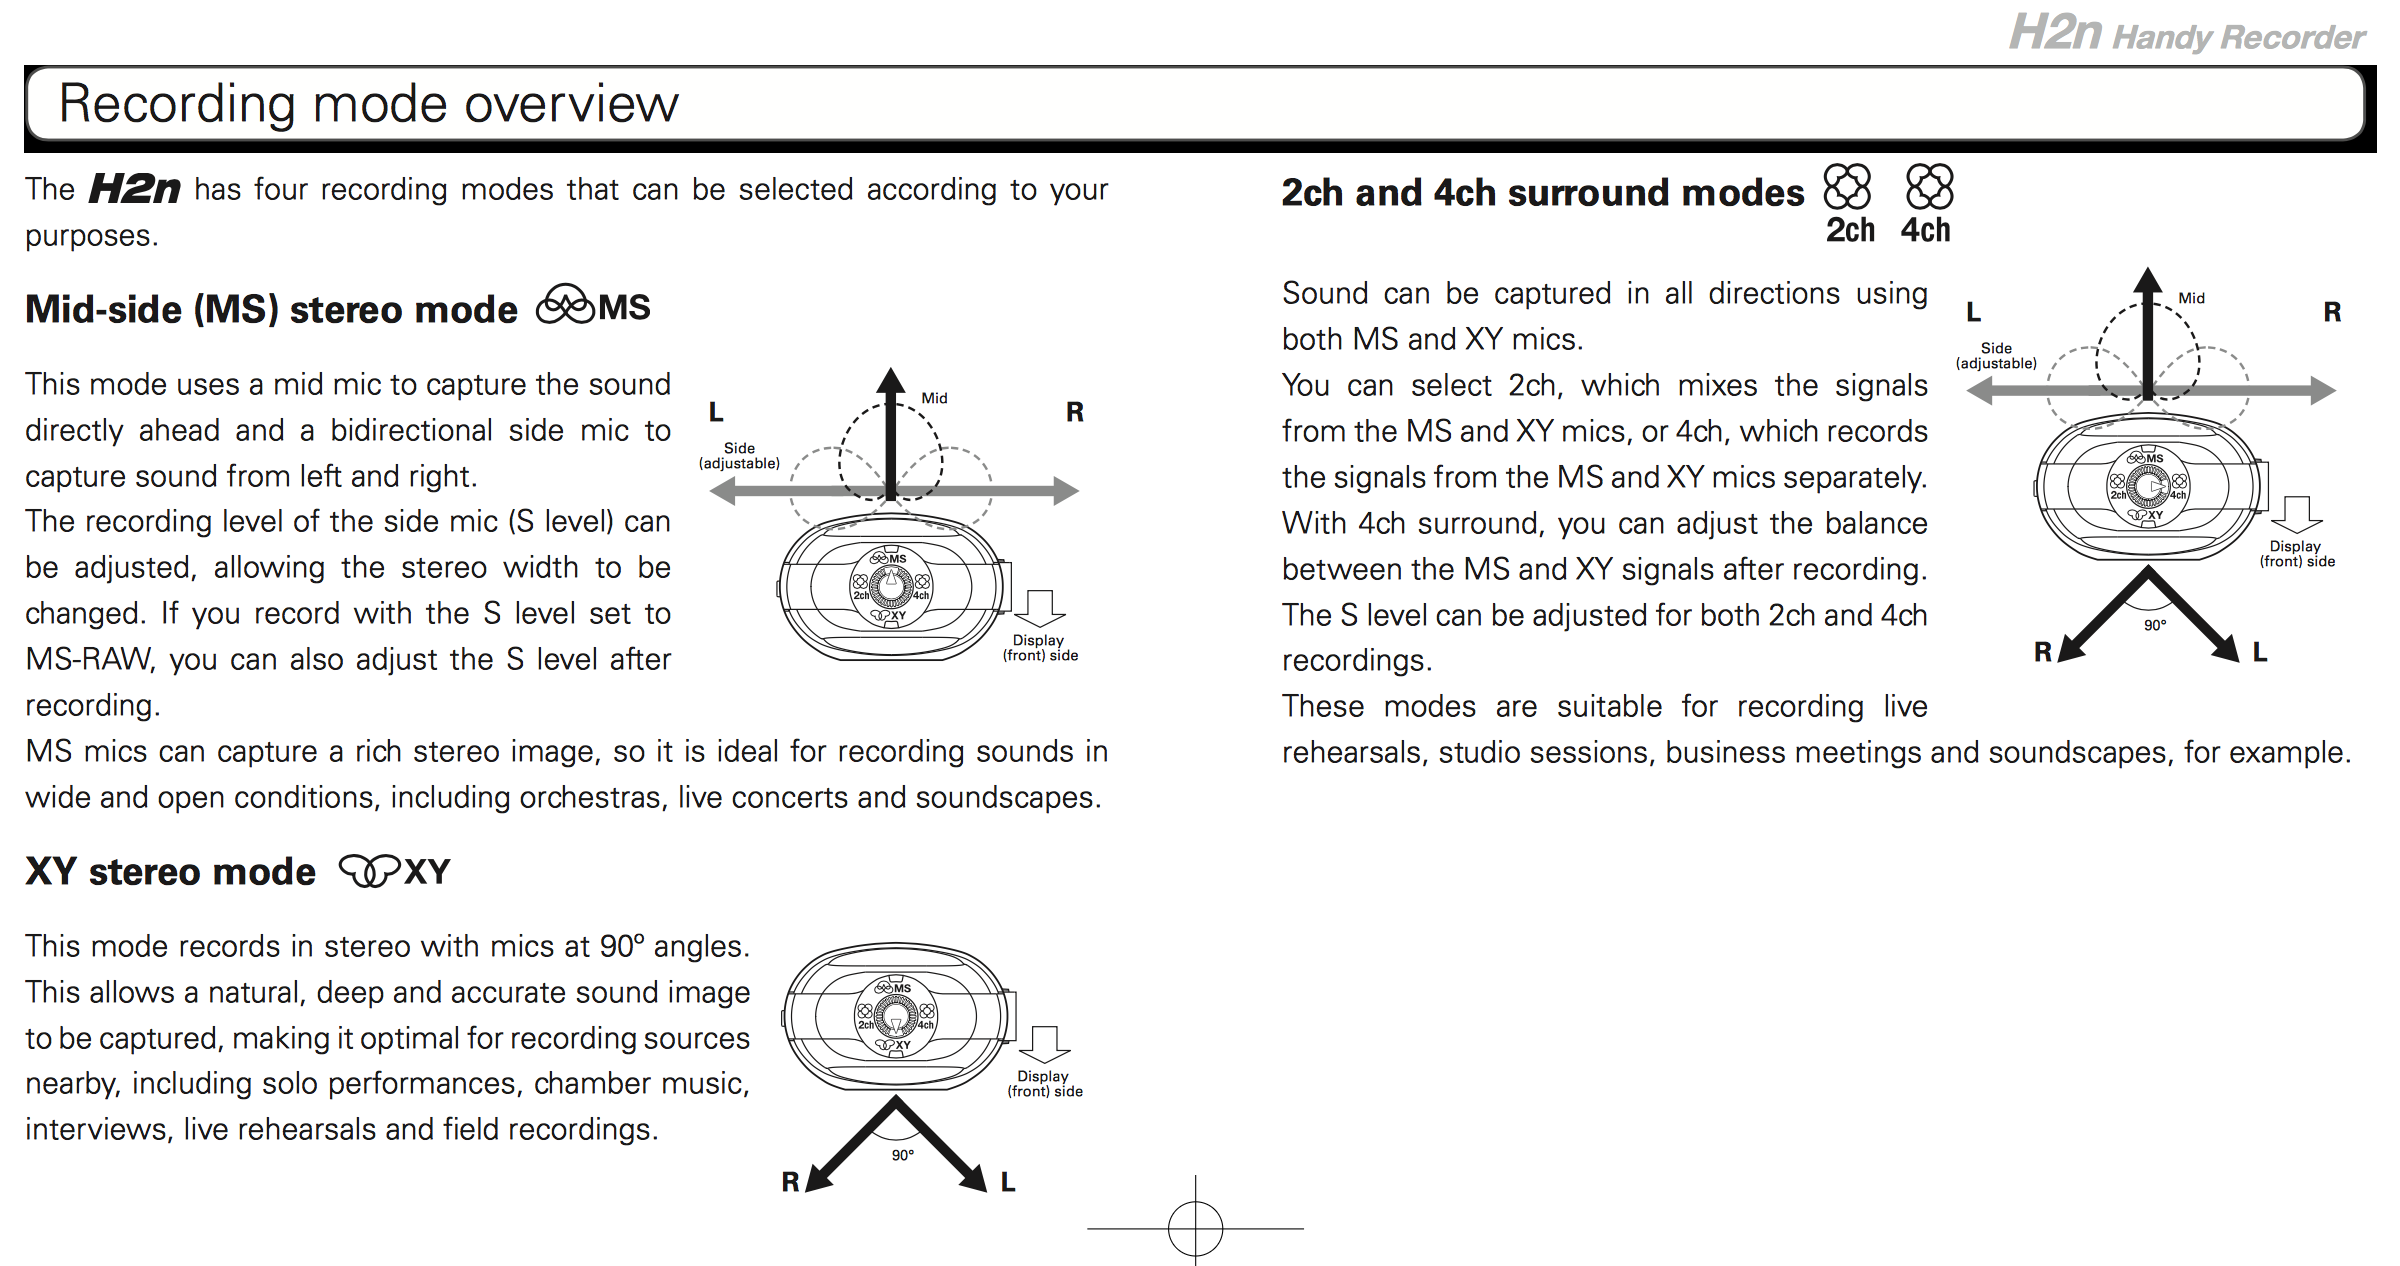
Another issue that bothers me is that the H2n doesn’t have an accurate rear rejection in XY as the H6 does. Sure, I could fix this issue by switching to MS and turning off the sides, but then I wouldn’t be able to capture the stereo field as precisely as I’d hope for. Moreover, the H2n is extremely sensitive to the absolute minimal handling noise, so the user ought to be careful when operating it.
Conclusion
As you’ll find out there, the Zoom H2n is mostly reviewed when exposed to vocals and guitars. The portable recorder has an impressive audio quality — I must confess that I was afraid of investing in the H2n for field recording purposes –, and despite it limitations due to its small size, the Zoom H2n has proven to be a worthy companion.
Throughout this review we analysed its performance on the field and in the studio and we observed how it distinguishes itself from its older cousin, the Zoom H6. The difference in body and weight is clear, but not dramatic. The H2n’s noise floor is quite loud and it can be a problem when recording quiet sources, such as cloth, especially in uncontrolled environments. While it’s certainly possible to apply noise reduction, it’s always good to capture the cleanest recordings possible. Such achievement is indeed possible, though the chances of being successful are limited to louder sounds. One advantage over the H6 is that its noise floor is more spread out across all frequencies, thus providing the H2n a flatter response. Other than that, the recorder performs well under most situations and it demonstrates an excellent transient response as well.
The fact that the accessories don’t come with the product is quite disappointing. I believe the reason for this is to minimise the cost of the device, but I’d be happier if it came with a windscreen at least. The lack of accuracy in the H2n’s rear cancellation negatively affects recordings in XY, as all sides sound similar in distance across the 360 spectrum. Another unfavourable aspect is its susceptibility to handling noise. I wish Zoom had designed it with a rugged material, as they did with the H4n Pro. In addition, the XY microphones directionality confusion is inconvenient but not necessarily a buzzkill, provided that the user remembers to flip the side when recording.
On the positive side, the Zoom H2n is indeed an incredibly versatile tool. Granting it doesn’t replace a proper field recorder, it certainly contributes to the success of trips, and because of its portable size, it becomes an excellent companion in stealth field recording practices. While not entirely satisfied with the quality of the recordings in MS, I like the possibility of controlling how much of the mid or the side the user wants. By no means can the Zoom H2n be accurately compared to a shotgun microphone due to polar pattern differences, but it was fun and interesting to have a listen at how well it performs against professional equipment.
At the end of the day, recorders and microphones are just tools that help us get the job done. The right tools are the ones you’ve got and what matters is how creative can you be with them. For US$ 139.99, the Zoom H2n will not disappoint, whether you’re a beginner or a veteran looking for something portable to help you tell the stories you want.


Thanks for the detailed review!
I use an H2n myself as the field recorder I always take with me on trips. It’s a nice step up from the H1 and covers a lot of uses for which I’d bring an H4n otherwise. It’s also less conspicuous than a H4n if you want to put it somewhere and record a bit of ambience or walla, especially if you put the pop filter on it, which blocks the recording light ;) However the H2n isn’t that easy to hold stable without gripping it since it stands upright.
Regarding the lack of bundled accessories, I can’t really blame Zoom. I bought the H2n with accessories as a bundle – costing less than buying both separately – but I’d completely understand if someone would like to only get the H2n. The accessories in the kit are rather basic, so you might rather want a rubberized grip, a gorillapod and a windscreen (I bought the Røde Deadkitten, for example).
Thanks for this very useful and thorough review. One question – I notice the NTG3 foley recordings have a low frequency resonance on them – is that from vibrations picked up via the mic stand perhaps?
Hi Paul, I’m glad you liked it. Yes, you’re right, there is a low end resonance. The problem was that I positioned the mic stand way too close to the foley pit and as I’d perform the sounds, the pit would bump against the mic stand.
Nice one!
Thanks for the comprehensive run-down of your experiences with the H2n, it’s very interesting.
I do have one question: is there any particular reason that in the various photos you’ve aimed the H2n at the sound source as though it were an end-address microphone?
…It’s side address, so shouldn’t it be rotated 90 degrees?
I was asking the same question by looking at the photos. The H2n is supposed to be used in the vertical position, not horizontal with its top facing the sound source, isn’t that so? That might explain the bad rejection of rear sounds.