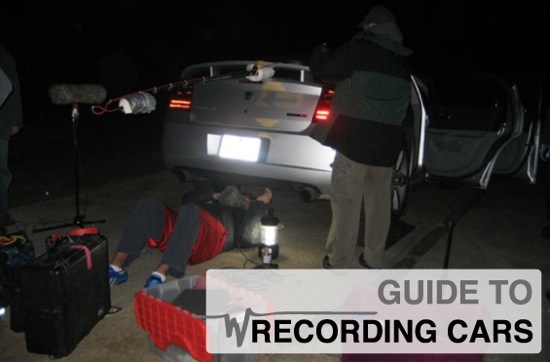
Back in the day when I first started recording cars, we were using small DAT machines, the Sony TCD7 and back in those days DAT machines were very expensive, so we had maybe 2 DAT machines. We had to record sounds for this movie called The Chase, and it was all a car chase movie. So Greg and I set out to figure out how we could make big hollywood sounding cars and between the 2 of us we came up with the idea of mounting mics under the body of the car. and running the cables to the driver’s seat. We thought about what’s important on a car, what are the most important sounds we need, obviously it was the muffler and the rear tires. We found the loudest muffler spot, and then angled the mic toward the tires. We weren’t going for tire noise, so through trial and error we found the spots without tire sound and no wind. We found a place where the mic would not be hit by wind, this is called drafting, a spot under the belly where the path of the wind isn’t going to hit the mic.
Those were the factors we used to determine where to place our first mic. Another thing to consider is that if you’re doing any gravel or dirt, is that kicking up rocks and pebbles and debris into the mic can create endless hours of editing, so that could be a factor also.
As far as the engine goes, we had heard about the tachometer where you put a car and you mic the engine and you blast the engine. I don’t know if we heard the recordings or we just deduced that a car that’s not moving without substantial drag on the engine, would sound like an interior car that was idling with stationary revs. Another thought was, we don’t want to be inside the engine compartment because that would be going in the direction of the tachometer but we wanted to have the feeling of movement so we decided to look under the belly of the car, get as close to the engine as possible, listen to the sweet spot where the engine really roars, stay away from the tire sounds because we didn’t want the tire whine, and then find the right spot for the mic.
We had this simple 2 mic technique that we then brought to the recorders in the interior, and that’s how we started with our onboard recording techniques. The second mic was in the interior, because you always cut to the interior (we had a Neumann in the interior).
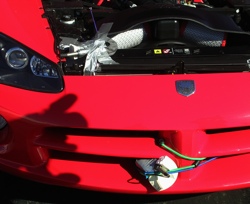
For mics we were looking for thin small ones that could handle a lot of SPL (Sound Pressure Level) and that we could hide for drafting purposes. We settled on small Crown PZM mics. These mics can handle a lot of impact, they’re great for keeping out of the wind, the downside is that they don’t cover a broad spectrum of sound.
Years passed by and now I have the DEVA-5 8 channel onboard recording. What the DEVA allows you to do is that you can focus your main mics on the main spots (engine, muffler, interior) but then it gives you a couple of other mics to play with. For example, if you’re not sure how a mic is going to sound, or you want to test this mic, the DEVA is great for that because you can put 8 mics on the car, if you lose one mic or two it’s not the end of the world. So its changed the approach to recording cars. The fundamental for main mics is still the same, but now you have a little room to play with other mics and try other things. You can also pick up locations in a car that don’t often make noise, for example, you can have one mic focus on tire noise, so when you get a squeal or tear or some sort of big tire sound, you use that mic for that tire sound.

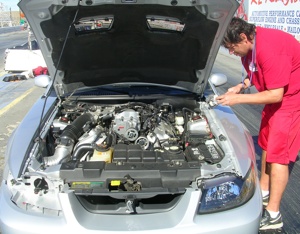
There are parts in the engine compartment that are more relevant or useful, with the 8 channels you can now focus on them. So you want to hit your air intake, listen to the engine and hit it, rev it, see where the air sucking is. This is a very important part to record, I learned this from Richard Yawn and Bruce Stambler, through their recordings of “Three Kings” and “Fast and the Furious”. At some point the air intake is going to kick in and you’re going to have a big suck sound and you want to have that for when they cut to shots of the engine in a chase scene.
Stay away from the fan noise, it’s pretty useless, in my opinion. Any mic you place in the engine compartment you should also consider drafting, you don’t want wind hitting your mic.
Don’t replicate your recordings unless it’s so necessary or incredible that you want to double cover it. having a back up is OK if the sound is really worthwhile. Normally try to stay away from having two high frequency whirl inside the engine compartment because that sound is really not that useful to a sound editor as say for example two muffler sounds. In the past I’ve made a couple of these mistakes and now I try to focus more on getting better muffler sounds. In that regard I’ve invested in large diaphragm condensers like the AKGC 4000B. Derek Vanderhorst recommended an EVR E20 I’ve also used my MKH60 (as crazy as that sounds…putting that mic under an Infinity that was so quiet I had to get really directional on the muffler with my MKH60 in order to bring out some low frequency from that car.
The main thing is find the good sounds, draft, stay away from the bad sounds that you don’t want to hear and choose your mics based on frequency response, high frequency mic for high frequency sound and if you record low frequency sounds then use a large diaphragm condenser. If you’re recording high SPL sound then you need to choose a mic that can really take a punch. For some high engine electronic sounds I use a simple COuntryman Lav that’s easily placed and hidden for drafting. In the interior either run a stereo Neumann or a boundary microphone near the pedals if you want more of a feeling of the driver’s position.
One of the mics I’ve been really happy with is the Sanken CUB 01 it’s a small boundary microphone, maybe a big bigger than a quarter, thin cable, the mic sounds good, it handles SPL well. It gravitates to medium low frequency to all the way up. For really deep muffler you can double with a large condenser but maybe for low end it might not be the ideal mic but it can certainly do a reasonable job.
When you are mounting your mics on a vehicle, there are a couple of considerations. If you have to move your mic or change your position you don’t want to be completely locked in so things like zip ties, tape, these kind of devices lock you in place making it very difficult to take it apart and change the mics positioning. Most of the times when we’re recording cars we have an hour, maybe an hour and a half depending on who you’re recording and how much they charge you really don’t have all the time in the world to set up. It’s important to set up fast to also not bore the people you’re working with, do things as quickly as possible without overlooking details. Also, when you’re out recording the wind can change, traffic can change..if it’s a cloudy day and the sky opens up then suddenly planes appear so don’t lose valuable recording time with long set ups, because you never know what’s going to happen.
Going back to my days of recording with Greg King, we came up with the idea of using bungee cords to mount mics on cars. They’re really good because what they do is they allow the mic to move a little but while keeping it in place. If you apply pressure or force to it, it has some give but not to the point where it’s going to move around while you’re driving.
The way to anchor the mics is to get under the car (elevate the car with some small ramps) and check for holes where the mic will be protected from wind and rocks and hook the bungee cord, place the mic. Then hook another bungee cord making an X so the mic is held in place in two directions. Then test the position by moving the mic with your hands and see how tight it is, what’s the probability of this mic popping out of this set up? If it’s still lose then add a third bungee cord to secure it.
I will use zip ties on cables, you don’t want a cable getting caught into the engine. This is mostly for safety, remember to think about this always, safety of the driver and safety of the recordist. If you’re the recordist and the driver is doings 100 mph and something happens and the cable inside the engine compartment gets yanked and pulled inside the engine causing the driver to lose control of the vehicle you could kill someone. So always think about safety.
Once all the mics are in place in the engine compartment, I’ll zip tie the XLR cable where it’s closest to the mic and then I’ll run all the cables on the same path all the way to the interior of the car. It’s not good to have cables coming out of every part of the hood, that creates more safety concerns.
Tape can be used on the exterior, just make sure you don’t ruin the paint or peel the paint off.
I’ve experimented with fishing poles on cars, I’d have to say that I’m not absolutely certain that is a useful technique. One of the things I was trying to achieve with the fishing pole on a muffler was, as a car is moving, and the sound is projected behind the muffler on a car, low frequency spread and they reflect off the pavement, off the back of the car and I wanted to get away from the really dry ECU muffler sound. The idea was to get a richer low frequency that sounded more natural, that was away from the car. The fishing pole increases wind because you’re not directly drafting, so the mic is more exposed to wind. There’s not too much movement, the fishing pole moves but the mic doesn’t. I’m still not absolutely positive is a way to go.
I’m definitely not a fan of suction cups, I’ve seen people use them and have mics exposed to the wind (directly into it) and any time you do that, anything over 20 or 30 MPH in my opinion gets very hard to use. For slow moves I could see suction cups being useful.
The driver is really critical, if they know how to manipulate a car then they’ll know how to make sounds that you want, especially when you’re close to a mic or when you’re doing your onboard sets. I try to find a driver who is either a professional or a mechanic and after that I’d probably go with a SFX recordist. A SFX recordist has typically recorded cars before or listened to car sets and he has an idea of what needs to be done. General people, especially when you have to do redundant sets (5 MPH, 10 MPH…), they get a little bored, especially with the 5 MPH (a “parade crawl”, a term I learned from the Soundstorm Library).
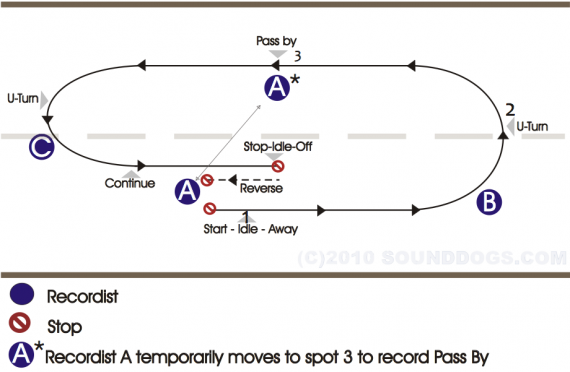
We needed to record cars and thinking about the moves, for example a “start and away”, we saw that we were losing a lot of time with the driver having to come back to do the move once more. Same thing with recording a set of “up and stop”, the driver had to go away from us and then do the “up and stop”, over and over at different speeds. So then seeing how we minimized time with the “pass by” moves (because the driver would do them both ways, going and coming back) we thought (probably Greg thought of it being the practical guy that he is) we could minimize the time by doing “start and away” and “up and stop” altogether. This led to the idea of doing the whole set of moves at once at one speed, starting with 5 MPH all the way up to 100 MPH. This would be useful for the sound editor working with the files, they need a 25 MPH pass by, they wouldn’t have to look for it in different files, they’d just go to the 25 MPH set and get it and move on.

The moves are performed in a circuit (image). For the “start and away” moves the recordist is positioned slightly closer to the front of the car and for the “up and stop” the car stops and leaves the recordist slightly behind. We record “pass by” moves close, you can do medium moves at the end of the shoot.
The type of road I look for is a long 2 mile stretch of road, so you can get high speeds. For the “away” fast moves, you want the driver to keep up the speed, not have to drop the gas pedal to decrease speed to fit the road, the car should maintain its power as it goes away. The same for the “pass by”, if the car has to decelerate by the time it’s coming up to you, it’s not going to work.
As we always say, chose a location with no highways close by, no traffic and no airplanes. Also mind residents that might not be pleased with you recording there. Try and talk to people and explain what you’re doing. If someone goes by in their car while you’re shooting be friendly, wave or ask some random, friendly question, be nice. People will be less likely to have a negative reaction towards what you’re doing or call the police if they get a sense that you’re a nice guy just recording some cars.
Whether you’re on the south side or north side of the road, you have to factor in the direction of the wind or the direction of noise. What I always try to do is think about the good sound and bad sound. The car is the good sound, and wind or noise is the bad sound, so I want to have the noise at my back or the wind at my back and the car in the front. If the wind is coming from the “good sound” side, then you want to have it coming at you and pushing the bad sound away. For example, you’re standing next to the front of the car, the wind is coming at you and pushing that sound towards your mic and the bad sound from the background away from you.
If there’re are birds and insects then make sure you minimize that sound, taking out bird chirps when editing is a painful task. Someone once advised on using a scatter gun for birds but I’m not sure I want to be shooting anything off anywhere I’m recording, it’s going to attract more attention and usually residents don’t like people shooting around them, making big noises.
When you’re doing a show you can have reverse moves, J turns, doughnuts, three point turns, fishtails, swerves. Those are all great things to record that we’ve integrated in our list. We also have reverse burn outs (where it’s important to add fluids under the tires to prevent fire), break stands, driving in circles…just think of all the moves a car can make that are not in your series that you want to integrate into your list. In some cases a movie could have a very specific move. If you can get a look at it then try to map the move out as in the perspective of the shot in the film and then shoot that specific move. Some supervising sound editors prefer to have specific moves shot specifically based on the picture, they don’t want to be rummaging through the files to match the routines in the shots.

In the interior of the car, make sure the driver has his cell phone off, anything that makes noise in the car has to be out (no bags, lose items, change in the box, pens, nothing). I usually put the DEVA on the passenger front seat, strapped, you don’t want it to move around introducing noise into the recording. Make sure the cables are not moving. Also keep the screen of the DEVA visible to make sure it’s in record.
If you’ve ever read anything or talked to me, I’m a firm believer in “less talking more recording”. What I find with the walkie-talkie technique is that people end up spending a lot of time talking and not a lot of time recording. So what I like to do is I tell my recordists to record when the car comes up to them, when you start hearing it, record. I explain to the driver our routine, we do a test drive at a comfortable speed so they get the hang of it and as soon as they get that process down then when do one routine at 5 MPH, when he stops I go to the driver, standing next to the front of the car and say “10 MPH” give him a thumbs-up and he starts, idles and goes. When he comes back I record the “up and stop” and the routine continues. In this way we avoid any extra talking.
For the other recordists on the circuit, it’s OK to move the MIC if the sound is really loud. However, if the car isn’t going to fast and loud then the right way to move is to swivel your hips, move your torso following the car instead of moving just your arm which introduces more handling noise into the mic.
It’s important to make sure you wipe any pebbles or stones from under your feet, to minimize crackling when moving. The cleaner your recordings are the faster you’re going to finish editing and delivered to the sound editor.
We generally record pavement unless there’s a request for gravel or dirt. You can always add grit or gravel with foley or additional sound effects. Pavement is the general rule unless you’re doing something that’s all off road or if you’re doing something that’s all snow.
If you have the chance to record your “up and stop” or your “pass by” on a hill it will force the engine to work harder thus making the sound louder. Beware that at the end of a hill there’s usually a blind spot, if your driver is going fast up the hill he needs to be careful as there could be a bad accident.
Using the downside of the hill can be used to record a “neutral roll”, this is when you put the car in neutral with the engine off and you basically steer the car going downhill in neutral, so you’re getting just tire sounds.
Written by Rob Nokes for Designing Sound
Very interesting and in depth article. Every sfx recordist should read this!
Yep! very good article with quite a few things I never thought of recording a vehicle.