
Lesson 4 – Step Sequencer
Counting Steps
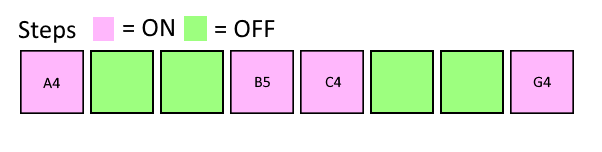
A step sequencer consists of a list of steps that tell a sampler to play a note for some length of time at the specified pitch. It listens to a Metronome for ticks, checks for active steps, and reports to a Sampler (or multiple samplers) with the time and pitch information.
The Step class is a simple container that looks like this:
[Serializable]
public class Step
{
  public bool Active;
  public int MidiNoteNumber;
  public double Duration;
}
The Active field tells us whether that step is active–whether it should be ignored or trigger a sound. The MidiNoteNumber field specifies what note should be played, and is later converted into a pitch value. The Duration field is how long, in seconds, the note should play. This will become the sustain time of the volume envelope. Also, the Serializable attribute tells Unity that fields of this type in other classes can be serialized with the GameObject.
The StepSequencer class has a familiar event called Ticked. You might remember this from the Metronome class. It performs a similar function, passing listeners the tick time, but also the note number and duration from the appropriate Step. The StepSequencer class listens to the Ticked event from a Metronome, just like the Sampler did in the previous lesson. But instead of just listening for ticks and passing them on to a Sampler, the StepSequencer cycles through its Steps, checks to see if the current step is active, and if so, tells the Sampler to play.
public void HandleTicked(double tickTime)
{
  int numSteps = _steps.Count;

  if (numSteps == 0)
  {
    return;
  }

  Step step = _steps[_currentTick];

  if (step.Active)
  {
    if (Ticked != null)
    {
      Ticked(tickTime, step.MidiNoteNumber, step.Duration);
    }
  }

  _currentTick = (_currentTick + 1) % numSteps;
}
Sampler Modifications
Since the Steps in the StepSequencer will be defining the duration of the note, we can get rid of the sustain time field in the Sampler. And instead of listening for the Ticked event from a Metronome, we’ll listen for the Ticked event from a StepSequencer. We’ll also need to modify the HandleTicked function to add parameters for the note number and duration and pass them on to the SamplerVoice:
private void HandleTicked(double tickTime, int midiNoteNumber, double duration)
{
  float pitch = MusicMathUtils_Lesson4.MidiNoteToPitch(midiNoteNumber, MusicMathUtils_Lesson4.MidiNoteC4);
  _samplerVoices[_nextVoiceIndex].Play(_audioClip, pitch, tickTime, _attackTime, duration, _releaseTime);

  _nextVoiceIndex = (_nextVoiceIndex + 1) % _samplerVoices.Length;
}
Music Math
You might have noticed the reference to MusicMathUtils. For convenience and reuse, we’ll add a helper class to do some basic conversions related to music. The first–and the only one we’ll need for this series–is MidiNoteToPitch. This converts a MIDI note number to a percentage pitch value used by the AudioSource component:
public static class MusicMathUtils_Lesson4
{
  public const int MidiNoteC4 = 60;

  public static float MidiNoteToPitch(int midiNote, int baseNote)
  {
    int semitoneOffset = midiNote - baseNote;
    return Mathf.Pow(2.0f, semitoneOffset / 12.0f);
  }
}
The pitch field of an AudioSource is the playback speed. So a value of 1.0 plays back at normal speed, 2.0 plays back twice as fast (or one octave up in pitch), 0.5 plays half as fast (or one octave down), and a negative value will play the sound backward. MidiNoteToPitch takes the MIDI note we want to play and the “base” note that should correspond to no pitch change (1.0 pitch), and gives us the appropriate pitch. So for example, if our base note is 60 (middle C), and we want the pitch for note 72 (one octave above middle C), MidiNoteToPitch will return 2.0.
For more info on musical note scaling, here’s a great reference.
SamplerVoice Modifications
Finally, we need to update the SamplerVoice class to change its pitch. The only modification needed is to add a pitch parameter to the Play function, and set the pitch of the AudioSource before playing:
public void Play(AudioClip audioClip, float pitch, double startTime, double attackTime, double sustainTime, double releaseTime)
{
  sustainTime = (sustainTime > attackTime) ? (sustainTime - attackTime) : 0.0;
  _envelope.Reset(attackTime, sustainTime, releaseTime, AudioSettings.outputSampleRate);

  double timeUntilTrigger = (startTime > AudioSettings.dspTime) ? (startTime - AudioSettings.dspTime) : 0.0;
  _samplesUntilEnvelopeTrigger = (uint)(timeUntilTrigger * AudioSettings.outputSampleRate);

  _audioSource.clip = audioClip;
  _audioSource.pitch = pitch;
  _audioSource.PlayScheduled(startTime);
}
Try it Out
Similar to last lesson’s setup, we’ll wire up our sequencer and make it make some noise. In addition to the setup you already have, add the StepSequencer component to an empty GameObject. Then assign the Metronome to the metronome field on the StepSequencer, and assign the StepSequencer to the sequencer field on the Sampler. Add some steps in the list on the StepSequencer, press play, and you should hear some sound. Play around with different rhythms, pitches, and durations to create different musical lines. Make a bunch of sequencers and samplers to make a more full piece of music. Enjoy!